Java8 CompletableFuture异步多线程怎么实现
1、一个示例回顾Future一些业务场景我们需要使用多线程异步执行任务,加快任务执行速度。JDK5新增了Future接口,用于描述一个异步计算的结果。虽然Future以及相关使用方法提供了异步执行任务的能力,但是对于结果的获取却是很不方便,我们必须使用Future.get()的方式阻塞调用线程,或者使用轮询方式判断Future.isDone任务是否结束,再获取结果。这两种处理方式都不是很优雅,相关代码如下:@TestpublicvoidtestFuture()throwsExecutionExceptio
1、一个示例回顾Future
一些业务场景我们需要使用多线程异步执行任务,加快任务执行速度。
JDK5新增了Future接口,用于描述一个异步计算的结果。
虽然 Future 以及相关使用方法提供了异步执行任务的能力,但是对于结果的获取却是很不方便,我们必须使用Future.get()的方式阻塞调用线程,或者使用轮询方式判断 Future.isDone 任务是否结束,再获取结果。
这两种处理方式都不是很优雅,相关代码如下:
    @Test
    public void testFuture() throws ExecutionException, InterruptedException {
        ExecutorService executorService = Executors.newFixedThreadPool(5);
        Future future = executorService.submit(() -> {
            Thread.sleep(2000);
            return "hello";
        });
        System.out.println(future.get());
        System.out.println("end");
    }
与此同时,Future无法解决多个异步任务需要相互依赖的场景,简单点说就是,主线程需要等待子线程任务执行完毕之后在进行执行,这个时候你可能想到了「CountDownLatch」,没错确实可以解决,代码如下。
这里定义两个Future,第一个通过用户id获取用户信息,第二个通过商品id获取商品信息。
    @Test
    public void testCountDownLatch() throws InterruptedException, ExecutionException {
        ExecutorService executorService = Executors.newFixedThreadPool(5);
        CountDownLatch downLatch = new CountDownLatch(2);
        long startTime = System.currentTimeMillis();
        Future userFuture = executorService.submit(() -> {
            //模拟查询商品耗时500毫秒
            Thread.sleep(500);
            downLatch.countDown();
            return "用户A";
        });

        Future goodsFuture = executorService.submit(() -> {
            //模拟查询商品耗时500毫秒
            Thread.sleep(400);
            downLatch.countDown();
            return "商品A";
        });

        downLatch.await();
        //模拟主程序耗时时间
        Thread.sleep(600);
        System.out.println("获取用户信息:" + userFuture.get());
        System.out.println("获取商品信息:" + goodsFuture.get());
        System.out.println("总共用时" + (System.currentTimeMillis() - startTime) + "ms");

    }
「运行结果」
获取用户信息:用户A
获取商品信息:商品A
总共用时1110ms
从运行结果可以看出结果都已经获取,而且如果我们不用异步操作,执行时间应该是:500+400+600 = 1500,用异步操作后实际只用1110。
但是Java8以后我不在认为这是一种优雅的解决方式,接下来来了解下CompletableFuture的使用。
2、通过CompletableFuture实现上面示例
    @Test
    public void testCompletableInfo() throws InterruptedException, ExecutionException {
        long startTime = System.currentTimeMillis();

        //调用用户服务获取用户基本信息
        CompletableFuture userFuture = CompletableFuture.supplyAsync(() ->
                //模拟查询商品耗时500毫秒
        {
            try {
                Thread.sleep(500);
            } catch (InterruptedException e) {
                e.printStackTrace();
            }
            return "用户A";
        });

        //调用商品服务获取商品基本信息
        CompletableFuture goodsFuture = CompletableFuture.supplyAsync(() ->
                //模拟查询商品耗时500毫秒
        {
            try {
                Thread.sleep(400);
            } catch (InterruptedException e) {
                e.printStackTrace();
            }
            return "商品A";
        });

        System.out.println("获取用户信息:" + userFuture.get());
        System.out.println("获取商品信息:" + goodsFuture.get());

        //模拟主程序耗时时间
        Thread.sleep(600);
        System.out.println("总共用时" + (System.currentTimeMillis() - startTime) + "ms");
    }
运行结果
获取用户信息:用户A
获取商品信息:商品A
总共用时1112ms
通过CompletableFuture可以很轻松的实现CountDownLatch的功能,你以为这就结束了,远远不止,CompletableFuture比这要强多了。
比如可以实现:任务1执行完了再执行任务2,甚至任务1执行的结果,作为任务2的入参数等等强大功能,下面就来学学CompletableFuture的API。
3、CompletableFuture创建方式
3.1、常用的4种创建方式
CompletableFuture源码中有四个静态方法用来执行异步任务
public static  CompletableFuture supplyAsync(Supplier supplier){..}
public static  CompletableFuture supplyAsync(Supplier supplier,Executor executor){..}
public static CompletableFuture runAsync(Runnable runnable){..}
public static CompletableFuture runAsync(Runnable runnable,Executor executor){..}
一般我们用上面的静态方法来创建CompletableFuture,这里也解释下他们的区别:
「supplyAsync」执行任务,支持返回值。
「runAsync」执行任务,没有返回值。
3.1.1、「supplyAsync方法」
//使用默认内置线程池ForkJoinPool.commonPool(),根据supplier构建执行任务
public static  CompletableFuture supplyAsync(Supplier supplier)
//自定义线程,根据supplier构建执行任务
public static  CompletableFuture supplyAsync(Supplier supplier, Executor executor)
3.1.2、「runAsync方法」
//使用默认内置线程池ForkJoinPool.commonPool(),根据runnable构建执行任务 public static CompletableFuturerunAsync(Runnable runnable) //自定义线程,根据runnable构建执行任务 public static CompletableFuture runAsync(Runnable runnable, Executor executor)
3.2、结果获取的4种方式
对于结果的获取CompltableFuture类提供了四种方式
//方式一
public T get()
//方式二
public T get(long timeout, TimeUnit unit)
//方式三
public T getNow(T valueIfAbsent)
//方式四
public T join()
说明:
「get()和get(long timeout, TimeUnit unit)」 => 在Future中就已经提供了,后者提供超时处理,如果在指定时间内未获取结果将抛出超时异常
「getNow」 => 立即获取结果不阻塞,结果计算已完成将返回结果或计算过程中的异常,如果未计算完成将返回设定的valueIfAbsent值
「join」 => 方法里不会抛出异常
示例:
    @Test
    public void testCompletableGet() throws InterruptedException, ExecutionException {

        CompletableFuture cp1 = CompletableFuture.supplyAsync(() -> {
            try {
                Thread.sleep(1000);
            } catch (InterruptedException e) {
                e.printStackTrace();
            }
            return "商品A";
        });

        // getNow方法测试
        System.out.println(cp1.getNow("商品B"));

        //join方法测试
        CompletableFuture cp2 = CompletableFuture.supplyAsync((() -> 1 / 0));
        System.out.println(cp2.join());
        System.out.println("-----------------------------------------------------");
        //get方法测试
        CompletableFuture cp3 = CompletableFuture.supplyAsync((() -> 1 / 0));
        System.out.println(cp3.get());
    }
「运行结果」:
第一个执行结果为 「商品B」,因为要先睡上1秒结果不能立即获取
join方法获取结果方法里不会抛异常,但是执行结果会抛异常,抛出的异常为CompletionException
get方法获取结果方法里将抛出异常,执行结果抛出的异常为ExecutionException
4、异步回调方法
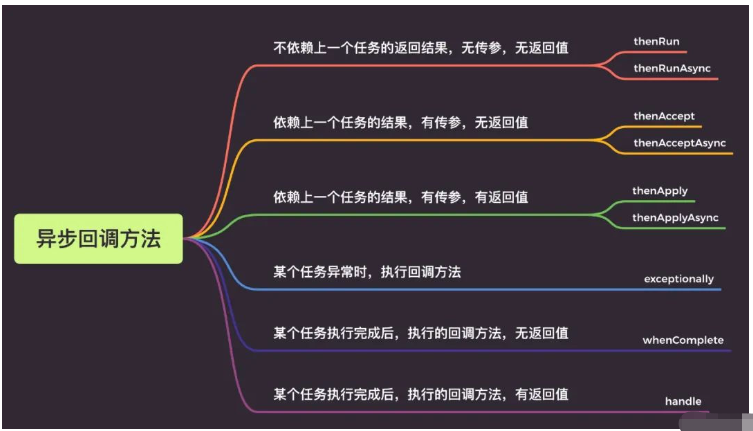
4.1、thenRun/thenRunAsync
通俗点讲就是,「做完第一个任务后,再做第二个任务,第二个任务也没有返回值」。
示例
    @Test
    public void testCompletableThenRunAsync() throws InterruptedException, ExecutionException {
        long startTime = System.currentTimeMillis();

        CompletableFuture cp1 = CompletableFuture.runAsync(() -> {
            try {
                //执行任务A
                Thread.sleep(600);
            } catch (InterruptedException e) {
                e.printStackTrace();
            }

        });

        CompletableFuture cp2 = cp1.thenRun(() -> {
            try {
                //执行任务B
                Thread.sleep(400);
            } catch (InterruptedException e) {
                e.printStackTrace();
            }
        });

        // get方法测试
        System.out.println(cp2.get());

        //模拟主程序耗时时间
        Thread.sleep(600);
        System.out.println("总共用时" + (System.currentTimeMillis() - startTime) + "ms");
    }

    //运行结果
    /**
     *  null
     *  总共用时1610ms
     */
「thenRun 和thenRunAsync有什么区别呢?」
如果你执行第一个任务的时候,传入了一个自定义线程池:
调用thenRun方法执行第二个任务时,则第二个任务和第一个任务是共用同一个线程池。
调用thenRunAsync执行第二个任务时,则第一个任务使用的是你自己传入的线程池,第二个任务使用的是ForkJoin线程池。
说明: 后面介绍的thenAccept和thenAcceptAsync,thenApply和thenApplyAsync等,它们之间的区别也是这个。
4.2、thenAccept/thenAcceptAsync
第一个任务执行完成后,执行第二个回调方法任务,会将该任务的执行结果,作为入参,传递到回调方法中,但是回调方法是没有返回值的。
示例
    @Test
    public void testCompletableThenAccept() throws ExecutionException, InterruptedException {
        long startTime = System.currentTimeMillis();
        CompletableFuture cp1 = CompletableFuture.supplyAsync(() -> {
            return "dev";

        });
        CompletableFuture cp2 = cp1.thenAccept((a) -> {
            System.out.println("上一个任务的返回结果为: " + a);
        });

        cp2.get();
    }
4.3、 thenApply/thenApplyAsync
表示第一个任务执行完成后,执行第二个回调方法任务,会将该任务的执行结果,作为入参,传递到回调方法中,并且回调方法是有返回值的。
示例
    @Test
    public void testCompletableThenApply() throws ExecutionException, InterruptedException {
        CompletableFuture cp1 = CompletableFuture.supplyAsync(() -> {
            return "dev";

        }).thenApply((a) -> {
            if (Objects.equals(a, "dev")) {
                return "dev";
            }
            return "prod";
        });

        System.out.println("当前环境为:" + cp1.get());

        //输出: 当前环境为:dev
    }
5、异常回调
当CompletableFuture的任务不论是正常完成还是出现异常它都会调用「whenComplete」这回调函数。
「正常完成」:whenComplete返回结果和上级任务一致,异常为null;
「出现异常」:whenComplete返回结果为null,异常为上级任务的异常;
即调用get()时,正常完成时就获取到结果,出现异常时就会抛出异常,需要你处理该异常。
下面来看看示例
5.1、只用whenComplete
    @Test
    public void testCompletableWhenComplete() throws ExecutionException, InterruptedException {
        CompletableFuture future = CompletableFuture.supplyAsync(() -> {

            if (Math.random() < 0.5) {
                throw new RuntimeException("出错了");
            }
            System.out.println("正常结束");
            return 0.11;

        }).whenComplete((aDouble, throwable) -> {
            if (aDouble == null) {
                System.out.println("whenComplete aDouble is null");
            } else {
                System.out.println("whenComplete aDouble is " + aDouble);
            }
            if (throwable == null) {
                System.out.println("whenComplete throwable is null");
            } else {
                System.out.println("whenComplete throwable is " + throwable.getMessage());
            }
        });
        System.out.println("最终返回的结果 = " + future.get());
    }
正常完成,没有异常时:
正常结束
whenComplete aDouble is 0.11
whenComplete throwable is null
最终返回的结果 = 0.11
出现异常时:get()会抛出异常
whenComplete aDouble is null
whenComplete throwable is java.lang.RuntimeException: 出错了
java.util.concurrent.ExecutionException: java.lang.RuntimeException: 出错了
at java.util.concurrent.CompletableFuture.reportGet(CompletableFuture.java:357)
at java.util.concurrent.CompletableFuture.get(CompletableFuture.java:1895)
5.2、whenComplete + exceptionally示例
    @Test
    public void testWhenCompleteExceptionally() throws ExecutionException, InterruptedException {
        CompletableFuture future = CompletableFuture.supplyAsync(() -> {
            if (Math.random() < 0.5) {
                throw new RuntimeException("出错了");
            }
            System.out.println("正常结束");
            return 0.11;

        }).whenComplete((aDouble, throwable) -> {
            if (aDouble == null) {
                System.out.println("whenComplete aDouble is null");
            } else {
                System.out.println("whenComplete aDouble is " + aDouble);
            }
            if (throwable == null) {
                System.out.println("whenComplete throwable is null");
            } else {
                System.out.println("whenComplete throwable is " + throwable.getMessage());
            }
        }).exceptionally((throwable) -> {
            System.out.println("exceptionally中异常:" + throwable.getMessage());
            return 0.0;
        });

        System.out.println("最终返回的结果 = " + future.get());
    }
当出现异常时,exceptionally中会捕获该异常,给出默认返回值0.0。
whenComplete aDouble is null
whenComplete throwable is java.lang.RuntimeException: 出错了
exceptionally中异常:java.lang.RuntimeException: 出错了
最终返回的结果 = 0.0
6、多任务组合回调
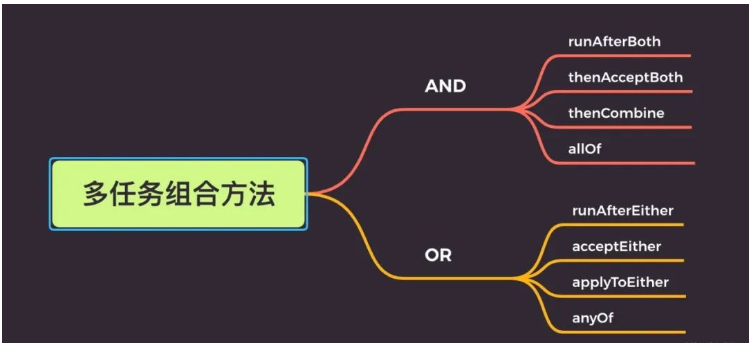
6.1、AND组合关系
thenCombine / thenAcceptBoth / runAfterBoth都表示:「当任务一和任务二都完成再执行任务三」。
区别在于:
「runAfterBoth」 不会把执行结果当做方法入参,且没有返回值
「thenAcceptBoth」: 会将两个任务的执行结果作为方法入参,传递到指定方法中,且无返回值
「thenCombine」:会将两个任务的执行结果作为方法入参,传递到指定方法中,且有返回值
示例
    @Test
    public void testCompletableThenCombine() throws ExecutionException, InterruptedException {
        //创建线程池
        ExecutorService executorService = Executors.newFixedThreadPool(10);
        //开启异步任务1
        CompletableFuture task = CompletableFuture.supplyAsync(() -> {
            System.out.println("异步任务1,当前线程是:" + Thread.currentThread().getId());
            int result = 1 + 1;
            System.out.println("异步任务1结束");
            return result;
        }, executorService);

        //开启异步任务2
        CompletableFuture task2 = CompletableFuture.supplyAsync(() -> {
            System.out.println("异步任务2,当前线程是:" + Thread.currentThread().getId());
            int result = 1 + 1;
            System.out.println("异步任务2结束");
            return result;
        }, executorService);

        //任务组合
        CompletableFuture task3 = task.thenCombineAsync(task2, (f1, f2) -> {
            System.out.println("执行任务3,当前线程是:" + Thread.currentThread().getId());
            System.out.println("任务1返回值:" + f1);
            System.out.println("任务2返回值:" + f2);
            return f1 + f2;
        }, executorService);

        Integer res = task3.get();
        System.out.println("最终结果:" + res);
    }
「运行结果」
异步任务1,当前线程是:17
异步任务1结束
异步任务2,当前线程是:18
异步任务2结束
执行任务3,当前线程是:19
任务1返回值:2
任务2返回值:2
最终结果:4
6.2、OR组合关系
applyToEither / acceptEither / runAfterEither 都表示:「两个任务,只要有一个任务完成,就执行任务三」。
区别在于:
「runAfterEither」:不会把执行结果当做方法入参,且没有返回值
「acceptEither」: 会将已经执行完成的任务,作为方法入参,传递到指定方法中,且无返回值
「applyToEither」:会将已经执行完成的任务,作为方法入参,传递到指定方法中,且有返回值
示例
    @Test
    public void testCompletableEitherAsync() {
        //创建线程池
        ExecutorService executorService = Executors.newFixedThreadPool(10);
        //开启异步任务1
        CompletableFuture task = CompletableFuture.supplyAsync(() -> {
            System.out.println("异步任务1,当前线程是:" + Thread.currentThread().getId());

            int result = 1 + 1;
            System.out.println("异步任务1结束");
            return result;
        }, executorService);

        //开启异步任务2
        CompletableFuture task2 = CompletableFuture.supplyAsync(() -> {
            System.out.println("异步任务2,当前线程是:" + Thread.currentThread().getId());
            int result = 1 + 2;
            try {
                Thread.sleep(3000);
            } catch (InterruptedException e) {
                e.printStackTrace();
            }
            System.out.println("异步任务2结束");
            return result;
        }, executorService);

        //任务组合
        task.acceptEitherAsync(task2, (res) -> {
            System.out.println("执行任务3,当前线程是:" + Thread.currentThread().getId());
            System.out.println("上一个任务的结果为:" + res);
        }, executorService);
    }
运行结果
//通过结果可以看出,异步任务2都没有执行结束,任务3获取的也是1的执行结果
异步任务1,当前线程是:17
异步任务1结束
异步任务2,当前线程是:18
执行任务3,当前线程是:19
上一个任务的结果为:2
注意
如果把上面的核心线程数改为1也就是
ExecutorService executorService = Executors.newFixedThreadPool(1);
运行结果就是下面的了,会发现根本没有执行任务3,显然是任务3直接被丢弃了。
异步任务1,当前线程是:17
异步任务1结束
异步任务2,当前线程是:17
6.3、多任务组合
「allOf」:等待所有任务完成
「anyOf」:只要有一个任务完成
示例
allOf:等待所有任务完成
    @Test
    public void testCompletableAallOf() throws ExecutionException, InterruptedException {
        //创建线程池
        ExecutorService executorService = Executors.newFixedThreadPool(10);
        //开启异步任务1
        CompletableFuture task = CompletableFuture.supplyAsync(() -> {
            System.out.println("异步任务1,当前线程是:" + Thread.currentThread().getId());
            int result = 1 + 1;
            System.out.println("异步任务1结束");
            return result;
        }, executorService);

        //开启异步任务2
        CompletableFuture task2 = CompletableFuture.supplyAsync(() -> {
            System.out.println("异步任务2,当前线程是:" + Thread.currentThread().getId());
            int result = 1 + 2;
            try {
                Thread.sleep(3000);
            } catch (InterruptedException e) {
                e.printStackTrace();
            }
            System.out.println("异步任务2结束");
            return result;
        }, executorService);

        //开启异步任务3
        CompletableFuture task3 = CompletableFuture.supplyAsync(() -> {
            System.out.println("异步任务3,当前线程是:" + Thread.currentThread().getId());
            int result = 1 + 3;
            try {
                Thread.sleep(4000);
            } catch (InterruptedException e) {
                e.printStackTrace();
            }
            System.out.println("异步任务3结束");
            return result;
        }, executorService);

        //任务组合
        CompletableFuture allOf = CompletableFuture.allOf(task, task2, task3);

        //等待所有任务完成
        allOf.get();
        //获取任务的返回结果
        System.out.println("task结果为:" + task.get());
        System.out.println("task2结果为:" + task2.get());
        System.out.println("task3结果为:" + task3.get());
    }
anyOf: 只要有一个任务完成
@Test
public void testCompletableAnyOf() throws ExecutionException, InterruptedException {
//创建线程池
ExecutorService executorService = Executors.newFixedThreadPool(10);
//开启异步任务1
CompletableFuture task = CompletableFuture.supplyAsync(() -> {
int result = 1 + 1;
return result;
}, executorService);
//开启异步任务2
CompletableFuture task2 = CompletableFuture.supplyAsync(() -> {
int result = 1 + 2;
return result;
}, executorService);
//开启异步任务3
CompletableFuture task3 = CompletableFuture.supplyAsync(() -> {
int result = 1 + 3;
return result;
}, executorService);
//任务组合
CompletableFuture 7、CompletableFuture使用有哪些注意点
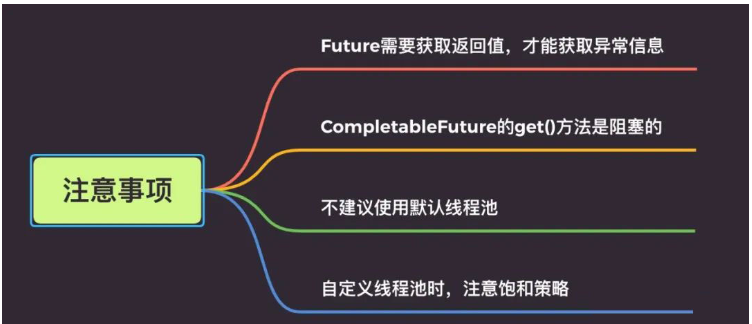
CompletableFuture 使我们的异步编程更加便利的、代码更加优雅的同时,我们也要关注下它,使用的一些注意点。
7.1、Future需要获取返回值,才能获取异常信息
    @Test
    public void testWhenCompleteExceptionally() {
        CompletableFuture future = CompletableFuture.supplyAsync(() -> {
            if (1 == 1) {
                throw new RuntimeException("出错了");
            }
            return 0.11;
        });

        //如果不加 get()方法这一行,看不到异常信息
        //future.get();
    }
Future需要获取返回值,才能获取到异常信息。如果不加 get()/join()方法,看不到异常信息。
小伙伴们使用的时候,注意一下哈,考虑是否加try...catch...或者使用exceptionally方法。
7.2、CompletableFuture的get()方法是阻塞的
CompletableFuture的get()方法是阻塞的,如果使用它来获取异步调用的返回值,需要添加超时时间。
//反例
 CompletableFuture.get();
//正例
CompletableFuture.get(5, TimeUnit.SECONDS);
7.3、不建议使用默认线程池
CompletableFuture代码中又使用了默认的「ForkJoin线程池」,处理的线程个数是电脑「CPU核数-1」。在大量请求过来的时候,处理逻辑复杂的话,响应会很慢。一般建议使用自定义线程池,优化线程池配置参数。
7.4、自定义线程池时,注意饱和策略
CompletableFuture的get()方法是阻塞的,我们一般建议使用future.get(5, TimeUnit.SECONDS)。并且一般建议使用自定义线程池。
但是如果线程池拒绝策略是DiscardPolicy或者DiscardOldestPolicy,当线程池饱和时,会直接丢弃任务,不会抛弃异常。因此建议,CompletableFuture线程池策略最好使用AbortPolicy,然后耗时的异步线程,做好线程池隔离哈。
深入解析C++中动态数组的初始化机制,涵盖new操作符的不同用法、基本类型与类对象的初始化差异,以及为何在现代C++开发中应优先使用std::vector。

谷歌浏览器Mac版官方安装指南 谷歌浏览器Mac版官方安装入口是https://www.google.com/chrome/,需macOS 12+系统、500MB空间,下载.dmg后拖入应用程序安装,支持多设备同步、性能优化与隐私保护功能。 苹果电脑Chrome的安装入口究竟在哪里?这个问题最近可是

Chrome中JavaScript未执行需依次检查:一、移除站点级禁用并添加允许域名;二、开启全局JavaScript开关;三、禁用干扰扩展;四、在开发者工具中启用JavaScript;五、重置内容设置为默认。 有时在Chrome里打开网页,会发现交互按钮点了没反应,数据加载不出来,页面仿佛“静止”

IE浏览器怀旧版在线网址:一次精准的技术时光回溯 最近,不少老用户和怀旧爱好者在反复搜索一个问题:那个经典的Internet Explorer,如今还能在哪里原汁原味地体验到?答案指向一个特定的地址:https://ie.microsoft.com/legacy/。 这个网站远不止是一个简单的“皮肤


Chrome官方免验证入口为https://www.google.cn/chrome/,提供全平台安装包、免登录即用、本地化安全机制及引擎级性能优化。 到底该去哪里找正版、免费且无需繁琐验证的Chrome浏览器入口?这个问题困扰了不少网友。今天,我们就来直通核心,为大家详细拆解Chrome引擎的官方

Java堆是JVM存储对象的核心内存区域,配置需结合场景:单体应用适中设置;大数据处理需大堆并关注GC停顿;微服务强调快速启动;高并发需精细划分堆区域。关键参数-Xms和-Xmx建议等值以稳定性能。垃圾回收器选择影响效率,如G1适用于大堆,ZGC可实现低停顿。内存错误时需监控堆状态。

Java堆内存溢出错误通常因内存泄漏、数据处理需求过大或JVM参数配置不当引起。排查时可借助jmap、堆转储及MAT等工具定位问题。解决方案包括调整JVM内存参数(如-Xmx)、修复代码中的内存泄漏、优化大数据处理逻辑,并建立持续监控与预防机制,以保障应用稳定运行。
XML在Java开发中用于配置、数据交换等场景。解析方式主要有DOM、SAX、StAX及第三方库。DOM适合操作小文件,SAX/StAX适合处理大文件流,JAXB用于对象与XML映射。选型需结合数据大小、内存、性能及团队熟悉度,现代框架常封装底层解析。
命名空间的基本概念与常见引入问题在C++等编程语言中,命名空间(namespace)是一种将代码标识符(如变量、函数、类名)封装在特定名称下的机制,其主要目的是避免命名冲突,尤其是在大型项目或使用多个第三方库时。使用“using namespace”指令可以将指定命名空间中的所有名称引入当前作用域,






Windows 10 是一款微软推出的经典操作系统,拥有硬件兼容性与多任务处理能力。它更偏向把系统状态查看和常用调节动作放在一起,适合需要持续观察和微调设备状态的场景。

极度公式是一款跨平台专业LaTeX公式识别编辑软件,支持OCR公式识别和多平台编辑。和使用说明,避免使用,享受完整功能与稳定支持。做扫描整理、文字提取和表格转换时,它能把识别后的处理步骤接得更顺,资料录入这类场景会省下不少时间。