iOS 底层alloc init new 源码流程示例分析
alloc&init 的源码流程图 先从最简单的场景说起:创建一个 Person 类,然后在 main 函数里写一句 Person *p = [Person alloc];。这一行代码到底是怎么运转的?一路往下追源码,你就会发现一条清晰的调用链。 第一步,进入 alloc 方法的实现——它其实就是一
alloc&init 的源码流程图
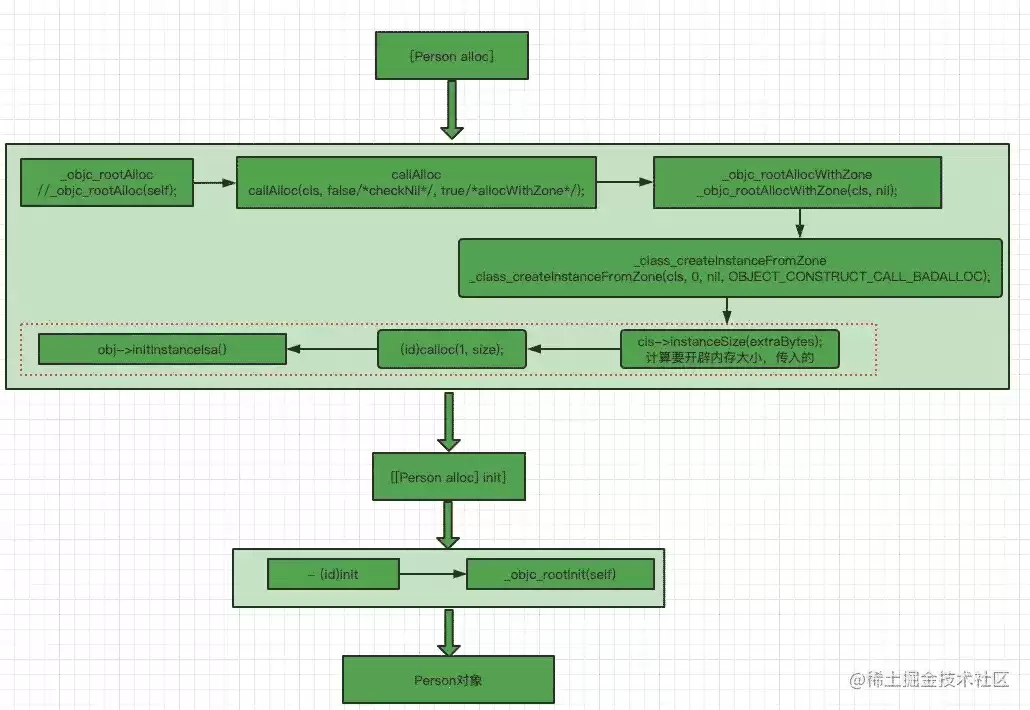
先从最简单的场景说起:创建一个 Person 类,然后在 main 函数里写一句 Person *p = [Person alloc];。这一行代码到底是怎么运转的?一路往下追源码,你就会发现一条清晰的调用链。
第一步,进入 alloc 方法的实现——它其实就是一个简单的桥接:
+ (id)alloc {
return _objc_rootAlloc(self);
}
第二步,跳转到 _objc_rootAlloc:
id
_objc_rootAlloc(Class cls)
{
    return callAlloc(cls, false/*checkNil*/, true/*allocWithZone*/);
}
第三步,来到核心函数 callAlloc。这里面涉及两个很有用的宏——fastpath 和 slowpath,本质是 __builtin_expect 的分支预测优化。简单说,fastpath(x) 告诉编译器“x 大概率是 true”,slowpath(x) 则告诉“x 大概率是 false”。这样编译器就能生成更高效的指令,减少不必要的指令跳转。日常开发中如果想要类似优化,可以在 Build Settings → Optimization Level → Debug 里把 None 改成 fastest/smallest。
#define fastpath(x) (__builtin_expect(bool(x), 1))
#define slowpath(x) (__builtin_expect(bool(x), 0))
看看 callAlloc 的完整实现:
static ALWAYS_INLINE id
callAlloc(Class cls, bool checkNil, bool allocWithZone=false)
{
#if __OBJC2__ //有可用的编译器优化
    if (slowpath(checkNil && !cls)) return nil;
    //判断是否自定义实现了 +allocWithZone 方法
    if (fastpath(!cls->ISA()->hasCustomAWZ())) {
        return _objc_rootAllocWithZone(cls, nil);
    }
    #endif
    // No shortcuts a vailable.
    if (allocWithZone) {
        return ((id(*)(id, SEL, struct _NSZone *))objc_msgSend)(cls, @selector(allocWithZone:), nil);
    }
    return ((id(*)(id, SEL))objc_msgSend)(cls, @selector(alloc));
第四步,如果走快速路径,就会进入 _objc_rootAllocWithZone:
id
_objc_rootAllocWithZone(Class cls, objc_zone_t zone __unused)
{
    // allocWithZone under __OBJC2__ ignores the zone parameter
    return _class_createInstanceFromZone(cls, 0, nil,
OBJECT_CONSTRUCT_CALL_BADALLOC);
}
第五步,也是真正干活的函数——_class_createInstanceFromZone。这里面包含三个关键操作:
static ALWAYS_INLINE id
_class_createInstanceFromZone(Class cls, size_t extraBytes, void *zone,int construct_flags = OBJECT_CONSTRUCT_NONE,bool cxxConstruct = true,size_t *outAllocatedSize = nil)
{
    ASSERT(cls->isRealized());
    // Read class's info bits all at once for performance
    bool hasCxxCtor = cxxConstruct && cls->hasCxxCtor();
    bool hasCxxDtor = cls->hasCxxDtor();
    bool fast = cls->canAllocNonpointer();
    size_t size;
    size = cls->instanceSize(extraBytes);
    if (outAllocatedSize) *outAllocatedSize = size;
    id obj;
#if SUPPORT_ZONES
    // 早期的内存是通过 zone 申请的
    if (zone) {
        obj = (id)malloc_zone_calloc((malloc_zone_t *)zone, 1, size);
    } else {
#endif
        obj = (id)calloc(1, size);
#if SUPPORT_ZONES
    }
#endif
    if (slowpath(!obj)) {
        if (construct_flags & OBJECT_CONSTRUCT_CALL_BADALLOC) {
            return _objc_callBadAllocHandler(cls);
        }
        return nil;
    }
    if (!zone && fast) {
        obj->initInstanceIsa(cls, hasCxxDtor);
    } else {
        // Use raw pointer isa on the assumption that they might be
        // doing something weird with the zone or RR.
        obj->initIsa(cls);
    }
    if (fastpath(!hasCxxCtor)) {
        return obj;
    }
    construct_flags |= OBJECT_CONSTRUCT_FREE_ONFAILURE;
    return object_cxxConstructFromClass(obj, cls, construct_flags);
}
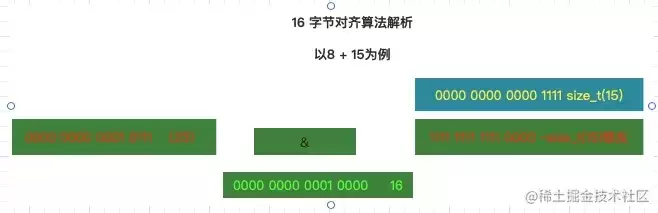
第一步:计算所需内存大小。 通过 cls->instanceSize(extraBytes) 来完成。内部实现会先尝试快速计算(利用缓存),否则执行 alignedInstanceSize() + extraBytes,并且保证至少 16 字节(这是 CoreFoundation 的要求)。align16 的作用是把数值按 16 字节对齐,比如传入 8,结果会是 16。
inline size_t instanceSize(size_t extraBytes) const {
    if (fastpath(cache.hasFastInstanceSize(extraBytes))) {
        return cache.fastInstanceSize(extraBytes);
    }
    size_t size = alignedInstanceSize() + extraBytes;
    if (size < 16) size = 16;
    return size;
}
断点调试时你会发现传入 align16 的参数 x 通常是 8,结果自然就是 16 了。
第二步:申请内存。 调用 calloc(1, size),向系统要一块大小为 instanceSize 计算出的连续空间,并将地址指针赋值给 obj。
第三步:初始化 isa 指针。 通过 obj->initInstanceIsa(cls, hasCxxDtor) 将类和 isa 关联起来。至此,一个实实在在的对象就诞生了。
Init 源码探索
直接翻看 Init 的源码,干净得让人意外:
- (id)init {
    return _objc_rootInit(self);
}
id
_objc_rootInit(id obj)
{
    // In practice, it will be hard to rely on this function.
    // Many classes do not properly chain -init calls.
    return obj;
}
说白了,init 就是把传进来的对象原封不动地返回。当然,子类通常会重写 init 来做自己的初始化工作。
new 的源码探索
日常开发中创建对象可以用 alloc init,也可以直接用 new。看看 new 源码:
+ (id)new {
    return [callAlloc(self, false/*checkNil*/) init];
}
很明显,new 等价于 alloc + init。那两者有什么区别?不同场景下侧重点略有不同,下面这张图总结得很清楚:

以上就是 iOS 底层中 alloc、init、new 的完整源码流程。整个链条从消息发送到内存分配再到 isa 绑定,每一步都有迹可循。理解这些,对日常开发中对象的生命周期把控会更有底气。

iOS27信息应用新增绘图选项,点击加号图标即可调用,并完整集成标记工具集。macOS27在备忘录和无边记应用中也加入了标记工具。目前两系统处于开发者测试阶段,正式版预计9月推送。

iOS27大幅扩展横屏支持,覆盖设置、相册、邮件等更多系统应用与核心功能,信息应用可折叠侧边栏,实时活动也完美适配横屏,同时优化键盘布局与通知中心显示,旨在为折叠屏等大屏设备优化交互体验与多任务效率。

iOS27锁屏迎来五大升级:扩展显示自动延展照片边缘;精简时钟模式将时间移至顶部;ImagePlayground支持自然语言生成AI壁纸;LiquidGlass新增透明度滑块,灵活调节视觉层次;Siri交互界面聚焦灵动岛,体验更直观。

iOS27首个开发者测试版代码中出现折叠状态、折叠角度及屏幕数量查询接口,证实苹果正为折叠屏设备进行系统层适配。该功能消失于iOS26,支撑折叠识别、UI自适应与跨屏调度,预计秋季发布首款折叠屏旗舰机型。

苹果WWDC2026发布iOS27等五大系统,超250项功能更新,涵盖通信、交互、影像、健康等领域,涉及同号互通、界面优化等。开发者测试版已开放,预计9月正式推送。
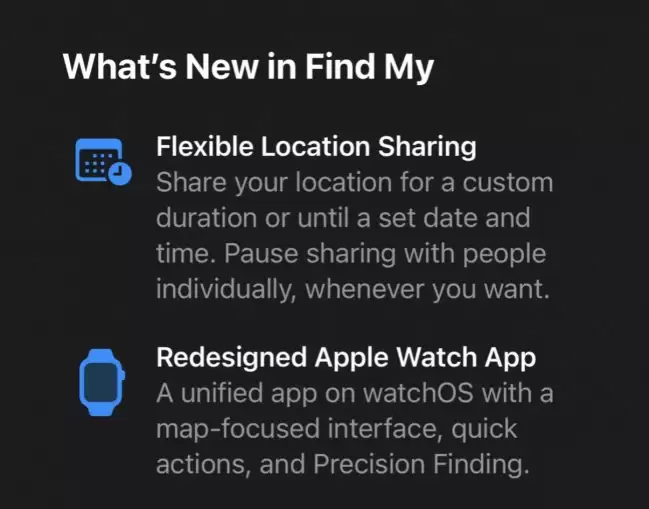
iOS27版FindMy新增位置共享时长控制,支持自定义时长或截止日期,并加入静默暂停功能,对方无通知但显示“未找到位置”。界面采用液态玻璃设计,标签栏统一,物品标签换用AirTag风格图标。

苹果在iOS27和macOS27系统中,为信息应用新增了绘图工具,并将Markup标注功能整合进聊天窗口,支持用户可以在图片和文档上即兴画写标注。此外,macOS27的备忘录和Freeform应用也同步获得该支持,并伴随多项人工智能功能升级。

iOS27首个Beta版本优化简体中文输入,结合上下文提供更精准候选词,减少选词错误;新增汉字拆字输入功能,输入组成部分拼音即可查找生僻字;同时主动提供标点符号建议,提升日常输入体验。

苹果推送iOS/iPadOS26.6开发者预览版Beta2,版本号23G5043d,距上次发布20天。公开测试版需注册AppleBeta计划后升级,开发者预览版需登录开发者计划后接收推送。

苹果iOS27系统“查找”App新增隐藏共享位置功能,启用后对方无通知,时长最长一天,也可精确自定义15分钟至30天。同时加入横屏模式,让操作更便捷,并增强隐私保护,用户可灵活控制位置共享。这一更新提升了用户隐私保护与使用灵活性。






Windows 10 是一款微软推出的经典操作系统,拥有硬件兼容性与多任务处理能力。它更偏向把系统状态查看和常用调节动作放在一起,适合需要持续观察和微调设备状态的场景。

极度公式是一款跨平台专业LaTeX公式识别编辑软件,支持OCR公式识别和多平台编辑。和使用说明,避免使用,享受完整功能与稳定支持。做扫描整理、文字提取和表格转换时,它能把识别后的处理步骤接得更顺,资料录入这类场景会省下不少时间。