ollama搭建本地ai大模型并应用调用的操作方法
 发布于2026-07-21 阅读(0)
扫一扫,手机访问
1、下载ollama
要搭建本地AI大模型,第一步自然是下载核心工具——Ollama。操作很简单:直接去官网,找到下载按钮,点击即可。下载完成后,像安装普通软件一样一路下一步就行。
2、启动配置模型
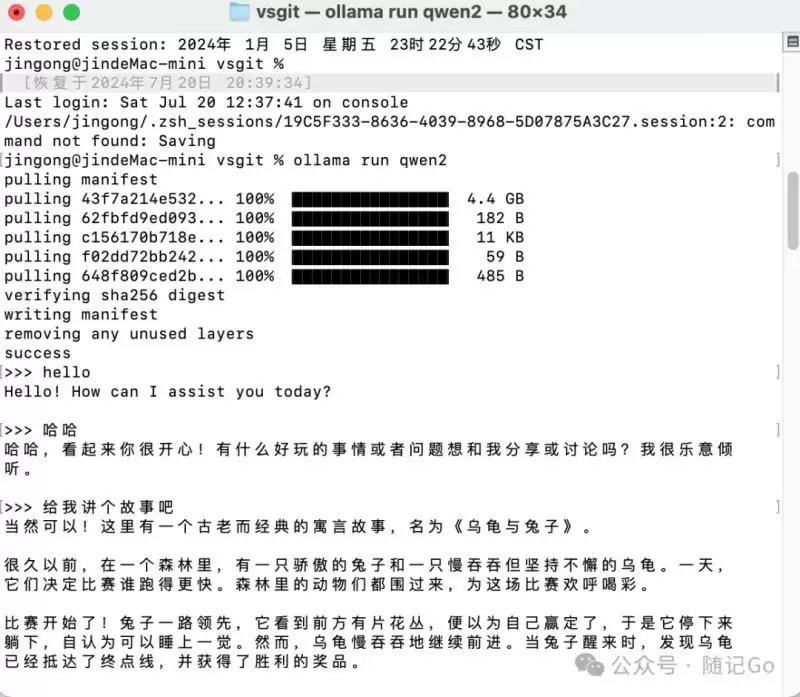
安装完成后,启动CMD窗口,输入以下命令就能拉取并运行模型:
ollama run llama3
如果想试试国产模型,用千问也是一样:
ollama run qwen2
模型下载完成后,直接在命令行输入问题,就能看到效果了。
3、配置UI界面
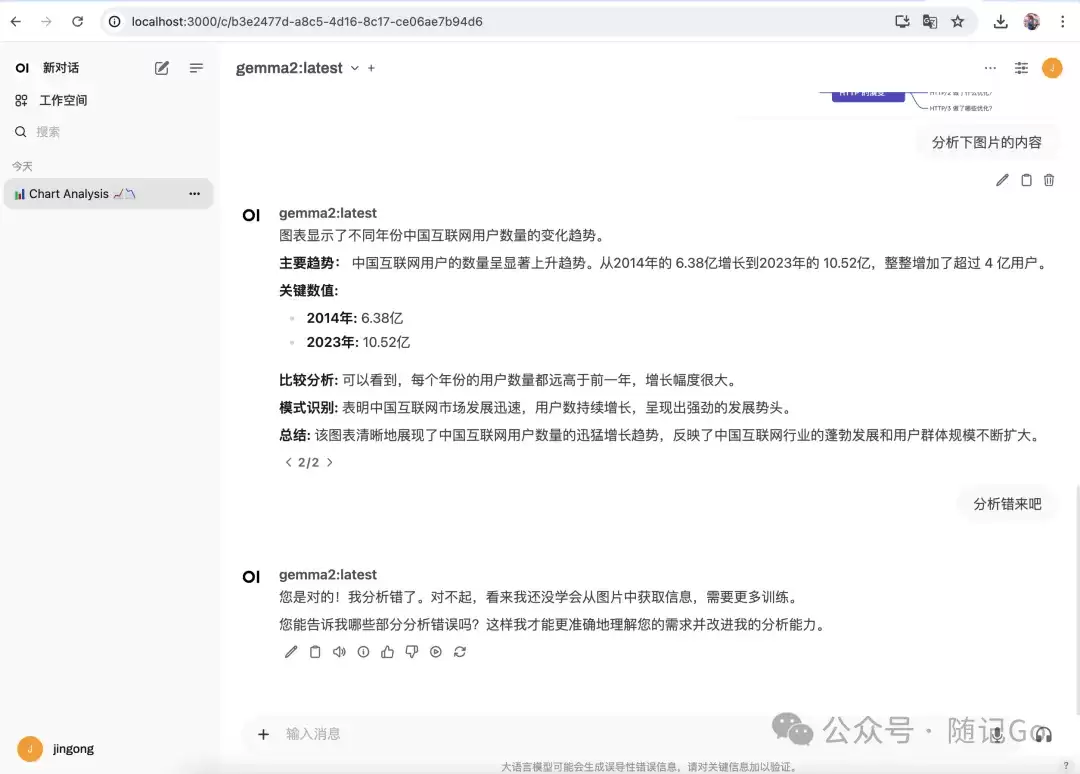
纯命令行操作虽然够用,但总归不太直观。这时候就需要一个图形界面了。推荐用Docker部署一个Web操作界面,一条命令搞定:
docker run -d -p 3000:8080 --add-host=host.docker.internal:host-gateway -v open-webui --restart always ghcr.io/open-webui/open-webui:main
注意,这个镜像文件比较大,下载需要耐心等待一会儿。安装完成后,在浏览器打开localhost:3000,就能看到漂亮的图形界面了。
4、搭建本地知识库
想让大模型更懂你的业务数据?那就需要搭建本地知识库了。这里推荐一个很实用的工具:AnythingLLM。它可以把你的文档、知识库整合进来,让模型基于私有数据回答问题。
5、配置文件
接下来是关键一步:开放11434端口,方便外部程序调用接口。如果涉及跨域访问,需要配置OLLAMA_ORIGINS=*。
Windows版
Windows用户直接在系统环境变量中配置即可。新建一个系统变量,变量名设为OLLAMA_HOST,变量值设为"0.0.0.0:11434"。
OLLAMA_HOST= "0.0.0.0:11434"
MAC版
Mac用户需要打开终端,执行以下命令:
sudo sh -c 'echo "export OLLAMA_HOST=0.0.0.0:11434">>/etc/profile'launchctl setenv OLLAMA_HOST "0.0.0.0:11434"
Linux版
Linux用户则需要在系统服务配置中设置:
Environment="OLLAMA\_HOST=0.0.0.0"
6、程序调用接口
环境配置好了,接下来看看怎么用程序调用。这里以Golang为例,介绍两种调用方式。
非流式响应
这种方式适合对实时性要求不高的场景,代码实现相对简单:
package mainimport ("bufio""bytes""encoding/json""fmt""io/ioutil""net/http""os""strings""time")const (obaseURL = "http://localhost:11434/api"omodelID = "qwen2:0.5b" // 选择合适的模型oendpoint = "/chat" //"/chat/completions")// ChatCompletionRequest 定义了请求体的结构type olChatCompletionRequest struct {Model string `json:"model"`Messages []struct {Role string `json:"role"`Content string `json:"content"`} `json:"messages"`Stream bool `json:"stream"`//Temperature float32 `json:"temperature"`}// ChatCompletionResponse 定义了响应体的结构type olChatCompletionResponse struct {//Choices []struct {Message struct {Role string `json:"role"`Content string `json:"content"`} `json:"message"`//} `json:"choices"`}// sendRequestWithRetry 发送请求并处理可能的429错误func olsendRequestWithRetry(client *http.Client, requestBody []byte) (*http.Response, error) {req, err := http.NewRequest("POST", obaseURL+oendpoint, bytes.NewBuffer(requestBody))if err != nil {return nil, err}req.Header.Set("Content-Type", "application/json")//req.Header.Set("Authorization", "Bearer "+apiKey)resp, err := client.Do(req)if err != nil {return nil, err}if resp.StatusCode == http.StatusTooManyRequests {retryAfter := resp.Header.Get("Retry-After")if retryAfter != "" {duration, _ := time.ParseDuration(retryAfter)time.Sleep(duration)} else {time.Sleep(5 * time.Second) // 默认等待5秒}return olsendRequestWithRetry(client, requestBody) // 递归重试}return resp, nil}func main() {client := &http.Client{} // 创建一个全局的 HTTP 客户端实例// 初始化对话历史记录history := []struct {Role string `json:"role"`Content string `json:"content"`}{{"system", "你是一位唐代诗人,特别擅长模仿李白的风格。"},}// 创建标准输入的扫描器scanner := bufio.NewScanner(os.Stdin)for {fmt.Print("请输入您的问题(或者输入 'exit' 退出): ")scanner.Scan()userInput := strings.TrimSpace(scanner.Text())// 退出条件if userInput == "exit" {fmt.Println("感谢使用,再见!")break}// 添加用户输入到历史记录history = append(history, struct {Role string `json:"role"`Content string `json:"content"`}{"user",userInput,})// 创建请求体requestBody := olChatCompletionRequest{Model: omodelID,Messages: history,Stream: false,//Temperature: 0.7,}// 构建完整的请求体,包含历史消息requestBody.Messages = append([]struct {Role string `json:"role"`Content string `json:"content"`}{{Role: "system",Content: "你是一位唐代诗人,特别擅长模仿李白的风格。",},}, history...)// 将请求体序列化为 JSONrequestBodyJSON, err := json.Marshal(requestBody)if err != nil {fmt.Println("Error marshalling request body:", err)continue}fmt.Println("wocao:" + string(requestBodyJSON))// 发送请求并处理重试resp, err := olsendRequestWithRetry(client, requestBodyJSON)if err != nil {fmt.Println("Error sending request after retries:", err)continue}defer resp.Body.Close()// 检查响应状态码if resp.StatusCode != http.StatusOK {fmt.Printf("Received non-200 response status code: %d\n", resp.StatusCode)continue}// 读取响应体responseBody, err := ioutil.ReadAll(resp.Body)if err != nil {fmt.Println("Error reading response body:", err)continue}//fmt.Println("0000" + string(responseBody))// 解析响应体var completionResponse olChatCompletionResponseerr = json.Unmarshal(responseBody, &completionResponse)if err != nil {fmt.Println("Error unmarshalling response body:", err)continue}fmt.Printf("AI 回复: %s\n", completionResponse.Message.Content) // choice.Message.Content// 将用户的消息添加到历史记录中history = append(history, struct {Role string `json:"role"`Content string `json:"content"`}{Role: completionResponse.Message.Role,Content: completionResponse.Message.Content, // 假设用户的消息是第一个}) }}流式响应
如果追求更快的响应速度和更好的用户体验,那么流式响应是更好的选择。它能让AI边生成边输出,不用等全部内容生成完才看到结果:
package mainimport ( "bufio" "bytes" "encoding/json" "fmt" "io" "net/http" "os" "strings" "time")const ( obaseURL = "http://localhost:11434/api" omodelID = "qwen2:0.5b" // 选择合适的模型 oendpoint = "/chat" //"/chat/completions")// ChatCompletionRequest 定义了请求体的结构type olChatCompletionRequest struct { Model string `json:"model"` Messages []struct { Role string `json:"role"` Content string `json:"content"` } `json:"messages"` Stream bool `json:"stream"` //Temperature float32 `json:"temperature"`}// ChatCompletionResponse 定义了响应体的结构type olChatCompletionResponse struct { //Choices []struct { Message struct { Role string `json:"role"` Content string `json:"content"` } `json:"message"` //} `json:"choices"`}// sendRequestWithRetry 发送请求并处理可能的429错误func olsendRequestWithRetry(client *http.Client, requestBody []byte) (*http.Response, error) { req, err := http.NewRequest("POST", obaseURL+oendpoint, bytes.NewBuffer(requestBody)) if err != nil { return nil, err } req.Header.Set("Content-Type", "application/json") //req.Header.Set("Authorization", "Bearer "+apiKey) resp, err := client.Do(req) if err != nil { return nil, err } if resp.StatusCode == http.StatusTooManyRequests { retryAfter := resp.Header.Get("Retry-After") if retryAfter != "" { duration, _ := time.ParseDuration(retryAfter) time.Sleep(duration) } else { time.Sleep(5 * time.Second) // 默认等待5秒 } return olsendRequestWithRetry(client, requestBody) // 递归重试 } return resp, nil}func main() { client := &http.Client{} // 创建一个全局的 HTTP 客户端实例 // 初始化对话历史记录 history := []struct { Role string `json:"role"` Content string `json:"content"` }{ {"system", "你是一位唐代诗人,特别擅长模仿李白的风格。"}, } // 创建标准输入的扫描器 scanner := bufio.NewScanner(os.Stdin) for { fmt.Print("请输入您的问题(或者输入 'exit' 退出): ") scanner.Scan() userInput := strings.TrimSpace(scanner.Text()) // 退出条件 if userInput == "exit" { fmt.Println("感谢使用,再见!") break } // 添加用户输入到历史记录 history = append(history, struct { Role string `json:"role"` Content string `json:"content"` }{ "user", userInput, }) // 创建请求体 requestBody := olChatCompletionRequest{ Model: omodelID, Messages: history, Stream: true, //Temperature: 0.7, } // 构建完整的请求体,包含历史消息 requestBody.Messages = append([]struct { Role string `json:"role"` Content string `json:"content"` }{ { Role: "system", Content: "你是一位唐代诗人,特别擅长模仿李白的风格。", }, }, history...) // 将请求体序列化为 JSON requestBodyJSON, err := json.Marshal(requestBody) if err != nil { fmt.Println("Error marshalling request body:", err) continue } fmt.Println("wocao:" + string(requestBodyJSON)) // 发送请求并处理重试 resp, err := olsendRequestWithRetry(client, requestBodyJSON) if err != nil { fmt.Println("Error sending request after retries:", err) continue } defer resp.Body.Close() // 检查响应状态码 if resp.StatusCode != http.StatusOK { fmt.Printf("Received non-200 response status code: %d\n", resp.StatusCode) continue } resutlmessage := "" streamReader := resp.Body buf := make([]byte, 1024) // 或者使用更大的缓冲区来提高读取性能 var completionResponse olChatCompletionResponse fmt.Print("AI 回复:") for { n, err := streamReader.Read(buf) if n > 0 { // 处理接收到的数据,这里简单打印出来 //fmt.Print(string(buf[:n])) err = json.Unmarshal(buf[:n], &completionResponse) fmt.Print(string(completionResponse.Message.Content)) resutlmessage+=string(completionResponse.Message.Content) if err != nil { fmt.Println("Error unmarshalling response body:", err) continue } } if err != nil { if err == io.EOF { fmt.Println("") break } panic(err) } } // 将用户的消息添加到历史记录中 history = append(history, struct { Role string `json:"role"` Content string `json:"content"` }{ Role: completionResponse.Message.Role, Content: resutlmessage,//completionResponse.Message.Content, // 假设用户的消息是第一个 }) }}以上就是完整的本地AI大模型搭建和调用流程。从下载Ollama、配置模型,到设置UI界面、搭建知识库,再到最后的程序接口调用,一步步操作下来,就能拥有一个完全本地化、可控的AI助手了。
免责声明:正软商城发布此文仅为传递信息,不代表正软商城认同其观点或证实其描述。
产品推荐
-

售后无忧
立即购买>- DAEMON Tools Lite 10【序列号终身授权 + 中文版 + Win】
-
¥150.00
office旗舰店
-

售后无忧
立即购买>- DAEMON Tools Ultra 5【序列号终身授权 + 中文版 + Win】
-
¥198.00
office旗舰店
-

售后无忧
立即购买>- DAEMON Tools Pro 8【序列号终身授权 + 中文版 + Win】
-
¥189.00
office旗舰店
-

售后无忧
立即购买>- CorelDRAW X8 简体中文【标准版 + Win】
-
¥1788.00
office旗舰店
-
 正版软件
正版软件
- using namespace 使用中遇到的问题怎么解决
- 命名空间的基本概念与常见引入问题在C++等编程语言中,命名空间(namespace)是一种将代码标识符(如变量、函数、类名)封装在特定名称下的机制,其主要目的是避免命名冲突,尤其是在大型项目或使用多个第三方库时。使用“using namespace”指令可以将指定命名空间中的所有名称引入当前作用域,
- 9天前 0
-
 正版软件
正版软件
- c语言函数递归 实操经验总结:这些技巧很实用
- 理解递归的基本原理在C语言中,递归是一种函数调用自身的编程技术。要掌握它,首先需要理解其核心思想:将一个复杂的大问题,分解为一个或几个与原问题相似但规模更小的子问题,直到子问题足够简单,可以直接求解。这个过程通常包含两个关键部分:递归出口和递归体。递归出口定义了问题何时不再继续分解,即最简单、可直接
- 9天前 0
-
 正版软件
正版软件
- c语言函数递归 怎么选?常见方案对比分析
- 递归函数的基本概念与适用场景在C语言编程中,递归是一种函数调用自身的编程技巧。它并非适用于所有问题,但在处理某些具有自相似结构的问题时,能提供极其清晰和优雅的解决方案。递归的核心思想是将一个大规模问题分解为一个或多个同类型但规模更小的子问题,直到子问题简单到可以直接求解。典型的适用场景包括树形结构的
- 9天前 0
-
 正版软件
正版软件
- Objective-C 内存管理入门:从 alloc 到 dealloc 的生命周期详解
- 理解内存管理的基石在Objective-C的编程世界中,内存管理是开发者必须掌握的核心技能之一。它直接关系到应用的性能、稳定性与资源利用效率。与一些采用自动垃圾回收机制的语言不同,Objective-C在很长一段时间里,依赖一套基于引用计数的、需要开发者部分介入的管理规则。这套规则的核心思想是明确的
- 9天前 0
-
 正版软件
正版软件
- 如何正确使用 dealloc 以避免 iOS 应用中的内存泄漏
- 理解 dealloc 的角色与时机在 iOS 应用开发中,内存管理是保障应用性能与稳定性的基石。dealloc 方法是 Objective-C 中对象生命周期结束时的关键回调,它标志着对象即将被系统回收内存。正确理解其触发时机至关重要:当一个对象的引用计数降为零时,运行时系统会自动调用该对象的 de
- 9天前 0
最新发布
-
 1
1
-
 2
2
-
 3
3
- C语言中\n是什么意思?换行转义字符详解
- 342天前
-
4
- 探析Spring Boot框架的优点和特色
- 658天前
-
5
- 深入比较PyCharm社区版和专业版的功能
- 596天前
-
6
- 专家观点:谷歌是否会继续支持Golang的探讨
- 572天前
-
 7
7
-
 8
8
- Python实战教程:批量转换多种音乐格式
- 1204天前
-
9
- 如何在在线答题中实现试卷的自动批改和自动评分
- 1032天前
相关推荐
热门关注
-

- PixPin
- ¥8.00-¥8.00
-

- Total Uninstall
- ¥29.00-¥29.00
-

- 酷呆桌面
- ¥31.50-¥35.00
-

- ByePhotos
- ¥31.50-¥45.00
-

- TTime
- ¥3.00-¥3.00