springboot如何整合mqtt
springboot整合mqtt搭建的时候如果你使用的是集群记得开放以下端口:好了,搭建成功下一步就是我们的java程序要与mqtt连接,这里有两种方式(其实不止两种)进行连接.一是直接使用MQTTJava客户端库二是使用springintegrationmqtt也是比较推荐的一种,也是我们主讲这种.第一步添加mavendependencyorg.springframework.integrationspring-integration-mqtt5.5.14第二步添加配置1先写好一些基本配置mqtt:us
springboot 整合 mqtt
搭建的时候如果你使用的是集群 记得开放以下端口:
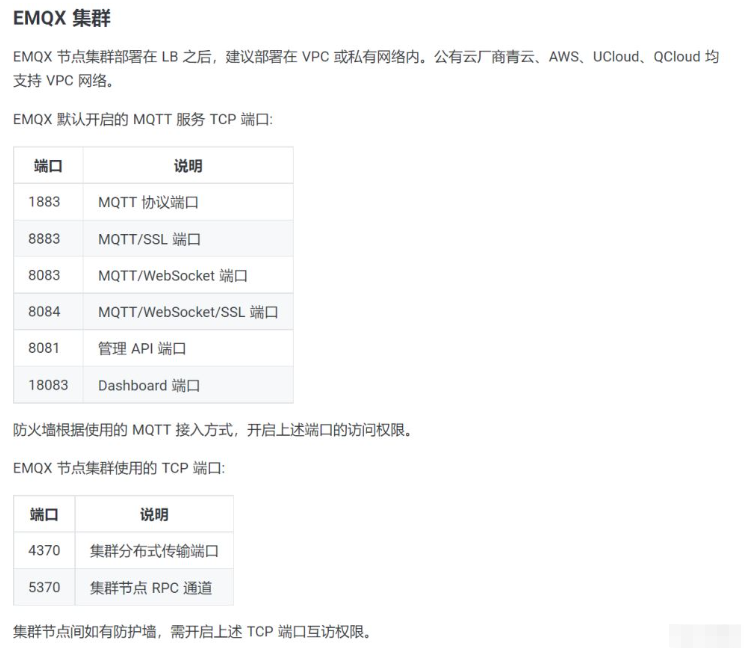
好了, 搭建成功下一步就是我们的java程序要与mqtt连接, 这里有两种方式(其实不止两种)进行连接.
一是 直接使用 MQTT Java 客户端库
二是使用 spring integration mqtt也是比较推荐的一种,也是我们主讲这种.
第一步 添加 maven dependency
            org.springframework.integration
            spring-integration-mqtt
            5.5.14
第二步 添加配置
1 先写好一些基本配置
mqtt:
 username: test                        # 账号
 password: 123456                      # 密码
 host-url: tcp://127.0.0.1:1883        # mqtt连接tcp地址
 in-client-id: ${random.value}         # 随机值,使出入站 client ID 不同
 out-client-id: ${random.value}
 client-id: ${random.int}                   # 客户端Id,不能相同,采用随机数 ${random.value}
 default-topic: test/#,topic/+/+/up         # 默认主题
 timeout: 60                                # 超时时间
 keepalive: 60                              # 保持连接
clearSession: true # 清除会话(设置为false,断开连接,重连后使用原来的会话 保留订阅的主题,能接收离线期间的消息)2.然后写一个对应的类MqttProperties
import org.springframework.beans.factory.annotation.Value;
import org.springframework.stereotype.Component;

/**
 * MqttProperties
 *
 * @author hengzi
 * @date 2022/8/23
 */
@Component
public class MqttProperties {

    /**
     * 用户名
     */
    @Value("${mqtt.username}")
    private String username;

    /**
     * 密码
     */
    @Value("${mqtt.password}")
    private String password;

    /**
     * 连接地址
     */
    @Value("${mqtt.host-url}")
    private String hostUrl;

    /**
     * 进-客户Id
     */
    @Value("${mqtt.in-client-id}")
    private String inClientId;

    /**
     * 出-客户Id
     */
    @Value("${mqtt.out-client-id}")
    private String outClientId;

    /**
     * 客户Id
     */
    @Value("${mqtt.client-id}")
    private String clientId;

    /**
     * 默认连接话题
     */
    @Value("${mqtt.default-topic}")
    private String defaultTopic;

    /**
     * 超时时间
     */
    @Value("${mqtt.timeout}")
    private int timeout;

    /**
     * 保持连接数
     */
    @Value("${mqtt.keepalive}")
    private int keepalive;

    /**是否清除session*/
    @Value("${mqtt.clearSession}")
    private boolean clearSession;

	// ...getter and setter

}
接下来就是配置一些乱七八糟的东西, 这里有很多概念性的东西 比如 管道channel, 适配器 adapter, 入站Inbound, 出站Outbound,等等等等, 看起来是非常头痛的
好吧,那就一个一个来,
首先连接mqtt需要一个客户端, 那么我们就开一个客户端工厂, 这里可以产生很多很多的客户端
    @Bean
    public MqttPahoClientFactory mqttPahoClientFactory(){
        DefaultMqttPahoClientFactory factory = new DefaultMqttPahoClientFactory();
        MqttConnectOptions options = new MqttConnectOptions();
        options.setServerURIs(mqttProperties.getHostUrl().split(","));
        options.setUserName(mqttProperties.getUsername());
        options.setPassword(mqttProperties.getPassword().toCharArray());
        factory.setConnectionOptions(options);
        return factory;
}然后再搞两根管子(channel),一个出站,一个入站
    //出站消息管道,
    @Bean
    public MessageChannel mqttOutboundChannel(){
        return new DirectChannel();
    }

    // 入站消息管道
    @Bean
    public MessageChannel mqttInboundChannel(){
        return new DirectChannel();
    }
为了使这些管子能流通 就需要一个适配器(adapter)
    // Mqtt 管道适配器
    @Bean
    public MqttPahoMessageDrivenChannelAdapter adapter(MqttPahoClientFactory factory){
        return new MqttPahoMessageDrivenChannelAdapter(mqttProperties.getInClientId(),factory,mqttProperties.getDefaultTopic().split(","));
    }
然后定义消息生产者
    // 消息生产者
    @Bean
    public MessageProducer mqttInbound(MqttPahoMessageDrivenChannelAdapter adapter){
        adapter.setCompletionTimeout(5000);
        adapter.setConverter(new DefaultPahoMessageConverter());
        //入站投递的通道
        adapter.setOutputChannel(mqttInboundChannel());
        adapter.setQos(1);
        return adapter;
    }
那我们收到消息去哪里处理呢,答案是这里:
    @Bean
    //使用ServiceActivator 指定接收消息的管道为 mqttInboundChannel,投递到mqttInboundChannel管道中的消息会被该方法接收并执行
    @ServiceActivator(inputChannel = "mqttInboundChannel")
    public MessageHandler handleMessage() {
    	// 这个 mqttMessageHandle 其实就是一个 MessageHandler 的实现类(这个类我放下面)
        return mqttMessageHandle;
		// 你也可以这样写
//        return new MessageHandler() {
//            @Override
//            public void handleMessage(Message message) throws MessagingException {
//                // do something
//            }
//        };
到这里我们其实已经可以接受到来自mqtt的消息了
接下来配置向mqtt发送消息
配置 出站处理器
    // 出站处理器
    @Bean
    @ServiceActivator(inputChannel = "mqttOutboundChannel")
    public MessageHandler mqttOutbound(MqttPahoClientFactory factory){
        MqttPahoMessageHandler handler = new MqttPahoMessageHandler(mqttProperties.getOutClientId(),factory);
        handler.setAsync(true);
        handler.setConverter(new DefaultPahoMessageConverter());
        handler.setDefaultTopic(mqttProperties.getDefaultTopic().split(",")[0]);
        return handler;
    }
这个 出站处理器 在我看来就是让别人 (MqttPahoMessageHandler)处理了, 我就不处理了,我只管我要发送什么,至于怎么发送,由MqttPahoMessageHandler来完成
接下来我们定义一个接口即可
import org.springframework.integration.annotation.MessagingGateway;
import org.springframework.integration.mqtt.support.MqttHeaders;
import org.springframework.messaging.handler.annotation.Header;
import org.springframework.stereotype.Component;

/**
 * MqttGateway
 *
 * @author hengzi
 * @date 2022/8/23
 */

@Component
@MessagingGateway(defaultRequestChannel = "mqttOutboundChannel")
public interface MqttGateway {

    void sendToMqtt(@Header(MqttHeaders.TOPIC) String topic, String data);

    void sendToMqtt(@Header(MqttHeaders.TOPIC) String topic, @Header(MqttHeaders.QOS) Integer Qos, String data);
}
我们直接调用这个接口就可以向mqtt 发送数据
到目前为止,整个配置文件长这样:
import org.eclipse.paho.client.mqttv3.MqttConnectOptions;
import org.springframework.beans.factory.annotation.Autowired;
import org.springframework.context.annotation.Bean;
import org.springframework.context.annotation.Configuration;
import org.springframework.integration.annotation.ServiceActivator;
import org.springframework.integration.channel.DirectChannel;
import org.springframework.integration.core.MessageProducer;
import org.springframework.integration.mqtt.core.DefaultMqttPahoClientFactory;
import org.springframework.integration.mqtt.core.MqttPahoClientFactory;
import org.springframework.integration.mqtt.inbound.MqttPahoMessageDrivenChannelAdapter;
import org.springframework.integration.mqtt.outbound.MqttPahoMessageHandler;
import org.springframework.integration.mqtt.support.DefaultPahoMessageConverter;
import org.springframework.messaging.Message;
import org.springframework.messaging.MessageChannel;
import org.springframework.messaging.MessageHandler;
import org.springframework.messaging.MessagingException;

/**
 * MqttConfig
 *
 * @author hengzi
 * @date 2022/8/23
 */
@Configuration
public class MqttConfig {


    /**
     *  以下属性将在配置文件中读取
     **/
    @Autowired
    private MqttProperties mqttProperties;


    //Mqtt 客户端工厂
    @Bean
    public MqttPahoClientFactory mqttPahoClientFactory(){
        DefaultMqttPahoClientFactory factory = new DefaultMqttPahoClientFactory();
        MqttConnectOptions options = new MqttConnectOptions();
        options.setServerURIs(mqttProperties.getHostUrl().split(","));
        options.setUserName(mqttProperties.getUsername());
        options.setPassword(mqttProperties.getPassword().toCharArray());
        factory.setConnectionOptions(options);
        return factory;
    }

    // Mqtt 管道适配器
    @Bean
    public MqttPahoMessageDrivenChannelAdapter adapter(MqttPahoClientFactory factory){
        return new MqttPahoMessageDrivenChannelAdapter(mqttProperties.getInClientId(),factory,mqttProperties.getDefaultTopic().split(","));
    }


    // 消息生产者
    @Bean
    public MessageProducer mqttInbound(MqttPahoMessageDrivenChannelAdapter adapter){
        adapter.setCompletionTimeout(5000);
        adapter.setConverter(new DefaultPahoMessageConverter());
        //入站投递的通道
        adapter.setOutputChannel(mqttInboundChannel());
        adapter.setQos(1);
        return adapter;
    }


    // 出站处理器
    @Bean
    @ServiceActivator(inputChannel = "mqttOutboundChannel")
    public MessageHandler mqttOutbound(MqttPahoClientFactory factory){
        MqttPahoMessageHandler handler = new MqttPahoMessageHandler(mqttProperties.getOutClientId(),factory);
        handler.setAsync(true);
        handler.setConverter(new DefaultPahoMessageConverter());
        handler.setDefaultTopic(mqttProperties.getDefaultTopic().split(",")[0]);
        return handler;
    }

    @Bean
    //使用ServiceActivator 指定接收消息的管道为 mqttInboundChannel,投递到mqttInboundChannel管道中的消息会被该方法接收并执行
    @ServiceActivator(inputChannel = "mqttInboundChannel")
    public MessageHandler handleMessage() {
        return mqttMessageHandle;
    }

    //出站消息管道,
    @Bean
    public MessageChannel mqttOutboundChannel(){
        return new DirectChannel();
    }


    // 入站消息管道
    @Bean
    public MessageChannel mqttInboundChannel(){
        return new DirectChannel();
    }
}
处理消息的 MqttMessageHandle
@Component
public class MqttMessageHandle implements MessageHandler {
    @Override
    public void handleMessage(Message message) throws MessagingException {

    }
}
在进一步了解之后,发现可以优化的地方,比如channel 的类型是有很多种的, 这里使用的DirectChannel,是Spring Integration默认的消息通道,它将消息发送给为一个订阅者,然后阻碍发送直到消息被接收,传输方式都是同步的方式,都是由一个线程来运行的.
这里我们可以将入站channel改成 ExecutorChannel一个可以使用多线程的channel
@Bean
    public ThreadPoolTaskExecutor mqttThreadPoolTaskExecutor()
    {
        ThreadPoolTaskExecutor executor = new ThreadPoolTaskExecutor();
        // 最大可创建的线程数
        int maxPoolSize = 200;
        executor.setMaxPoolSize(maxPoolSize);
        // 核心线程池大小
        int corePoolSize = 50;
        executor.setCorePoolSize(corePoolSize);
        // 队列最大长度
        int queueCapacity = 1000;
        executor.setQueueCapacity(queueCapacity);
        // 线程池维护线程所允许的空闲时间
        int keepAliveSeconds = 300;
        executor.setKeepAliveSeconds(keepAliveSeconds);
        // 线程池对拒绝任务(无线程可用)的处理策略
        executor.setRejectedExecutionHandler(new ThreadPoolExecutor.CallerRunsPolicy());
        return executor;
    }

    // 入站消息管道
    @Bean
    public MessageChannel mqttInboundChannel(){
        // 用线程池
        return new ExecutorChannel(mqttThreadPoolTaskExecutor());
    }
到这里其实可以运行了.
但是这样配置其实还是有点多, 有点乱, 于是我查找官网, f发现一种更简单的配置方法 叫 Java DSL
我们参考官网,稍微改一下,使用 DSL的方式进行配置:
import org.eclipse.paho.client.mqttv3.MqttConnectOptions;
import org.springframework.beans.factory.annotation.Autowired;
import org.springframework.context.annotation.Bean;
import org.springframework.context.annotation.Configuration;
import org.springframework.integration.channel.ExecutorChannel;
import org.springframework.integration.dsl.IntegrationFlow;
import org.springframework.integration.dsl.IntegrationFlows;
import org.springframework.integration.mqtt.core.DefaultMqttPahoClientFactory;
import org.springframework.integration.mqtt.core.MqttPahoClientFactory;
import org.springframework.integration.mqtt.inbound.MqttPahoMessageDrivenChannelAdapter;
import org.springframework.integration.mqtt.outbound.MqttPahoMessageHandler;
import org.springframework.integration.mqtt.support.DefaultPahoMessageConverter;
import org.springframework.scheduling.concurrent.ThreadPoolTaskExecutor;

import java.util.concurrent.ThreadPoolExecutor;

/**
 * MqttConfigV2
 *
 * @author hengzi
 * @date 2022/8/24
 */
@Configuration
public class MqttConfigV2 {

    @Autowired
    private MqttProperties mqttProperties;

    @Autowired
    private MqttMessageHandle mqttMessageHandle;


    //Mqtt 客户端工厂 所有客户端从这里产生
    @Bean
    public MqttPahoClientFactory mqttPahoClientFactory(){
        DefaultMqttPahoClientFactory factory = new DefaultMqttPahoClientFactory();
        MqttConnectOptions options = new MqttConnectOptions();
        options.setServerURIs(mqttProperties.getHostUrl().split(","));
        options.setUserName(mqttProperties.getUsername());
        options.setPassword(mqttProperties.getPassword().toCharArray());
        factory.setConnectionOptions(options);
        return factory;
    }

    // Mqtt 管道适配器
    @Bean
    public MqttPahoMessageDrivenChannelAdapter adapter(MqttPahoClientFactory factory){
        return new MqttPahoMessageDrivenChannelAdapter(mqttProperties.getInClientId(),factory,mqttProperties.getDefaultTopic().split(","));
    }

    // 消息生产者 (接收,处理来自mqtt的消息)
    @Bean
    public IntegrationFlow mqttInbound(MqttPahoMessageDrivenChannelAdapter adapter) {
        adapter.setCompletionTimeout(5000);
        adapter.setQos(1);
        return IntegrationFlows.from( adapter)
                .channel(new ExecutorChannel(mqttThreadPoolTaskExecutor()))
                .handle(mqttMessageHandle)
                .get();
    }

    @Bean
    public ThreadPoolTaskExecutor mqttThreadPoolTaskExecutor()
    {
        ThreadPoolTaskExecutor executor = new ThreadPoolTaskExecutor();
        // 最大可创建的线程数
        int maxPoolSize = 200;
        executor.setMaxPoolSize(maxPoolSize);
        // 核心线程池大小
        int corePoolSize = 50;
        executor.setCorePoolSize(corePoolSize);
        // 队列最大长度
        int queueCapacity = 1000;
        executor.setQueueCapacity(queueCapacity);
        // 线程池维护线程所允许的空闲时间
        int keepAliveSeconds = 300;
        executor.setKeepAliveSeconds(keepAliveSeconds);
        // 线程池对拒绝任务(无线程可用)的处理策略
        executor.setRejectedExecutionHandler(new ThreadPoolExecutor.CallerRunsPolicy());
        return executor;
    }

    // 出站处理器 (向 mqtt 发送消息)
    @Bean
    public IntegrationFlow mqttOutboundFlow(MqttPahoClientFactory factory) {

        MqttPahoMessageHandler handler = new MqttPahoMessageHandler(mqttProperties.getOutClientId(),factory);
        handler.setAsync(true);
        handler.setConverter(new DefaultPahoMessageConverter());
        handler.setDefaultTopic(mqttProperties.getDefaultTopic().split(",")[0]);
        return IntegrationFlows.from( "mqttOutboundChannel").handle(handler).get();
    }

}
这样看起来真的简单多了, 头也没那么大了, 我要是早知道多好.
好了以上就是配置相关的, 到这里其实是已经完成springboot 与 mqtt 的整合了.
但其实我一直有个想法, 就是我们接收的消息 都是在 handleMessage这个方法里面执行的,
	@Override
    public void handleMessage(Message message) throws MessagingException {

    }
所以我就有了一个想法, 能不能根据 我订阅的主题,在不同的方法执行, 对于这个问题,其实你用if ... else ...也能实现, 但很明显,如果我订阅的主题很多的话, 那写起来就很头痛了.
对于这个问题,有两种思路, 一个是添加Spring Integration的路由 router,根据不同topic路由到不同的channel, 这个我也知道能不能实现, 我这里就不讨论了.
第二种是, 我也不知道名字改如何叫, 我是参考了 spring的 @Controller的设计, 暂且叫他注解模式.
众所周知,我们的接口都是在类上加 @Controller这个注解, 就代表这个类是 http 接口, 再在方法加上 @RequestMapping就能实现不同的 url 调用不同的方法.
参数这个设计 我们在类上面加 @MqttService就代表这个类是专门处理mqtt消息的服务类
同时 在这个类的方法上 加上 @MqttTopic就代表 这个主题由这个方法处理.
OK, 理论有了,接下来就是 实践.
先定义 两个注解
import org.springframework.core.annotation.AliasFor;
import org.springframework.stereotype.Component;

import java.lang.annotation.*;

@Documented
@Target({ElementType.TYPE})
@Retention(RetentionPolicy.RUNTIME)
@Component
public @interface MqttService {

    @AliasFor(
            annotation = Component.class
    )
    String value() default "";
}
加上 @Component注解 spring就会扫描, 并注册到IOC容器里
import java.lang.annotation.ElementType;
import java.lang.annotation.Retention;
import java.lang.annotation.RetentionPolicy;
import java.lang.annotation.Target;

@Target(ElementType.METHOD)
@Retention(RetentionPolicy.RUNTIME)
public @interface MqttTopic {

    /**
     * 主题名字
     */
    String value() default "";

}
参考 @RequestMapping我们使用起来应该是这样的:
import org.slf4j.Logger;
import org.slf4j.LoggerFactory;
import org.springframework.messaging.Message;

/**
 * MqttTopicHandle
 *
 * @author hengzi
 * @date 2022/8/24
 */
@MqttService
public class MqttTopicHandle {

    public static final Logger log = LoggerFactory.getLogger(MqttTopicHandle.class);

	// 这里的 # 号是通配符
    @MqttTopic("test/#")
    public void test(Message message){
        log.info("test="+message.getPayload());
    }

	// 这里的 + 号是通配符
    @MqttTopic("topic/+/+/up")
    public void up(Message message){
        log.info("up="+message.getPayload());
    }

	// 注意 你必须先订阅
    @MqttTopic("topic/1/2/down")
    public void down(Message message){
        log.info("down="+message.getPayload());
    }
}
OK 接下来就是实现这样的使用
分析 :
当我们收到消息时, 我们从IOC容器中 找到所有 带 @MqttService注解的类
然后 遍历这些类, 找到带有 @MqttTopic的方法
接着 把 @MqttTopic注解的的值 与 接受到的topic 进行对比
如果一致则执行这个方法
废话少说, 上代码
import org.slf4j.Logger;
import org.slf4j.LoggerFactory;
import org.springframework.messaging.Message;
import org.springframework.messaging.MessageHandler;
import org.springframework.messaging.MessagingException;
import org.springframework.stereotype.Component;

import java.lang.reflect.InvocationTargetException;
import java.lang.reflect.Method;
import java.util.Map;

/**
 * MessageHandleService
 *
 * @author hengzi
 * @date 2022/8/24
 */
@Component
public class MqttMessageHandle implements MessageHandler {

    public static final Logger log = LoggerFactory.getLogger(MqttMessageHandle.class);

    // 包含 @MqttService注解 的类(Component)
    public static Map mqttServices;


    /**
     * 所有mqtt到达的消息都会在这里处理
     * 要注意这个方法是在线程池里面运行的
     * @param message message
     */
    @Override
    public void handleMessage(Message message) throws MessagingException {
        getMqttTopicService(message);
    }

    public Map getMqttServices(){
        if(mqttServices==null){
            mqttServices = SpringUtils.getBeansByAnnotation(MqttService.class);
        }
        return mqttServices;
    }

    public void getMqttTopicService(Message message){
        // 在这里 我们根据不同的 主题 分发不同的消息
        String receivedTopic = message.getHeaders().get("mqtt_receivedTopic",String.class);
        if(receivedTopic==null || "".equals(receivedTopic)){
            return;
        }
        for(Map.Entry entry : getMqttServices().entrySet()){
        	// 把所有带有 @MqttService 的类遍历
            Class clazz = entry.getValue().getClass();
            // 获取他所有方法
            Method[] methods = clazz.getDeclaredMethods();
            for ( Method method: methods ){
                if (method.isAnnotationPresent(MqttTopic.class)){
                	// 如果这个方法有 这个注解
                    MqttTopic handleTopic = method.getAnnotation(MqttTopic.class);
                    if(isMatch(receivedTopic,handleTopic.value())){
                    	// 并且 这个 topic 匹配成功
                        try {
                            method.invoke(SpringUtils.getBean(clazz),message);
                            return;
                        } catch (IllegalAccessException e) {
                            e.printStackTrace();
                            log.error("代理炸了");
                        } catch (InvocationTargetException e) {
                            log.error("执行 {} 方法出现错误",handleTopic.value(),e);
                        }
                    }
                }
            }
        }
    }


    /**
     * mqtt 订阅的主题与我实际的主题是否匹配
     * @param topic 是实际的主题
     * @param pattern 是我订阅的主题 可以是通配符模式
     * @return 是否匹配
     */
    public static boolean isMatch(String topic, String pattern){

        if((topic==null) || (pattern==null) ){
            return false;
        }

        if(topic.equals(pattern)){
            // 完全相等是肯定匹配的
            return true;
        }

        if("#".equals(pattern)){
            // # 号代表所有主题  肯定匹配的
            return true;
        }
        String[] splitTopic = topic.split("/");
        String[] splitPattern = pattern.split("/");

        boolean match = true;

        // 如果包含 # 则只需要判断 # 前面的
        for (int i = 0; i < splitPattern.length; i++) {
            if(!"#".equals(splitPattern[i])){
                // 不是# 号 正常判断
                if(i>=splitTopic.length){
                    // 此时长度不相等 不匹配
                    match = false;
                    break;
                }
                if(!splitTopic[i].equals(splitPattern[i]) && !"+".equals(splitPattern[i])){
                    // 不相等 且不等于 +
                    match = false;
                    break;
                }
            }
            else {
                // 是# 号  肯定匹配的
                break;
            }
        }

        return match;
    }

}
工具类 SpringUtils
import org.springframework.aop.framework.AopContext;
import org.springframework.beans.BeansException;
import org.springframework.beans.factory.NoSuchBeanDefinitionException;
import org.springframework.beans.factory.config.BeanFactoryPostProcessor;
import org.springframework.beans.factory.config.ConfigurableListableBeanFactory;
import org.springframework.context.ApplicationContext;
import org.springframework.context.ApplicationContextAware;
import org.springframework.stereotype.Component;

import java.util.Map;

/**
 * spring工具类 方便在非spring管理环境中获取bean
 *
 */
@Component
public final class SpringUtils implements BeanFactoryPostProcessor, ApplicationContextAware
{
    /** Spring应用上下文环境 */
    private static ConfigurableListableBeanFactory beanFactory;

    private static ApplicationContext applicationContext;


    public static Map getBeansByAnnotation(Class clsName) throws BeansException{

        return beanFactory.getBeansWithAnnotation(clsName);
    }

    @Override
    public void postProcessBeanFactory(ConfigurableListableBeanFactory beanFactory) throws BeansException
    {
        SpringUtils.beanFactory = beanFactory;
    }

    @Override
    public void setApplicationContext(ApplicationContext applicationContext) throws BeansException
    {
        SpringUtils.applicationContext = applicationContext;
    }

    /**
     * 获取对象
     *
     * @param name
     * @return Object 一个以所给名字注册的bean的实例
     * @throws org.springframework.beans.BeansException
     *
     */
    @SuppressWarnings("unchecked")
    public static  T getBean(String name) throws BeansException
    {
        return (T) beanFactory.getBean(name);
    }

    /**
     * 获取类型为requiredType的对象
     *
     * @param clz
     * @return
     * @throws org.springframework.beans.BeansException
     *
     */
    public static  T getBean(Class clz) throws BeansException
    {
        T result = (T) beanFactory.getBean(clz);
        return result;
    }

    /**
     * 如果BeanFactory包含一个与所给名称匹配的bean定义,则返回true
     *
     * @param name
     * @return boolean
     */
    public static boolean containsBean(String name)
    {
        return beanFactory.containsBean(name);
    }

    /**
     * 判断以给定名字注册的bean定义是一个singleton还是一个prototype。 如果与给定名字相应的bean定义没有被找到,将会抛出一个异常(NoSuchBeanDefinitionException)
     *
     * @param name
     * @return boolean
     * @throws org.springframework.beans.factory.NoSuchBeanDefinitionException
     *
     */
    public static boolean isSingleton(String name) throws NoSuchBeanDefinitionException
    {
        return beanFactory.isSingleton(name);
    }

    /**
     * @param name
     * @return Class 注册对象的类型
     * @throws org.springframework.beans.factory.NoSuchBeanDefinitionException
     *
     */
    public static Class getType(String name) throws NoSuchBeanDefinitionException
    {
        return beanFactory.getType(name);
    }

    /**
     * 如果给定的bean名字在bean定义中有别名,则返回这些别名
     *
     * @param name
     * @return
     * @throws org.springframework.beans.factory.NoSuchBeanDefinitionException
     *
     */
    public static String[] getAliases(String name) throws NoSuchBeanDefinitionException
    {
        return beanFactory.getAliases(name);
    }

    /**
     * 获取aop代理对象
     *
     * @param invoker
     * @return
     */
    @SuppressWarnings("unchecked")
    public static  T getAopProxy(T invoker)
    {
        return (T) AopContext.currentProxy();
    }

    /**
     * 获取当前的环境配置,无配置返回null
     *
     * @return 当前的环境配置
     */
    public static String[] getActiveProfiles()
    {
        return applicationContext.getEnvironment().getActiveProfiles();
    }

}
OK, 大功告成. 终于舒服了, 终于不用写if...else...了, 个人感觉这样处理起来会更加优雅. 写代码最重要是什么, 是优雅~
以上!
参考文章:
使用 Spring integration 在Springboot中集成Mqtt
Spring Integration(一)概述
附:
动态添加主题方式:
import org.springframework.beans.factory.annotation.Autowired;
import org.springframework.integration.mqtt.inbound.MqttPahoMessageDrivenChannelAdapter;
import org.springframework.stereotype.Service;

import java.util.Arrays;

/**
 * MqttService
 *
 * @author hengzi
 * @date 2022/8/25
 */
@Service
public class MqttService {

    @Autowired
    private MqttPahoMessageDrivenChannelAdapter adapter;


    public void addTopic(String topic) {
        addTopic(topic, 1);
    }

    public void addTopic(String topic,int qos) {
        String[] topics = adapter.getTopic();
        if(!Arrays.asList(topics).contains(topic)){
            adapter.addTopic(topic,qos);
        }
    }

    public void removeTopic(String topic) {
        adapter.removeTopic(topic);
    }

}
直接调用就行
深入解析C++中动态数组的初始化机制,涵盖new操作符的不同用法、基本类型与类对象的初始化差异,以及为何在现代C++开发中应优先使用std::vector。
本文提供Android接入MQTT服务并控制ESP8266的完整方案。通过规划主题、配置Android依赖与权限、订阅温湿度数据及下发LED控制指令,实现双向通信。适用于具备基础编程知识的开发者,帮助快速搭建物联网联调环境,解决连接失败、数据不同步等常见问题。
命名空间的基本概念与常见引入问题在C++等编程语言中,命名空间(namespace)是一种将代码标识符(如变量、函数、类名)封装在特定名称下的机制,其主要目的是避免命名冲突,尤其是在大型项目或使用多个第三方库时。使用“using namespace”指令可以将指定命名空间中的所有名称引入当前作用域,

理解递归的基本原理在C语言中,递归是一种函数调用自身的编程技术。要掌握它,首先需要理解其核心思想:将一个复杂的大问题,分解为一个或几个与原问题相似但规模更小的子问题,直到子问题足够简单,可以直接求解。这个过程通常包含两个关键部分:递归出口和递归体。递归出口定义了问题何时不再继续分解,即最简单、可直接

递归函数的基本概念与适用场景在C语言编程中,递归是一种函数调用自身的编程技巧。它并非适用于所有问题,但在处理某些具有自相似结构的问题时,能提供极其清晰和优雅的解决方案。递归的核心思想是将一个大规模问题分解为一个或多个同类型但规模更小的子问题,直到子问题简单到可以直接求解。典型的适用场景包括树形结构的
理解内存管理的基石在Objective-C的编程世界中,内存管理是开发者必须掌握的核心技能之一。它直接关系到应用的性能、稳定性与资源利用效率。与一些采用自动垃圾回收机制的语言不同,Objective-C在很长一段时间里,依赖一套基于引用计数的、需要开发者部分介入的管理规则。这套规则的核心思想是明确的
理解 dealloc 的角色与时机在 iOS 应用开发中,内存管理是保障应用性能与稳定性的基石。dealloc 方法是 Objective-C 中对象生命周期结束时的关键回调,它标志着对象即将被系统回收内存。正确理解其触发时机至关重要:当一个对象的引用计数降为零时,运行时系统会自动调用该对象的 de
内存管理的基石在Objective-C的世界里,内存管理是开发者必须掌握的核心技能之一。作为一门在手动引用计数(MRC)时代诞生的语言,Objective-C要求程序员对对象的生命周期有清晰的认识。dealloc方法正是这一生命周期中至关重要的终点站。它是一个实例方法,当对象的引用计数降为零时,系统

native2ascii 工具的基本定位在Ja va应用程序的国际化与本地化开发过程中,处理非拉丁字符集是一个常见且关键的环节。Ja va内部使用Unicode字符集来统一表示全球各种语言的文字,但其属性文件(.properties)在历史上要求使用ASCII编码,或者更准确地说,要求非ASCII字
理解 native2ascii 工具的基本用途在软件开发,特别是涉及国际化处理的场景中,开发者常常需要处理不同编码的文本资源。native2ascii 是 Ja va 开发工具包(JDK)中提供的一个命令行实用程序,其主要功能是将包含本地字符编码(非ASCII字符)的文件,转换为包含 Unicode






Windows 10 是一款微软推出的经典操作系统,拥有硬件兼容性与多任务处理能力。它更偏向把系统状态查看和常用调节动作放在一起,适合需要持续观察和微调设备状态的场景。

极度公式是一款跨平台专业LaTeX公式识别编辑软件,支持OCR公式识别和多平台编辑。和使用说明,避免使用,享受完整功能与稳定支持。做扫描整理、文字提取和表格转换时,它能把识别后的处理步骤接得更顺,资料录入这类场景会省下不少时间。