SpringCloudStreamRabbitMQ动态路由Key问题
 发布于2026-05-06 阅读(0)
扫一扫,手机访问
前言
在实际业务开发中,我们常常会遇到这样的场景:用户完成一系列操作后,系统需要根据不同的操作结果,发送不同类型的通知邮件。如果直接在业务逻辑里同步调用邮件服务,不仅耗时,还会拖慢主流程。这时候,引入消息中间件进行异步解耦,就成了一个自然而然的选择。
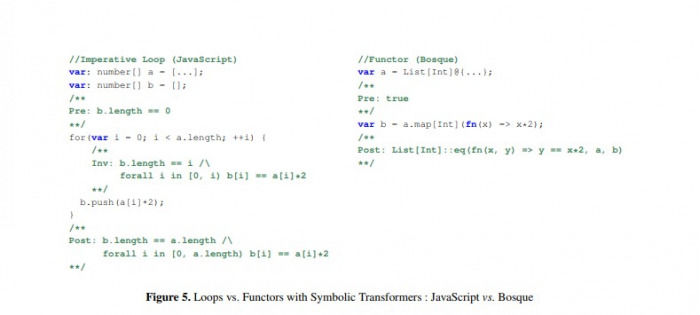
不过,新的问题也随之而来。不同的邮件类型,本质上对应着不同的业务逻辑,我们当然希望它们能被不同的消费者处理。在RabbitMQ的模型里,这就意味着生产者需要根据消息类型,将其投递到不同的队列。如何实现呢?核心就在于路由键(Routing Key)。
如上图所示,一个交换机(Exchange)可以根据不同的路由键,将消息精准地路由到与之绑定的队列中。这正是我们需要的效果。
要实现这个目标,思路其实很清晰:对于消费者而言,它需要声明自己只关心某个特定路由键的消息;而对于生产者,则需要在发送消息时,动态地指定这个消息的路由键。
这里还有一个Spring Cloud Stream的重要概念:group。在绑定RabbitMQ时,一个group就对应一个具体的队列。所以,要区分不同的业务,我们完全可以通过配置不同的group来实现。
例子
接下来,我们通过一个完整的代码示例,来看看如何用Spring Cloud Stream + RabbitMQ实现动态路由。示例包含一个生产者服务和一个消费者服务。
生产者
生产者的配置核心在于两点:一是定义Binder连接RabbitMQ,二是指定动态路由键的表达式。
spring:
  application:
    name: producer
  cloud:
    stream:
      binders: # 绑定MQ服务信息(此处我们是RabbitMQ)
        etpmsRabbitMQ: # 给Binder定义的名称,⽤于后⾯的关联
          type: rabbit # MQ类型,如果是Kafka的话,此处配置kafka
          environment: # MQ环境配置(⽤户名、密码等)
            spring:
              rabbitmq:
                host: localhost
                port: 5672
                username: admin
                password: xxxxxx
      bindings: # 关联整合通道和binder对象
        output: # output是我们定义的通道名称,此处不能乱改
          destination: testExchange # 要使⽤的Exchange名称(消息队列主题名称)
          content-type: text/plain # application/json # 消息类型设置,⽐如json
          binder: etpmsRabbitMQ # 关联MQ服务
      rabbit:
        bindings:
          output:
            producer:
              # 生产者配置RabbitMq的动态路由键
              routingKeyExpression: headers.type
请注意routingKeyExpression: headers.type这行配置。它告诉Spring Cloud Stream:消息的路由键,要从消息头(Header)中名为type的字段去获取。
配置好了,发送消息的代码就非常简单了:
package top.chenyt.producer;

import org.springframework.beans.factory.annotation.Autowired;
import org.springframework.cloud.stream.messaging.Source;
import org.springframework.messaging.support.MessageBuilder;
import org.springframework.stereotype.Service;

/**
 * @author yantao.chen
 */
@Service
public class ProviderService {
    /**
     * 将MessageChannel的封装对象Source注⼊到这⾥使⽤
     */
    @Autowired
    private Source source;

    public void sendMessage(String content, String type) {
        // 向mq中发送消息(并不是直接操作mq,应该操作的是spring cloud stream)
        // 使⽤通道向外发出消息(指的是Source⾥⾯的output通道)
        source.output().send(MessageBuilder.withPayload(content).setHeader("type",type).build());
    }
}
关键在于MessageBuilder.withPayload(content).setHeader("type",type).build()这一句。我们在构建消息时,通过setHeader方法设置了type这个头信息。发送时,框架会自动根据配置的表达式headers.type提取这个值,并将其作为路由键发送到RabbitMQ。
最后,别忘了在主应用类上启用绑定:
package top.chenyt;

import lombok.extern.slf4j.Slf4j;
import org.springframework.boot.SpringApplication;
import org.springframework.boot.autoconfigure.SpringBootApplication;
import org.springframework.cloud.openfeign.EnableFeignClients;
import org.springframework.cloud.stream.annotation.EnableBinding;
import org.springframework.cloud.stream.messaging.Sink;
import org.springframework.cloud.stream.messaging.Source;

/**
 * @ClassName etpms-parent
 * @Author Jinondo
 * @Date 2022/1/31 12:42
 */
@SpringBootApplication
@Slf4j
@EnableBinding({Source.class})
public class ProducerApplication {

    public static void main(String[] args)  {
        SpringApplication.run(ProducerApplication.class, args);
    }

}
总结一下生产者的关键步骤:在配置文件中定义routingKeyExpression,然后在发送消息时通过setHeader设置对应的值。
消费者
消费者的配置稍微复杂一点,因为我们需要定义多个绑定,每个绑定对应一个队列(即一个group),并指定其监听的路由键。
spring:
  application:
    name: consumer
  cloud:
    stream:
      binders: # 绑定MQ服务信息(此处我们是RabbitMQ)
        etpmsRabbitMQ: # 给Binder定义的名称,⽤于后⾯的关联
          type: rabbit # MQ类型,如果是Kafka的话,此处配置kafka
          environment: # MQ环境配置(⽤户名、密码等)
            spring:
              rabbitmq:
                host: localhost
                port: 5672
                username: admin
                password: xxxxx
      bindings: # 关联整合通道和binder对象
        input: # input是我们定义的通道名称,此处不能乱改
          destination: testExchange # 要使⽤的Exchange名称(消息队列主题名称)
          content-type: text/plain # application/json # 消息类型设置,⽐如json,自动将对象转为json
          binder: etpmsRabbitMQ # 关联MQ服务
          group: register
        my-input:
          destination: testExchange # 要使⽤的Exchange名称(消息队列主题名称)
          content-type: text/plain # application/json # 消息类型设置,⽐如json,自动将对象转为json
          binder: etpmsRabbitMQ # 关联MQ服务
          group: task
      rabbit:
        bindings:
          my-input:
            consumer:
              bindingRoutingKey: task
          input:
            consumer:
              bindingRoutingKey: register
仔细看这段配置,我们定义了两个绑定:input和my-input。它们连接的是同一个交换机testExchange,但属于不同的group(register和task),这会在RabbitMQ中创建两个独立的队列。
最关键的部分在spring.cloud.stream.rabbit.bindings下面。我们为每个绑定指定了bindingRoutingKey。这意味着:input通道对应的队列,只绑定路由键为register的消息;my-input通道对应的队列,只绑定路由键为task的消息。
接下来,我们需要定义my-input这个自定义通道的接口:
package top.chenyt.consumer;

import org.springframework.cloud.stream.annotation.Input;
import org.springframework.messaging.SubscribableChannel;

public interface MySink {

    String MY_INPUT = "my-input";

    @Input(MY_INPUT)
    SubscribableChannel myinput();

}
然后,编写消息监听器,分别监听这两个通道:
package top.chenyt.consumer;

import org.springframework.cloud.stream.annotation.StreamListener;
import org.springframework.cloud.stream.messaging.Sink;
import org.springframework.messaging.Message;
import org.springframework.stereotype.Service;

/**
 * @ClassName etpms-parent
 * @Author Jinondo
 * @Date 2022/1/31 12:42
 */
@Service
public class ConsumerMsg {

    @StreamListener(Sink.INPUT)
    public void receiveMessages(Message message) {
        System.out.println("========= input接收到的消息:" + message.getPayload());
    }

    @StreamListener(MySink.MY_INPUT)
    public void receiveMessages02(Message message) {
        System.out.println("========= myinput接收到的消息:" + message.getPayload());
    }
}
最后,在主应用类中启用这两个绑定:
package top.chenyt;

import lombok.extern.slf4j.Slf4j;
import org.springframework.boot.SpringApplication;
import org.springframework.boot.autoconfigure.SpringBootApplication;
import org.springframework.cloud.stream.annotation.EnableBinding;
import org.springframework.cloud.stream.messaging.Sink;
import top.chenyt.consumer.MySink;

/**
 * @ClassName etpms-parent
 * @Author Jinondo
 * @Date 2022/1/31 12:42
 */
@SpringBootApplication
@Slf4j
@EnableBinding({Sink.class, MySink.class})
public class ConsumerApplication {

    public static void main(String[] args)  {
        SpringApplication.run(ConsumerApplication.class, args);
    }

}
至此,整个流程就搭建完成了。当生产者发送一个type头为register的消息时,它会被路由到group为register的队列,并由receiveMessages方法处理。同理,type为task的消息则会由receiveMessages02方法处理。这就完美实现了基于消息类型的动态路由。
总结
通过上面的示例,我们可以看到,利用Spring Cloud Stream的routingKeyExpression和bindingRoutingKey配置,可以非常优雅地实现RabbitMQ的动态路由功能,而无需在代码中编写任何RabbitMQ原生API。这种方法清晰地将配置与业务代码分离,提高了可维护性。
其核心逻辑可以概括为:生产者通过消息头动态传递路由键,消费者通过配置静态声明其绑定的路由键。两者配合,再加上group对队列的隔离,就能构建出清晰、灵活的消息路由方案。希望这个实践思路能为大家在处理类似业务场景时提供一个可靠的参考。
您可能感兴趣的文章:
- SpringCloudStream+RabbitMQ使用中遇到的问题及解决
- 解决SpringCloudStream整合Kafka,两个通道对应同一个topic报错的情况
- SpringCloud Stream 快速入门实例教程
- SpringCloud使用Kafka Streams实现实时数据处理
- SpringCloudStream原理和深入使用小结
- SpringCloud中的Stream服务间消息传递详解
- SpringCloudStream中的消息分区数详解
免责声明:正软商城发布此文仅为传递信息,不代表正软商城认同其观点或证实其描述。
上一篇:Git推送时间修改方式
产品推荐
-

售后无忧
立即购买>- DAEMON Tools Lite 10【序列号终身授权 + 中文版 + Win】
-
¥150.00
office旗舰店
-

售后无忧
立即购买>- DAEMON Tools Ultra 5【序列号终身授权 + 中文版 + Win】
-
¥198.00
office旗舰店
-

售后无忧
立即购买>- DAEMON Tools Pro 8【序列号终身授权 + 中文版 + Win】
-
¥189.00
office旗舰店
-

售后无忧
立即购买>- CorelDRAW X8 简体中文【标准版 + Win】
-
¥1788.00
office旗舰店
-
 正版软件
正版软件
- CentOS Java编译失败如何快速定位问题
- CentOS Ja va编译失败快速定位 在CentOS上编译Ja va项目时遇到报错,这事儿确实让人头疼。错误信息五花八门,但追根溯源,问题往往出在几个常见环节。下面这份从环境到代码的排查指南,能帮你快速锁定症结所在。 一 快速检查清单 遇到编译失败,先别急着逐行看代码。按照下面这个清单走一遍,十
- 12分钟前 0
-
 正版软件
正版软件
- 怎么通过 Collections.binarySearch() 在自定义对象数组列表中进行高效模糊匹配
- 怎么通过 Collections.binarySearch() 在自定义对象数组列表中进行高效模糊匹配 开门见山地说,Collections.binarySearch() 这个工具本身并不支持模糊匹配。它的设计初衷就是进行精确的二分查找,并且要求列表必须已经按照严格一致的排序规则升序排列。那么,如果
- 13分钟前 0
-
 正版软件
正版软件
- 怎么利用 Math.atan2() 结合坐标变量计算目标物体的真实方位角并处理象限判定
- Math.atan2(y, x):计算真实方位角的最优解 在需要计算目标方向或角度的场景里,Math.atan2(y, x)堪称是那个最直接、最可靠的“瑞士军刀”。它最大的魅力在于,能够根据纵轴偏移量(y)和横轴偏移量(x)的顺序,自动处理好所有象限和坐标轴上的特殊情况,最终给出一个范围在-180°
- 13分钟前 0
-
 正版软件
正版软件
- 怎么利用 ZoneId 处理不同时区的日期与时间转换
- 怎么利用 ZoneId 处理不同时区的日期与时间转换 ZoneId 是什么,它和 TimeZone 有什么区别 简单来说,ZoneId 是 Ja va 8 新时间 API 的“时区身份证”。它唯一标识一个时区,比如 "Asia/Shanghai" 或 "America/New_York"。这里有个关
- 13分钟前 0
-
 正版软件
正版软件
- CentOS Java编译环境的优化策略
- CentOS Ja va编译环境的优化策略 一 基础环境优化 一个稳固的地基,决定了上层建筑能有多高。对于Ja va编译环境而言,基础环境的配置就是那个地基。这一步没做好,后续的编译过程很可能磕磕绊绊,甚至反复失败。 安装编译与图形依赖:首先,得把“工具箱”备齐。执行 sudo yum groupi
- 14分钟前 0
最新发布
-
 1
1
-
 2
2
-
 3
3
- C语言中\n是什么意思?换行转义字符详解
- 240天前
-
4
- 探析Spring Boot框架的优点和特色
- 556天前
-
5
- 深入比较PyCharm社区版和专业版的功能
- 494天前
-
6
- 专家观点:谷歌是否会继续支持Golang的探讨
- 470天前
-
 7
7
-
 8
8
- Python实战教程:批量转换多种音乐格式
- 1102天前
-
9
- 如何在在线答题中实现试卷的自动批改和自动评分
- 929天前
相关推荐
热门关注
-

- Xshell 6 简体中文
- ¥899.00-¥1149.00
-

- DaVinci Resolve Studio 16 简体中文
- ¥2550.00-¥2550.00
-

- Camtasia 2019 简体中文
- ¥689.00-¥689.00
-
- Luminar 3 简体中文
- ¥288.00-¥288.00
-
- Apowersoft 录屏王 简体中文
- ¥129.00-¥339.00