

Vue3利用NotificationAPI实现浏览器通知功能
在Vue3项目中,利用ServiceWorker注册showNotification()发送通知,并在notification-sw.js中监听notificationclick事件,即可在页面关闭后点击通知时正确跳转或聚焦窗口,从而避免传统Notification.onclick失效问题。
浏览器通知(Notification API)是个好东西,但很多开发者在实际落地时,往往会遇到一个“坑”:页面开着的时候,通知点击跳转一切正常;一旦用户关了浏览器标签页,再回头去点系统历史通知栏里的那条消息,就经常没反应了。
这个问题,其实根子在于事件监听的对象不对。今天我们就来掰扯清楚,怎么在 Vue3 项目里,用 Service Worker 把这件事彻底搞定。
1. 先说结论
只用 new Notification() 是不够的。要覆盖“旧通知点击跳转”这个场景,关键点在于:

- 发送阶段:优先使用
ServiceWorkerRegistration.showNotification()方法来发送通知。 - 点击阶段:在单独的
public/notification-sw.js文件中,监听notificationclick事件。 - 跳转策略:先尝试查找已存在的窗口并聚焦(
focus()),如果找不到,再打开新窗口(openWindow())。
简单来说,就是把通知点击的处理逻辑,从页面JS里,挪到Service Worker中去。这样,即使页面进程已死,事件依然能被响应。
2. Notification API 参数
2.1 new Notification(title, options)的核心参数
在开始项目落地之前,有必要先回顾一下 Notification API 的几个核心参数,它们是后续所有操作的基础。
title:通知标题(必填项)。body:通知正文。icon:大图标,建议尺寸 192x192 或 256x256。badge:小徽标,在 Android 上常见,建议用单色清晰图片。tag:通知分组标识,相同tag的通知会相互覆盖,避免刷屏。data:自定义数据载荷,这是我们传递跳转链接(url)的关键字段。requireInteraction:设为true表示通知不会自动消失,但各浏览器行为有差异。silent:是否静音,不同浏览器支持度不一。
一个简单的示例是这样的:
new Notification('系统提醒', {
  body: '您有一条待处理消息',
  icon: 'https://example.com/assets/notify-icon.png',
  badge: 'https://example.com/assets/notify-badge.png',
  tag: 'todo-1001',
  requireInteraction: true,
  data: {
    url: 'https://example.com/app/todo?id=1001'
  }
})
2.2 常用事件
notification.onclick:页面存活时生效。页面关闭后,这个事件就不可靠了。notification.onclose:通知关闭时的回调。notification.onerror:通知创建或展示失败的回调。
正是因为页面关闭后 onclick 不靠谱,我们才需要引入 Service Worker 的 notificationclick 事件来解决。
2.3 权限相关 API
Notification.permission:返回default、granted或denied三种状态。Notification.requestPermission():请求用户授权。注意,由用户手势(比如点击按钮)触发,成功率会更高。
3. 项目落地实现(3 步)
理论聊完了,直接上代码。整个实现分三步走。
3.1 注册通知 Service Worker
首先,在项目入口文件 src/main.ts 中注册一个专门用于处理通知的 Service Worker。
if ('serviceWorker' in na vigator) {
  window.addEventListener('load', () => {
    na vigator.serviceWorker.register('/notification-sw.js').catch((error: unknown) => {
      console.warn('[NotificationSW] register failed:', error)
    })
  })
}
这一步的作用,就是告诉浏览器:以后所有通知的点击事件,都交给 public/notification-sw.js 这个脚本来处理。
3.2 统一封装通知发送(优先 SW,失败降级)
接下来,我们封装一个组合式函数 useBrowserNotification.ts,统一管理所有通知的发送逻辑。
这个实现有几个关键点:
- 权限不是
granted,直接拦截。 - 优先获取 Service Worker 注册对象,并用
registration.showNotification()发送。 - 通过
data.url传递跳转目标地址。 - 如果 Service Worker 发送失败,则降级到传统的
new Notification()方式。
核心代码片段如下:
const notificationOptions: NotificationOptions = {
  body: options.body,
  icon: notificationIcon,
  badge: notificationBadgeIcon,
  requireInteraction: options.requireInteraction ?? false,
  tag: options.tag,
  data: {
    url: options.clickUrl ?? ''
  }
}

await registration.showNotification(options.title, notificationOptions)
3.3 在 SW 中处理点击(关键中的关键)
最后,也是最重要的,在 public/notification-sw.js 中编写点击事件的处理逻辑。
self.addEventListener('notificationclick', (event) => {
  event.notification.close()

  const targetUrl = String(event.notification?.data?.url || '').trim()
  if (!targetUrl) return

  event.waitUntil(
    self.clients.matchAll({ type: 'window', includeUncontrolled: true }).then((clients) => {
      for (const client of clients) {
        if (client.url === targetUrl && 'focus' in client) {
          return client.focus()
        }
      }
      return self.clients.openWindow(targetUrl)
    })
  )
})
这段逻辑保证了:
- 如果有现成的页面窗口,就聚焦它。
- 如果没有,就打开一个新窗口并跳转到目标地址。
- 即使浏览器关闭后,点击历史通知,依然能通过 Service Worker 唤起站点。
4. 为什么“旧通知点击可跳转”
这背后的原理其实很简单:点击系统通知时,事件是直接发送给 Service Worker 的,它完全不依赖页面是否还活着。所以,只要 Service Worker 还在生效,就能完成 focus 或 openWindow 操作,自然也就解决了“人走茶凉”的问题。
5. 注意
- 开发环境必须使用 HTTPS 或
localhost,否则 Notification 和 Service Worker 都可能不可用。 clickUrl建议使用绝对地址,避免路由 base 配置造成解析偏差。tag需要按业务维度设计,比如module-item-123,防止同类通知刷屏。- 对于权限被
denied的情况,最好在界面上给出引导提示,让用户手动去浏览器设置中开启。 requireInteraction的具体行为在不同浏览器上存在差异,建议在目标浏览器上进行实机验证。
useBrowserNotification全量源码
import { computed, ref, type ComputedRef, type Ref } from 'vue'
import notificationBadgeIcon from '@/assets/images/notify-badge-placeholder.png'
import notificationIcon from '@/assets/images/notify-icon-placeholder.png'

type NotifyPermission = NotificationPermission | 'unsupported'

interface SendBrowserNotificationOptions {
  title: string
  body: string
  clickUrl?: string
  tag?: string
  requireInteraction?: boolean
  autoCloseMs?: number
  onClick?: () => void
}

interface UseBrowserNotification {
  message: Ref
  isSupported: Ref
  permissionState: Ref
  supportText: ComputedRef
  permissionLabel: ComputedRef
  requestNotifyPermission: () => Promise
  sendBrowserNotification: (options: SendBrowserNotificationOptions) => void
}

export const useBrowserNotification = (): UseBrowserNotification => {
  const message = ref('等待操作')
  const isSupported = ref(typeof window !== 'undefined' && 'Notification' in window)
  const permissionState = ref(isSupported.value ? Notification.permission : 'unsupported')

  const supportText = computed(() => (isSupported.value ? '是' : '否'))

  const permissionLabel = computed(() => {
    if (permissionState.value === 'unsupported') return '浏览器不支持'
    if (permissionState.value === 'granted') return '已授权'
    if (permissionState.value === 'denied') return '已拒绝'
    return '未授权(default)'
  })

  const updatePermissionState = (): void => {
    permissionState.value = isSupported.value ? Notification.permission : 'unsupported'
  }

  const requestNotifyPermission = async (): Promise => {
    if (!isSupported.value) {
      message.value = '当前浏览器不支持 Notification API'
      return
    }
    try {
      const result = await Notification.requestPermission()
      permissionState.value = result
      message.value = `权限申请结果:${result}`
    } catch (error) {
      message.value = '申请通知权限失败,请稍后重试'
      console.error('Notification.requestPermission failed:', error)
    }
  }

  const getServiceWorkerRegistration = async (): Promise => {
    if (typeof window === 'undefined' || !('serviceWorker' in na vigator)) return null
    try {
      return await na vigator.serviceWorker.getRegistration()
    } catch {
      return null
    }
  }

  const sendBrowserNotification = (options: SendBrowserNotificationOptions): void => {
    if (!isSupported.value) {
      message.value = '当前浏览器不支持 Notification API'
      return
    }

    updatePermissionState()

    if (permissionState.value !== 'granted') {
      message.value = '请先授权通知权限后再发送'
      return
    }

    const autoCloseMs = options.autoCloseMs ?? 4000

    ;(async () => {
      const registration = await getServiceWorkerRegistration()

      if (registration) {
        try {
          const notificationOptions: NotificationOptions = {
            body: options.body,
            icon: notificationIcon,
            badge: notificationBadgeIcon,
            requireInteraction: options.requireInteraction ?? false,
            tag: options.tag,
            data: {
              url: options.clickUrl ?? ''
            }
          }
          await registration.showNotification(options.title, notificationOptions)
          message.value = `通知已发送:${options.title}`
          return
        } catch (error) {
          console.warn('ServiceWorker showNotification failed, fallback to page notification:', error)
        }
      }

      try {
        const notificationOptions: NotificationOptions = {
          body: options.body,
          icon: notificationIcon,
          badge: notificationBadgeIcon,
          requireInteraction: options.requireInteraction ?? false
        }

        // 不传 tag 时允许系统通知叠加显示;传 tag 时按 tag 覆盖同组通知
        if (options.tag) {
          notificationOptions.tag = options.tag
        }

        const notice = new Notification(options.title, notificationOptions)

        const shouldAutoClose = !(options.requireInteraction ?? false)
        const autoCloseTimer = shouldAutoClose
          ? window.setTimeout(() => {
              notice.close()
            }, autoCloseMs)
          : null

        notice.onclick = () => {
          window.focus()
          notice.close()
          if (options.clickUrl) {
            window.open(options.clickUrl, '_blank', 'noopener,noreferrer')
          }
          options.onClick?.()
          message.value = '已点击通知,窗口已尝试聚焦'
        }

        notice.onclose = () => {
          if (autoCloseTimer !== null) {
            window.clearTimeout(autoCloseTimer)
          }
        }

        notice.onerror = () => {
          if (autoCloseTimer !== null) {
            window.clearTimeout(autoCloseTimer)
          }
          message.value = '通知发送失败,请检查浏览器通知设置'
        }

        message.value = `通知已发送:${options.title}`
      } catch (error) {
        message.value = '创建通知失败,请检查浏览器设置'
        console.error('Notification constructor failed:', error)
      }
    })().catch((error: unknown) => {
      message.value = '创建通知失败,请检查浏览器设置'
      console.error('sendBrowserNotification failed:', error)
    })
  }

  return {
    message,
    isSupported,
    permissionState,
    supportText,
    permissionLabel,
    requestNotifyPermission,
    sendBrowserNotification
  }
}
public/notification-sw.js全量源码
self.addEventListener('notificationclick', (event) => {
  event.notification.close()

  const targetUrl = String(event.notification?.data?.url || '').trim()
  if (!targetUrl) return

  event.waitUntil(
    self.clients.matchAll({ type: 'window', includeUncontrolled: true }).then((clients) => {
      for (const client of clients) {
        if (client.url === targetUrl && 'focus' in client) {
          return client.focus()
        }
      }
      return self.clients.openWindow(targetUrl)
    }),
  )
}) 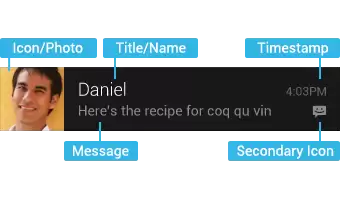
本节引言: 这一节要讲的,是 Android 里用来在状态栏展示通知信息的控件:Notification。做过 Android 开发的人,对它多半都不陌生。不过不少网上的 Notification 教程,讲的还是 2.x 时代的用法;可现在常见的 Android 设备,基本已经是 4.x 以上,甚至
解析六个GitHub AI开源项目的具体用途,包括软件静态分析、智能体回答检查、多语言配音、求职材料生成、本地代码检索及动态歌词展示,帮助开发者根据实际需求筛选工具并正确验证结果。
遇到OpenCode Skills无法加载或配置无效?本文手把手教你完成Skills的安装、环境变量设置及本地调试,避开常见坑点,让AI助手更懂你的代码习惯。
解决 Visual Studio 2022 编辑时不显示代码分析警告的问题。指南涵盖 .NET 项目实时分析设置、Roslyn 分析器范围调整及错误列表来源筛选,确保开发者能高效利用实时代码诊断功能。
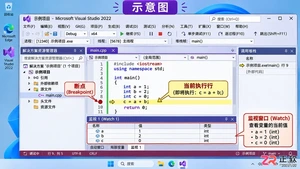
详解 Visual Studio 2022 调试技巧:包括断点设置、监视窗口开启方法、变量添加步骤以及通过 F10 单步执行观察变量值变化的全过程。
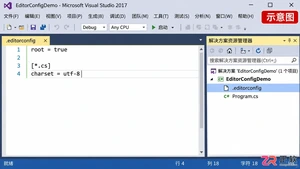
针对 Visual Studio 2017 缺乏全局默认编码选项的情况,详解如何利用 .editorconfig 设定项目级 UTF-8 无 BOM 规则,以及手动转换现有文件并校验字节的方法。
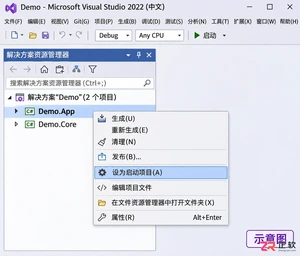
解决 Visual Studio 2022 F5 调试报错问题,通过设置启动项目、检查解决方案属性及正确区分类库与应用项目,快速恢复调试功能。
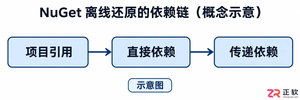
解决Visual Studio 2022离线环境中NuGet包还原失败的难题,涵盖依赖链分析、本地源配置、包集收集及隔离验证步骤,帮助开发者构建稳定的离线开发环境。
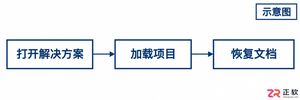
解决Visual Studio 2017大型项目加载慢的实用指南。涵盖性能监测、扩展管理、文档恢复优化及版本兼容性检查,帮助开发者精准定位瓶颈并提升工作效率。
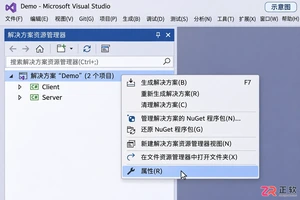
详解 Visual Studio 2022 多启动项目配置方法,包括启动动作选择、顺序调整及调试技巧,帮助开发者高效调试分布式或前后端分离应用。




火山引擎是字节跳动旗下企业级云与AI服务平台。聚焦大模型核心能力,依托字节自研豆包多模态大模型,凭借火山方舟一站式平台,提供模型精调、推理部署、智能应用搭建等全链路服务,结合高性能AI算力,助力各行业快速落地大模型数字化与智能化应用。