怎么使用Java多线程Future获取异步任务
Runnable的局限性在前文中我们谈到,通过编码实现Runnable接口,将获得具有边界性的"任务",在指定的线程(或者线程池)中运行。重新观察该接口,不难发现它并没有方法返回值:publicinterfaceRunnable{voidrun();}在JDK1.5之前,想利用任务的执行结果,需要小心的操作线程访问临界区资源。使用回调进行解耦是非常不错的选择。练手小Demo--回顾既往文章知识注意,为了减少篇幅使用了lambda,但jdk1.5之前并不支持lambda将计算任务分离到其他线程执行,再回到主
Runnable的局限性
在前文中我们谈到,通过编码实现Runnable接口,将获得具有边界性的 "任务",在指定的线程(或者线程池)中运行。
重新观察该接口,不难发现它并没有方法返回值:
public interface Runnable {
    void run();
}
在JDK1.5之前,想利用任务的执行结果,需要小心的操作线程访问临界区资源。使用 回调 进行解耦是非常不错的选择。
练手小Demo -- 回顾既往文章知识
注意,为了减少篇幅使用了lambda,但jdk1.5之前并不支持lambda
将计算任务分离到其他线程执行,再回到主线程消费结果
我们将计算、IO等耗时任务丢到其他线程,让主线程专注于自身业务,假想它在接受用户输入以及处理反馈,但我们略去这一部分
我们可以设计出类似下面的代码:
虽然它还有很多不合理之处值得优化,但也足以用于演示
class Demo {
    static final Object queueLock = new Object();
    static List mainQueue = new ArrayList<>();
    static boolean running = true;
    static final Runnable FINISH = () -> running = false;
    public static void main(String[] args) {
        synchronized (queueLock) {
            mainQueue.add(Demo::onStart);
        }
        while (running) {
            Runnable runnable = null;
            synchronized (queueLock) {
                if (!mainQueue.isEmpty())
                    runnable = mainQueue.remove(0);
            }
            if (runnable != null) {
                runnable.run();
            }
            Thread.yield();
        }
    }
    public static void onStart() {
        //...
    }
    public static void finish() {
        synchronized (queueLock) {
            mainQueue.clear();
            mainQueue.add(FINISH);
        }
    }
}
再模拟一个计算的线程和任务回调:
interface Callback {
    void onResultCalculated(int result);
}
class CalcThread extends Thread {
    private final Callback callback;
    private final int a;
    private final int b;
    public CalcThread(Callback callback, int a, int b) {
        this.callback = callback;
        this.a = a;
        this.b = b;
    }
    @Override
    public void run() {
        super.run();
        try {
            Thread.sleep(10);
        } catch (InterruptedException e) {
            e.printStackTrace();
        }
        final int result = a + b;
        System.out.println("threadId" + Thread.currentThread().getId() + ",calc result:" + result + ";" + System.currentTimeMillis());
        synchronized (queueLock) {
            mainQueue.add(() -> callback.onResultCalculated(result));
        }
    }
}
填充一下onStart业务:
class Demo {
    public static void onStart() {
        System.out.println("threadId" + Thread.currentThread().getId() + ",onStart," + System.currentTimeMillis());
        new CalcThread(result -> {
            System.out.println("threadId" + Thread.currentThread().getId() + ",onResultCalculated:" + result + ";" + System.currentTimeMillis());
            finish();
        }, 200, 300).start();
    }
}
复习:优化为使用Runnable
在前文我们提到,如果业务仅关注任务的执行,并不过于关心线程本身,则可以利用Runnable:
class Demo {
    static class CalcRunnable implements Runnable {
        private final Callback callback;
        private final int a;
        private final int b;
        public CalcRunnable(Callback callback, int a, int b) {
            this.callback = callback;
            this.a = a;
            this.b = b;
        }
        @Override
        public void run() {
            try {
                Thread.sleep(10);
            } catch (InterruptedException e) {
                e.printStackTrace();
            }
            final int result = a + b;
            System.out.println("threadId" + Thread.currentThread().getId() + ",calc result:" + result + ";" + System.currentTimeMillis());
            synchronized (queueLock) {
                mainQueue.add(() -> callback.onResultCalculated(result));
            }
        }
    }
    public static void onStart() {
        System.out.println("threadId" + Thread.currentThread().getId() + ",onStart," + System.currentTimeMillis());
        new Thread(new CalcRunnable(result -> {
            System.out.println("threadId" + Thread.currentThread().getId() + ",onResultCalculated:" + result + ";" + System.currentTimeMillis());
            finish();
        }, 200, 300)).start();
    }
}
不难想象出:我们非常需要
让特定线程、特定类型的线程方便地接收任务,回顾本系列文章中的 线程池篇 ,线程池是应运而生
拥有比Synchronize更轻量的机制
拥有更方便的数据结构
至此,我们可以体会到:JDK1.5之前,因为JDK的功能不足,Java程序对于线程的使用 较为粗糙。
为异步而生的Future
终于在JDK1.5中,迎来了新特性: Future 以及先前文章中提到的线程池, 时光荏苒,一晃将近20年了。
/** * 略 * @since 1.5 * @author Doug Lea * @paramThe result type returned by this Future's {@code get} method */ public interface Future { boolean cancel(boolean mayInterruptIfRunning); boolean isCancelled(); boolean isDone(); V get() throws InterruptedException, ExecutionException; V get(long timeout, TimeUnit unit) throws InterruptedException, ExecutionException, TimeoutException; }
尽管已经移除了API注释,但仍然能够理解每个API的含义,不多做赘述。
显而易见,为了增加返回值,没有必要用如此复杂的 接口来替代 Runnable。简单思考后可以对返回值的情况进行归纳:
返回Runnable中业务的结果,例如计算、读取资源等
单纯的在Runnable执行完毕后返回一个结果
从业务层上看,仅需要如下接口即可,它增加了返回值、并可以更友好地让使用者处理异常:
作者按:抛开底层实现,仅看业务方编码需要
public interface Callable{ /** * Computes a result, or throws an exception if unable to do so. * * @return computed result * @throws Exception if unable to compute a result */ V call() throws Exception; }
显然,JDK需要提供后向兼容能力:
Runnable 不能够丢弃,也不应当丢弃
不能要求使用者完全的重构代码
所以一并提供了适配器,让使用者进行简单的局部重构即可用上新特性
static final class RunnableAdapterimplements Callable { final Runnable task; final T result; RunnableAdapter(Runnable task, T result) { this.task = task; this.result = result; } public T call() { task.run(); return result; } }
而Future恰如其名,它代表了在 "未来" 的一个结果和状态,为了更方便地处理异步而生。
并且内置了 FutureTask,在 FutureTask详解 章节中再行展开。
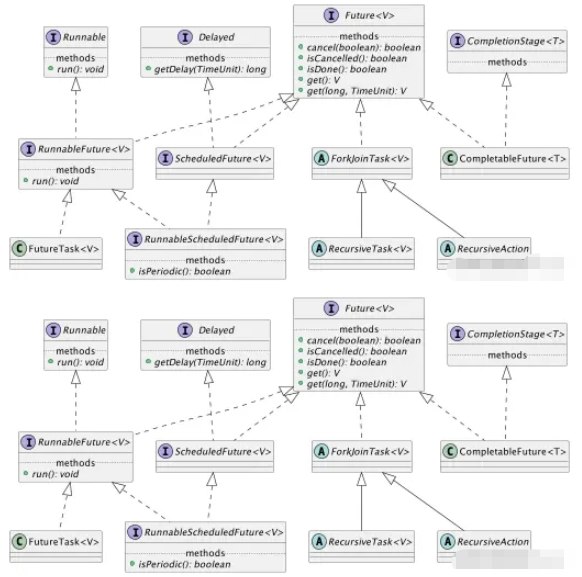
类图
在JDK1.8的基础上,看一下精简的类图结构:
FutureTask详解
构造函数
public class FutureTask {
    public FutureTask(Callable callable) {
        if (callable == null)
            throw new NullPointerException();
        this.callable = callable;
        this.state = NEW;       // ensure visibility of callable
    }
    public FutureTask(Runnable runnable, V result) {
        this.callable = Executors.callable(runnable, result);
        this.state = NEW;       // ensure visibility of callable
    }
}
生命周期
public class FutureTask {
    //新建
    private static final int NEW = 0;
    //处理中
    private static final int COMPLETING = 1;
    //正常
    private static final int NORMAL = 2;
    //异常
    private static final int EXCEPTIONAL = 3;
    //已取消
    private static final int CANCELLED = 4;
    //中断中
    private static final int INTERRUPTING = 5;
    //已中断
    private static final int INTERRUPTED = 6;
}
可能的生命周期转换如下:
NEW -> COMPLETING -> NORMAL
NEW -> COMPLETING -> EXCEPTIONAL
NEW -> CANCELLED
NEW -> INTERRUPTING -> INTERRUPTED
JDK中原汁原味的解释如下:
The run state of this task, initially NEW. The run state transitions to a terminal state only in methods set, setException, and cancel. During completion, state may take on transient values of COMPLETING (while outcome is being set) or INTERRUPTING (only while interrupting the runner to satisfy a cancel(true)). Transitions from these intermediate to final states use cheaper ordered/lazy writes because values are unique and cannot be further modified.
核心方法
本节从以下三块入手阅读源码
状态判断
取消
获取结果
状态判断API的实现非常简单
public class FutureTask {
    public boolean isCancelled() {
        return state >= CANCELLED;
    }
    public boolean isDone() {
        return state != NEW;
    }
}
取消:
当前状态为
NEW且 CAS修改 state 成功,否则返回取消失败如果
mayInterruptIfRunning则中断在执行的线程并CAS修改state为INTERRUPTED调用 finishCompletion
删除并通知所有等待的线程
调用done()
设置callable为null
public class FutureTask {
    public boolean cancel(boolean mayInterruptIfRunning) {
        if (!(state == NEW &&
                UNSAFE.compareAndSwapInt(this, stateOffset, NEW,
                        mayInterruptIfRunning ? INTERRUPTING : CANCELLED))) {
            return false;
        }
        try {    // in case call to interrupt throws exception
            if (mayInterruptIfRunning) {
                try {
                    Thread t = runner;
                    if (t != null)
                        t.interrupt();
                } finally { // final state
                    UNSAFE.putOrderedInt(this, stateOffset, INTERRUPTED);
                }
            }
        } finally {
            finishCompletion();
        }
        return true;
    }
    private void finishCompletion() {
        // assert state > COMPLETING;
        for (WaitNode q; (q = waiters) != null; ) {
            if (UNSAFE.compareAndSwapObject(this, waitersOffset, q, null)) {
                for (; ; ) {
                    Thread t = q.thread;
                    if (t != null) {
                        q.thread = null;
                        LockSupport.unpark(t);
                    }
                    WaitNode next = q.next;
                    if (next == null)
                        break;
                    q.next = null; // unlink to help gc
                    q = next;
                }
                break;
            }
        }
        done();
        callable = null;        // to reduce footprint
    }
}
获取结果: 先判断状态,如果未进入到 COMPLETING(即为NEW状态),则阻塞等待状态改变,返回结果或抛出异常
public class FutureTask {
    public V get() throws InterruptedException, ExecutionException {
        int s = state;
        if (s <= COMPLETING)
            s = awaitDone(false, 0L);
        return report(s);
    }
    public V get(long timeout, TimeUnit unit)
            throws InterruptedException, ExecutionException, TimeoutException {
        if (unit == null)
            throw new NullPointerException();
        int s = state;
        if (s <= COMPLETING &&
                (s = awaitDone(true, unit.toNanos(timeout))) <= COMPLETING)
            throw new TimeoutException();
        return report(s);
    }
    private V report(int s) throws ExecutionException {
        Object x = outcome;
        if (s == NORMAL)
            return (V) x;
        if (s >= CANCELLED)
            throw new CancellationException();
        throw new ExecutionException((Throwable) x);
    }
}
如何使用
而使用则非常简单,也非常的朴素。
我们以文中的的例子进行改造:
沿用原Runnable逻辑
移除回调,增加
CalcResult将
CalcResult对象作为既定返回结果,Runnable中设置其属性
class Demo {
   static class CalcResult {
      public int result;
   }
   public static void onStart() {
      System.out.println("threadId" + Thread.currentThread().getId() + ",onStart," + System.currentTimeMillis());
      final CalcResult calcResult = new CalcResult();
      Future<CalcResult> resultFuture = Executors.newSingleThreadExecutor().submit(() -> {
         try {
            Thread.sleep(10);
         } catch (InterruptedException e) {
            e.printStackTrace();
         }
         final int result = 200 + 300;
         System.out.println("threadId" + Thread.currentThread().getId() + ",calc result:" + result + ";" + System.currentTimeMillis());
         calcResult.result = result;
      }, calcResult);
      System.out.println("threadId" + Thread.currentThread().getId() + "反正干点什么," + System.currentTimeMillis());
      if (resultFuture.isDone()) {
         try {
            final int ret = resultFuture.get().result;
            System.out.println("threadId" + Thread.currentThread().getId() + ",get result:" + ret + ";" + System.currentTimeMillis());
         } catch (InterruptedException | ExecutionException e) {
            e.printStackTrace();
         }
      }
      finish();
   }
}
如果直接使用新特性Callback,则如下:
直接返回结果,当然也可以直接返回Integer,不再包裹一层
class Demo {
   public static void onStart() {
      System.out.println("threadId" + Thread.currentThread().getId() + ",onStart," + System.currentTimeMillis());
      ExecutorService executor = Executors.newSingleThreadExecutor();
      Future resultFuture = executor.submit(() -> {
         try {
            Thread.sleep(10);
         } catch (InterruptedException e) {
            e.printStackTrace();
         }
         final int result = 200 + 300;
         System.out.println("threadId" + Thread.currentThread().getId() + ",calc result:" + result + ";" + System.currentTimeMillis());
         final CalcResult calcResult = new CalcResult();
         calcResult.result = result;
         return calcResult;
      });
      System.out.println("threadId" + Thread.currentThread().getId() + "反正干点什么," + System.currentTimeMillis());
      if (resultFuture.isDone()) {
         try {
            final int ret = resultFuture.get().result;
            System.out.println("threadId" + Thread.currentThread().getId() + ",get result:" + ret + ";" + System.currentTimeMillis());
         } catch (InterruptedException | ExecutionException e) {
            e.printStackTrace();
         }
      }
      executor.shutdown();
      finish();
   }
}
相信读者诸君会有这样的疑惑:
为何使用Future比原先的回调看起来粗糙?
首先要明确一点:文中前段的回调Demo,虽然达成了既定目标,但效率并不高!!在当时计算很昂贵的背景下,并不会如此莽撞地使用!
而在JDK1.5开始,提供了大量内容支持多线程开发。考虑到篇幅,会在系列文章中逐步展开。
另外,FutureTask中的CAS与Happens-Before本篇中亦不做展开。
接下来,再做一些引申,简单看一看多线程业务模式。
引申,多线程业务模式
常用的多线程设计模式包括:
Future模式
Master-Worker模式
Guarded Suspension模式
不变模式
生产者-消费
Future模式
文中对于Future的使用方式遵循了Future模式。
业务方在使用时,已经明确了任务被分离到其他线程执行时有等待期,在此期间,可以干点别的事情,不必浪费系统资源。
Master-Worker模式
在程序系统中设计两类线程,并相互协作:
Master线程(单个)
Worker线程
Master线程负责接受任务、分配任务、接收(必要时进一步组合)结果并返回;
Worker线程负责处理子任务,当子任务处理完成后,向Master线程返回结果;
作者按:此时可再次回想一下文章开头的Demo
Guarded Suspension模式
使用缓存队列,使得 服务线程/服务进程 在未就绪、忙碌时能够延迟处理请求。
使用等待-通知机制,将消费
服务的返回结果的方式规范化
不变模式
在并行开发过程中,为确保数据的一致性和正确性,有必要对对象进行同步,而同步操作会对程序系统的性能产生相当的损耗。
因此,使用状态不可改变的对象,依靠其不变性来确保 并行操作 在 没有同步机制 的情况下,保持一致性和正确性。
对象创建后,其内部状态和数据不再发生改变
对象被共享、被多个线程访问
生产者-消费
设计两类线程:若干个生产者线程和若干个消费者线程。
生产者线程负责提交用户请求,消费者线程负责处理用户请求。生产者和消费者之间通过共享内存缓冲区进行通信。
内存缓冲区的意义:
解决是数据在多线程间的共享问题
缓解生产者和消费者之间的性能差
这几种模式从不同角度出发解决特定问题,但亦有一定的相似之处,不再展开。
深入解析C++中动态数组的初始化机制,涵盖new操作符的不同用法、基本类型与类对象的初始化差异,以及为何在现代C++开发中应优先使用std::vector。

谷歌浏览器Mac版官方安装指南 谷歌浏览器Mac版官方安装入口是https://www.google.com/chrome/,需macOS 12+系统、500MB空间,下载.dmg后拖入应用程序安装,支持多设备同步、性能优化与隐私保护功能。 苹果电脑Chrome的安装入口究竟在哪里?这个问题最近可是

IDC预测,未来五年中国企业智能体演进将经历十大关键节点:数据质量决定效率,订阅模式重构,自建项目多被终止。多智能体协同、主动服务、人工监督战略化、AI卓越中心规模化、岗位重塑、战略顾问及治理风险等趋势将重构企业机制与决策范式。

Chrome中JavaScript未执行需依次检查:一、移除站点级禁用并添加允许域名;二、开启全局JavaScript开关;三、禁用干扰扩展;四、在开发者工具中启用JavaScript;五、重置内容设置为默认。 有时在Chrome里打开网页,会发现交互按钮点了没反应,数据加载不出来,页面仿佛“静止”

IE浏览器怀旧版在线网址:一次精准的技术时光回溯 最近,不少老用户和怀旧爱好者在反复搜索一个问题:那个经典的Internet Explorer,如今还能在哪里原汁原味地体验到?答案指向一个特定的地址:https://ie.microsoft.com/legacy/。 这个网站远不止是一个简单的“皮肤


Chrome官方免验证入口为https://www.google.cn/chrome/,提供全平台安装包、免登录即用、本地化安全机制及引擎级性能优化。 到底该去哪里找正版、免费且无需繁琐验证的Chrome浏览器入口?这个问题困扰了不少网友。今天,我们就来直通核心,为大家详细拆解Chrome引擎的官方

Java堆是JVM存储对象的核心内存区域,配置需结合场景:单体应用适中设置;大数据处理需大堆并关注GC停顿;微服务强调快速启动;高并发需精细划分堆区域。关键参数-Xms和-Xmx建议等值以稳定性能。垃圾回收器选择影响效率,如G1适用于大堆,ZGC可实现低停顿。内存错误时需监控堆状态。

Java堆内存溢出错误通常因内存泄漏、数据处理需求过大或JVM参数配置不当引起。排查时可借助jmap、堆转储及MAT等工具定位问题。解决方案包括调整JVM内存参数(如-Xmx)、修复代码中的内存泄漏、优化大数据处理逻辑,并建立持续监控与预防机制,以保障应用稳定运行。
XML在Java开发中用于配置、数据交换等场景。解析方式主要有DOM、SAX、StAX及第三方库。DOM适合操作小文件,SAX/StAX适合处理大文件流,JAXB用于对象与XML映射。选型需结合数据大小、内存、性能及团队熟悉度,现代框架常封装底层解析。






Windows 10 是一款微软推出的经典操作系统,拥有硬件兼容性与多任务处理能力。它更偏向把系统状态查看和常用调节动作放在一起,适合需要持续观察和微调设备状态的场景。

极度公式是一款跨平台专业LaTeX公式识别编辑软件,支持OCR公式识别和多平台编辑。和使用说明,避免使用,享受完整功能与稳定支持。做扫描整理、文字提取和表格转换时,它能把识别后的处理步骤接得更顺,资料录入这类场景会省下不少时间。