Python EasyOCR库的使用方法
说明1、EasyOCR是一个用python编写的OCR三方库。可以在python中调用,用来识别图像中的文字,并输出为文本。2、支持80多种语言的识别,识别精度高,甚至要超过PaddleOCR。安装命令pipinstalleasyocr代码实现importeasyocr#设置识别中英文两种语言reader=easyocr.Reader(["ch_sim","en"],gpu=False)#needtorunonlyoncetoloadmodelintomemoryresult=reader.readtex
说明
1、EasyOCR是一个用python编写的OCR三方库。可以在python中调用,用来识别图像中的文字,并输出为文本。
2、支持80多种语言的识别,识别精度高,甚至要超过PaddleOCR。
安装命令
pip install easyocr
代码实现
import easyocr

#设置识别中英文两种语言
reader = easyocr.Reader(["ch_sim","en"], gpu = False) # need to run only once to load model into memory
result = reader.readtext(r"d:Desktop4A34A16F-6B12-4ffc-88C6-FC86E4DF6912.png", detail = 0)
print(result)
实例扩展:
图文提取的代码
from pathlib import Path
import easyocr


file_url = r"识别图片.jpg"    # 需识别的图片
split_symbol = " "          # 默认空格为分隔符
row_space = 15              # 默认字符高度为15px,当识别出来的字符间距超过这个数值时会换行。


def make_reader():
    # 将模型加载到内存中。模型文件地址 C:Users用户.EasyOCRmodel
    reader = easyocr.Reader(["ch_sim", "en"])
    return reader


def change_to_character(file_url, reader, split_symbol=" ", row_space=15, save_dir="."):
    with open(file_url, "rb") as img:
        img_b = img.read()
    result = reader.readtext(img_b)

    result.sort(key=lambda x: x[0][0][1])  # 按竖直方向,进行排序==>进行分行处理。
    # for i in result:
    #     print(i)
    # print("="*100)

    # 按行进行分组
    content = []
    item = [result[0]]  # 首先放入第一个元素
    for i in result[1:]:
        if row_space >= i[0][0][1] - item[-1][0][0][1] >= 0:
            item.append(i)
        else:
            content.append(item)
            item = [i]
    content.append(item)

    filemane = Path(file_url).name.split(".")[0]
    with open(f"{save_dir}/{filemane}.txt", "w", encoding="utf8") as t:
        for i in content:                     # i 为每一行的内容
            i.sort(key=lambda x: x[0][0][0])  # 对每行的内容进行先后排序
            for r in i:
                # print(r)
                t.write(r[1] + split_symbol)
            t.write("
")
    return content


if __name__ == "__main__":
    change_to_character(file_url,  make_reader())
UI 界面的代码
import tkinter as tk
from tkinter import filedialog
from PIL import Image, ImageTk
from pathlib import Path
from character import change_to_character, make_reader
from threading import Thread
import time

# class Showing(tk.Frame):
#     def __init__(self, master=None):
#         super().__init__(master)
#         self.master = master
#         self.pack()
#         # self.img = tk.PhotoImage(file=r"C:UsersyanhyDesktop捕获22.PNG")
#         self.create_widgets()
#
#     def create_widgets(self):
#         self.img = tk.PhotoImage(file=r"C:UsersyanhyDesktop捕获22.PNG")
#         self.img_wig = tk.Label(self, image=self.img)
#         self.img_wig.pack()


# 最外层窗口设置
root = tk.Tk()
root.title("图片文字识别程序                    联系:410889472@qq.com")
window_x = root.winfo_screenwidth()
window_y = root.winfo_screenheight()
WIDTH = 1200
HEIGHT = 750
x = (window_x - WIDTH) / 2  # 水平居中
y = (window_y - HEIGHT) / 3  # 垂直偏上
root.geometry(f"{WIDTH}x{HEIGHT}+{int(x)}+{int(y)}")
root.resizable(width=False, height=False)

# 》》》》》》》》》》》》》》》》》》》》》》》》》》》》》》》》》》》》》》》》》
Row_space = 15
File_url_list = []
Img_type = [".jpg", ".jpeg", ".png", ".gif"]
Split_symbol = " "                               # 间隔符。
Save_dir = Path.cwd().joinpath("img_to_word")
if Save_dir.is_dir():
    pass
else:
    Path.mkdir(Save_dir)

# 》》》》》》》》》》》》》》》》》》》》》》》》》》》》》》》》》》》》》》》》》

def test():
    print(f"{Row_space=}")


def choose_file():       # 获取导入的图片路径地址
    global show_img, img_label, text, File_url_list
    filenames = filedialog.askopenfilenames()
    if len(filenames) == 1 and len(File_url_list) == 0:       # 单张图片导入,显示图片
        if Path(filenames[0]).suffix.lower() in Img_type:     # 判断是否图片类型
            File_url_list = list(filenames)
            try:
                if text.winfo_exists():
                    text.destroy()
            except NameError as e:
                print(f"choose_file提示:张图片导入错误>>> {e}")
            try:
                if img_label.winfo_exists():
                    img_label.destroy()
            except NameError as e:
                print(f"choose_file提示:单张图片导入错误>>> {e}")
            img = Image.open(File_url_list[0]).resize((560, 660))
            # print(img.size)
            show_img = ImageTk.PhotoImage(image=img)
            img_label = tk.Label(f_left, image=show_img)
            img_label.pack()
        else:
            print("导入的是非图像格式")
    else:                                     # 多张图片导入,显示列表。
        try:
            if img_label.winfo_exists():
                img_label.destroy()
        except NameError as e:
            print(f"提示:多张图片导入错误>>> {e}")
        try:
            if text.winfo_exists():
                text.destroy()
        except NameError as e:
            print(f"提示:多张图片导入错误>>> {e}")
        text = tk.Text(f_left, spacing1=5, spacing3=5)
        text.pack(fill="both", expand=True)


        for i in filenames:
            if Path(i).suffix.lower() in Img_type:
                File_url_list.append(i)
            else:
                pass
        File_url_list = set(File_url_list)
        for i in list(File_url_list):       # 把文件写入到文本框中
            text.insert("end", str(list(File_url_list).index(i)+1) + ": " + i + "
")
        File_url_list = list(File_url_list)
    print(f"{File_url_list=}")


def choose_dir():
    global show_img, img_label, text, File_url_list
    directoryname = filedialog.askdirectory()
    print(f"{directoryname=}")
    try:
        if img_label.winfo_exists():
            img_label.destroy()
    except NameError as e:
        print(f"choose_dir提示:多张图片导入错误>>> {e}")
    try:
        if text.winfo_exists():
            text.destroy()
    except NameError as e:
        print(f"choose_dir提示:多张图片导入错误>>> {e}")
    text = tk.Text(f_left, spacing1=5, spacing3=5)
    text.pack(fill="both", expand=True)

    for i in Path(directoryname).iterdir():       # 获取文件夹下的所有文件。
        if Path(i).suffix.lower() in Img_type:
            File_url_list.append(i.as_posix())    # as_posix() 把Path型转为字符串。
        else:
            pass
    File_url_list = set(File_url_list)
    for i in list(File_url_list):  # 把文件写入到文本框中
        text.insert("end", str(list(File_url_list).index(i) + 1) + ": " + i + "
")
    File_url_list = list(File_url_list)
    print(f"{File_url_list=}")


def clear_file_list():
    global File_url_list
    File_url_list.clear()
    try:
        if img_label.winfo_exists():
            img_label.destroy()
    except NameError as e:
        print(f"clear_file_list提示:清空错误>>> {e}")
    try:
        if text.winfo_exists():
            text.destroy()
    except NameError as e:
        print(f"clear_file_list提示:清空错误错误>>> {e}")


def get_entry1():       # 设置换行间距变量值
    global Row_space
    num = entry1.get()
    if num.isdigit():
        if int(num) > 0:
            Row_space = int(num)
    else:
        entry1.delete(0, "end")
        entry1.insert(0, 15)
        Row_space = 15


def set_split_symbol():
    global Split_symbol
    Split_symbol = entry2.get()
    print(f"{Split_symbol=}")


def do_change():
    if File_url_list:
        v.set("文字提取中,请稍后……")
        button_do.config(state="disable")        # 使按钮不可用。
        # ========================================
        def main():
            reader = make_reader()
            for i in File_url_list:
                content = change_to_character(i, reader, row_space=Row_space, split_symbol=Split_symbol, save_dir=Save_dir)
                read_text.delete(1.0, "end")
                for c in content:  # i 为每一行的内容
                    c.sort(key=lambda x: x[0][0][0])  # 对每行的内容进行先后排序
                    for r in c:
                        # print(r)
                        read_text.insert("end", r[1] + Split_symbol)
                    read_text.insert("end", "
")
            v.set("文字提取结束。")
            button_do.config(state="normal")     # 恢复按钮可用。
        # ========================================
        t = Thread(target=main, daemon=True)
        t.start()

    else:
        v.set("请先选择图片!")


def join_file():
    v.set("文件开始合并。")
    filst = list(Path(Save_dir).iterdir())      # 获取文件夹中所有的文本文件。
    with open(f"{Save_dir}/合并文件.txt", "w", encoding="utf8") as join_f:
        for f in filst:
            with open(f, "r", encoding="utf8") as r_f:
                read_con = r_f.read()
            join_f.write(f.name+"
"+read_con + "

")
    time.sleep(1)
    v.set("文件合并完毕。")


# 》》》》》》》》》》》》》》》》》》》》》》》》》》》》》》》》》》》》》》》》》》》》》》》》》》》》》》
f_top = tk.Frame(root, height=65, width=1100, bd=1, relief="flat")  # "sunken" "raised","groove" 或 "ridge"
f_top.pack_propagate(False)  # 如果不加这个参数,当Frame框架中加入部件时,会自动变成底层窗口,自身的特性会消失。
f_top.pack(side="top", pady=5)

f_left = tk.Frame(root, height=660, width=560, bd=1, relief="groove")
f_left.pack_propagate(False)
f_left.pack(side="left", padx=20)

f_right = tk.Frame(root, height=660, width=560, bd=1, relief="groove")
f_right.pack_propagate(False)
f_right.pack(side="left", padx=20)

read_text = tk.Text(f_right, spacing1=5, spacing3=5)
read_text.pack(fill="both", expand=True)


# 》》》》》》》》》》》》》》》》》》》》》》》》》》》》》》》》》》》》》》》》》》》》》》》》》》》》》》》》》》》》》》》》》》》》》
button_choose_file = tk.Button(f_top, text="选择图片", command=choose_file)
button_choose_file.pack(side="left", padx=10, ipadx=5)

button_choose_file = tk.Button(f_top, text="选择文件夹", command=choose_dir)
button_choose_file.pack(side="left", padx=10, ipadx=5)

button_clear_file = tk.Button(f_top, text="清空选择", bg="#FFEF2F", command=clear_file_list)
button_clear_file.pack(side="left", padx=5, ipadx=5)

# 》》》》》》》》》》》》》》》》》》》》》》》》》》》》》》》》》》》》》》》》》》》》》》》》》》》》》》》》》》》》》》》》》》》》》
f_row_content = tk.Frame(f_top, height=50, width=300, bg="#D1D4D0", relief="flat")  # "sunken" "raised","groove" 或 "ridge"
f_row_content.pack_propagate(False)
f_row_content.pack(side="left", padx=15)

button_set_row_height = tk.Button(f_row_content, text="设置行间距", command=get_entry1)
button_set_row_height.pack(side="left", ipadx=3, padx=3)

entry1 = tk.Entry(f_row_content, font=("", 18), width=3)
entry1.insert(0, 15)
entry1.pack(padx=5, side="left")

tk.Label(f_row_content, justify="left", text="填入像素值,设置换行间距。
默认15个像素。").pack(side="left")

# 》》》》》》》》》》》》》》》》》》》》》》》》》》》》》》》》》》》》》》》》》》》》》》》》》》》》》》》》》》》》》》》》》》》》》
f_split = tk.Frame(f_top, height=50, width=215, bg="#D1D4D0", relief="flat")  # "sunken" "raised","groove" 或 "ridge"
f_split.pack_propagate(False)
f_split.pack(side="left", padx=4)

button_split = tk.Button(f_split, text="设置分隔符", command=set_split_symbol)
button_split.pack(side="left", ipadx=3, padx=3)

entry2 = tk.Entry(f_split, font=("", 18), width=3)
entry2.insert(0, " ")
entry2.pack(padx=5, side="left")

tk.Label(f_split, justify="left", text="默认一个空格").pack(side="left")

# 《《《《《《《《《《《《《《《《《《《《《《  提取 合并文件  》》》》》》》》》》》》》》》》》》》》》》》》》
button_do = tk.Button(f_top, text="开始提取", bg="#4AB0FF", command=do_change)
button_do.pack(side="left", padx=10, ipadx=2)

button_join = tk.Button(f_top, text="合并文件", command=join_file)
button_join.pack(side="left", padx=5, ipadx=2)

v = tk.StringVar()
v.set("info……")
tk.Label(f_top, bg="#2EBD1D", justify="left", textvariable=v).pack(side="left")

# 《《《《《《《《《《《《《《《《《《《《《《  右键菜单  》》》》》》》》》》》》》》》》》》》》》》》》》》》》》》》》》》》
def copy_text():
    read_text.event_generate("<>")

menubar = tk.Menu(tearoff=False)
# root["menu"] = menubar      # 没有把这个 菜单部件 加入到 root 窗口的菜单属性中,所以它不会在root窗口的顶部显示。
menubar.add_command(label="复制", command=copy_text)

def show_menu(event):
    """用 菜单部件 的 post 方法展示菜单"""
    menubar.post(event.x_root, event.y_root)

read_text.bind("", show_menu)
# 》》》》》》》》》》》》》》》》》》》》》》》》》》》》》》》》》》》》》》》》》》》》》》》》》》》》》》》》》》》》》》》

root.mainloop() 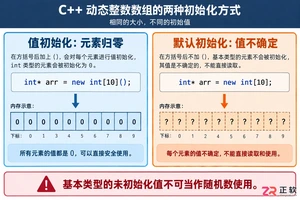
深入解析C++中动态数组的初始化机制,涵盖new操作符的不同用法、基本类型与类对象的初始化差异,以及为何在现代C++开发中应优先使用std::vector。
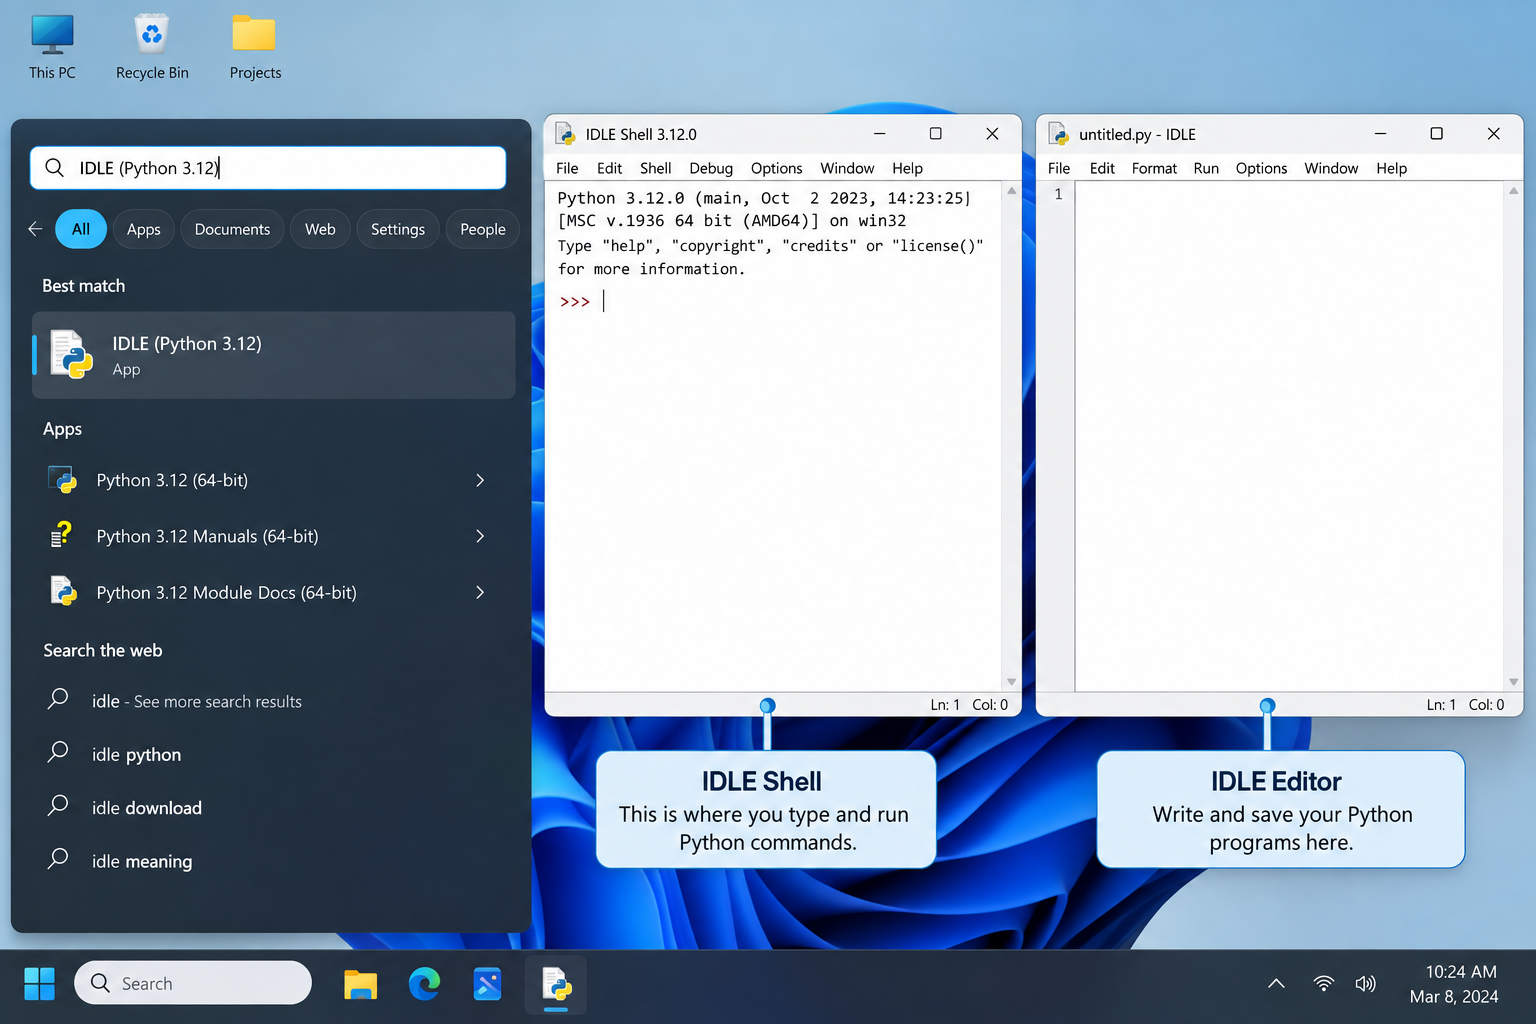
刚在Windows安装好Python却不知道如何启动?本文详细演示如何通过开始菜单找到并打开IDLE集成开发环境,以及如何在PowerShell或命令提示符中使用python和py命令启动交互式解释器、运行.py脚本文件。包含退出解释器的方法及常见启动问题排查,帮助初学者快速验证安装成功并开始编写代码。
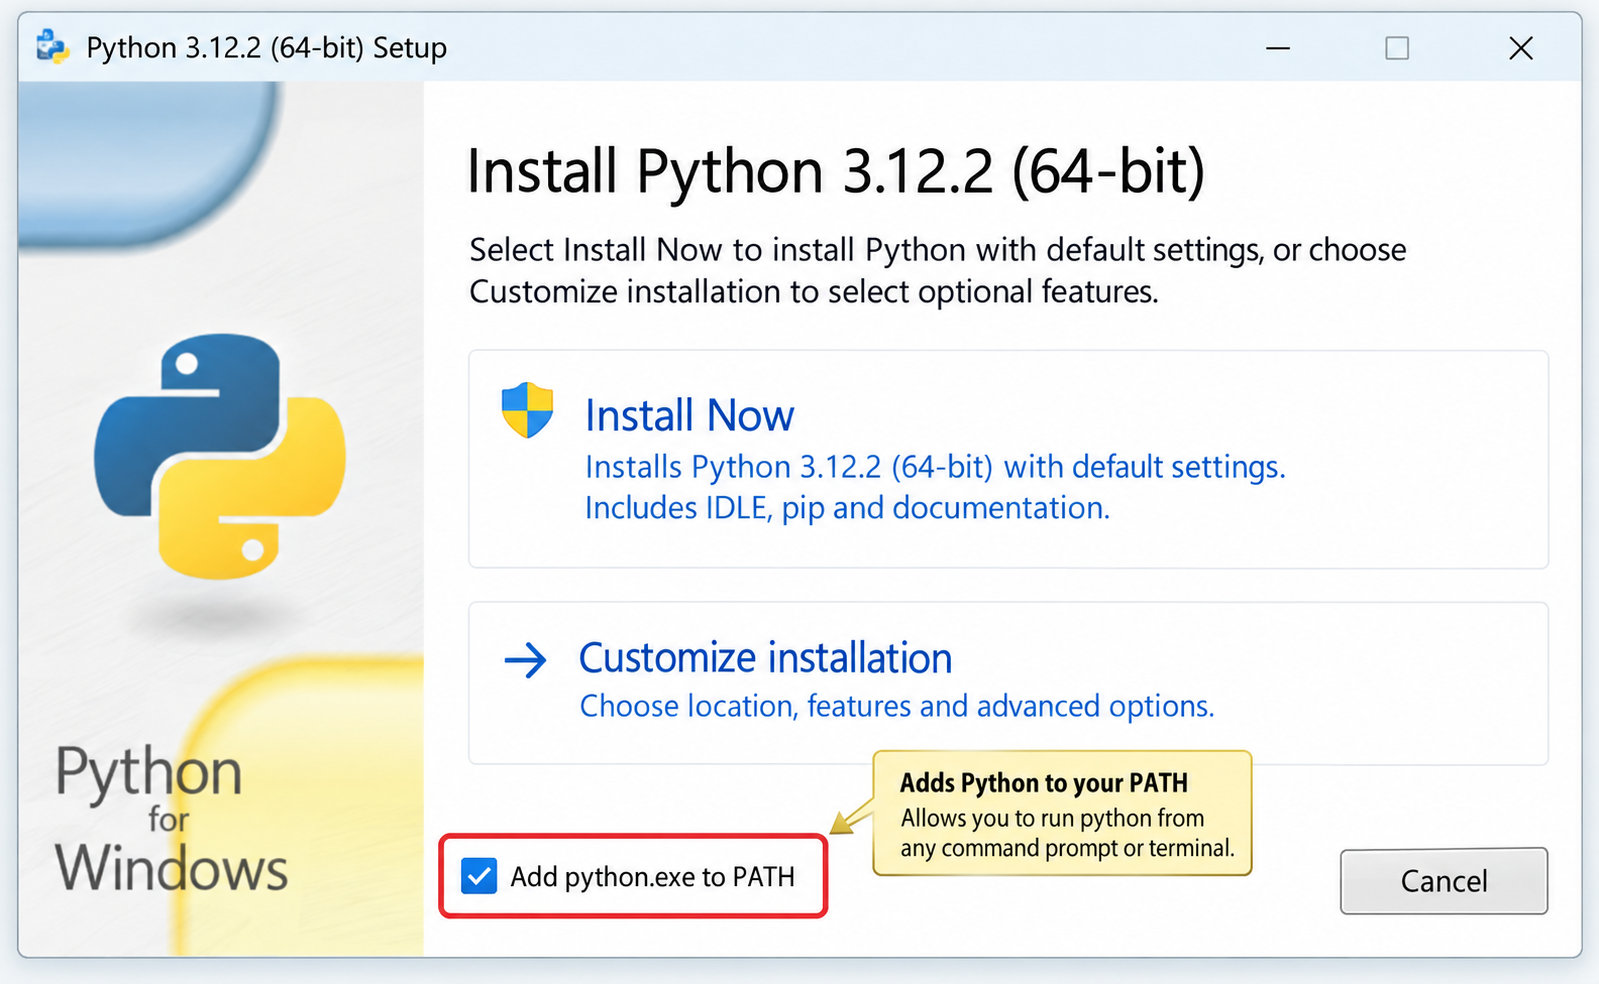
针对Windows初学者的Python安装实战指南。详细讲解如何从Python官网下载匹配架构的安装包,重点演示安装首屏勾选“Add python.exe to PATH”的关键操作,并提供使用python --version和py命令验证环境变量的具体步骤,帮助新手快速搭建开发环境并排查路径问题。

要想确认麒麟OS中Python程序的运行状态以及资源占用情况,我们可以这样做:用ps -ef | grep python来筛选进程;通过top命令,按P键排序查看实时负载;使用pgrep -f "script.py"精准获取PID;借助lsof -p PID验证文件打开状态。另外,还可以结合syst

在Debian系统上配置SSL证书通常涉及以下几个步骤:安装Web服务器:首先,你需要一个Web服务器,比如Apache或Nginx。这里以Apache为例。sudo apt updatesudo apt install apache2获取SSL证书:你可以从Let’s Encrypt免费获取SSL

要想让Python项目在统信UOS上正常运行,得先安装python3、python3-pip、python3-venv、python3-dev以及build-essential等组件。具体操作就是执行sudo apt install命令来一步到位完成安装,同时别忘了配置清华镜像源来给pip加速哦。在
在互联网上的各类网站中,无论大小,基本上都会有一个搜索框,用来给用户对内容进行搜索,小到站点搜索,大到搜索引擎搜索。从简单的来说,搜索功能确实很简单,一个简单的select语句就可以实现数据的搜索。而从复杂的来看,无论是搜索的精度还是搜索的效率,都是有很深的研究范围的。对于简单的搜索功能来说,一个s

立即在终端输入sudo shutdown -c取消倒计时关机,成功后显示“Shutdown cancelled”;若存在pmset重复任务,需再执行sudo pmset repeat cancel清除。Mac因Python脚本执行了os.system("sudo shutdown -h +10")或

之前写过一篇同步场景下用 Python 管理多个固定出口 IP 的实践(ExitPool + requests/httpx),覆盖了健康检查、故障转移和连接池复用。但在实际业务中,越来越多的场景用 asyncio 做高并发采集或批量接口调用——异步事件循环下多出口的管理方式和同步场景完全不同:单线程

写在前面:为什么静态出口 IP 不是"买了就行"不少团队在引入静态出口 IP 产品时,第一反应往往是:“地址配上去,这事就算完了。”可真到了真实业务里,静态出口 IP 真正能体现价值的地方,往往不在分配这一步,而在分配之后怎么管:地址有没有漂移,质量是否达标,某一条线路突然不可用时怎么切换,连接层又






Windows 10 是一款微软推出的经典操作系统,拥有硬件兼容性与多任务处理能力。它更偏向把系统状态查看和常用调节动作放在一起,适合需要持续观察和微调设备状态的场景。

极度公式是一款跨平台专业LaTeX公式识别编辑软件,支持OCR公式识别和多平台编辑。和使用说明,避免使用,享受完整功能与稳定支持。做扫描整理、文字提取和表格转换时,它能把识别后的处理步骤接得更顺,资料录入这类场景会省下不少时间。