

使用uv构建并发布Python包到PyPI的完整教程
使用uv这一超快Python包管理器,可整合传统多工具(如pip、poetry、build等),无需手动切换,告别繁琐配置,从项目创建、依赖管理、配置pyproject.toml、编写代码到构建源码包与wheel包、最终一键发布至PyPI,全流程自动化高效流畅,操作简单,显著提升开发效率。
概述
Python 包发布到 PyPI,是每个 Python 开发者迟早要面对的事情。传统流程涉及 pip、pip-tools、poetry、twine 等多个工具,配置繁琐。不过,现在有了 uv——一个超快的 Python 包管理器,它把这些环节全部整合在了一起,整个过程变得高效又流畅。下面,我们一步步来看如何用 uv 完成从项目创建到发布的全流程。
- 创建一个标准的 Python 包项目
- 配置
pyproject.toml - 构建源码分发包(sdist)和 wheel 包
- 发布到 PyPI(Python Package Index)
为什么选择 uv?
- 极快:比 pip 快 10‑100 倍
- 一体化:替代 pip、pip-tools、poetry、pyenv、twine 等多个工具
- 现代:原生支持 pyproject.toml 和最新的 Python 打包标准
- 可靠:提供锁文件和可重现的环境
环境准备
1. 安装 uv
macOS 和 Linux:
curl -LsSf https://astral.sh/uv/install.sh | sh
Windows (PowerShell):
powershell -ExecutionPolicy ByPass -c "irm https://astral.sh/uv/install.ps1 | iex"
通过 pip 安装:
pip install uv
2. 验证安装
uv --version
3. 安装 Python(如果需要)
# 安装特定版本的 Python
uv python install 3.12
# 查看已安装的 Python 版本
uv python list
创建项目
方法一:使用 uv init 自动创建
# 创建新项目
uv init my-awesome-package
# 进入项目目录
cd my-awesome-package
# 项目结构会自动创建
方法二:手动创建项目结构
my-awesome-package/
├── src/
│   └── my_awesome_package/
│       ├── __init__.py
│       └── core.py
├── tests/
│   ├── __init__.py
│   └── test_core.py
├── pyproject.toml
├── README.md
├── LICENSE
└── .gitignore
创建目录结构:
mkdir -p my-awesome-package/src/my_awesome_package
mkdir -p my-awesome-package/tests
cd my-awesome-package
pyproject.toml 配置详解
pyproject.toml 是 Python 项目的核心配置文件,包含三个主要部分:
完整的 pyproject.toml 示例
[build-system]
requires = ["hatchling >= 1.26"]
build-backend = "hatchling.build"
[project]
name = "my-awesome-package"
version = "0.1.0"
authors = [
    { name = "Your Name", email = "your.email@example.com" }
]
maintainers = [
    { name = "Your Name", email = "your.email@example.com" }
]
description = "A short description of your package"
readme = "README.md"
requires-python = ">=3.9"
license = "MIT"
license-files = ["LICEN[CS]E*"]
keywords = ["example", "package", "tutorial"]
classifiers = [
    "Development Status :: 3 - Alpha",
    "Intended Audience :: Developers",
    "License :: OSI Approved :: MIT License",
    "Operating System :: OS Independent",
    "Programming Language :: Python :: 3",
    "Programming Language :: Python :: 3.9",
    "Programming Language :: Python :: 3.10",
    "Programming Language :: Python :: 3.11",
    "Programming Language :: Python :: 3.12",
    "Programming Language :: Python :: 3.13",
]
dependencies = [
    "requests>=2.28.0",
    "pydantic>=2.0.0",
]
[project.optional-dependencies]
dev = [
    "pytest>=7.0.0",
    "pytest-cov>=4.0.0",
    "ruff>=0.1.0",
    "mypy>=1.0.0",
]
docs = [
    "mkdocs>=1.5.0",
    "mkdocs-material>=9.0.0",
]
[project.urls]
Homepage = "https://github.com/yourusername/my-awesome-package"
Documentation = "https://github.com/yourusername/my-awesome-package#readme"
Repository = "https://github.com/yourusername/my-awesome-package"
Issues = "https://github.com/yourusername/my-awesome-package/issues"
Changelog = "https://github.com/yourusername/my-awesome-package/blob/main/CHANGELOG.md"
[project.scripts]
my-cli = "my_awesome_package.cli:main"
[project.gui-scripts]
my-gui = "my_awesome_package.gui:main"
[tool.hatch.build.targets.wheel]
packages = ["src/my_awesome_package"]
[tool.ruff]
line-length = 88
target-version = "py39"
[tool.ruff.lint]
select = ["E", "F", "I", "N", "W", "UP"]
[tool.pytest.ini_options]
testpaths = ["tests"]
addopts = "-v --cov=my_awesome_package"
[tool.mypy]
python_version = "3.9"
warn_return_any = true
warn_unused_configs = true
各部分详解
[build-system] - 构建系统配置
[build-system]
requires = ["hatchling >= 1.26"]
build-backend = "hatchling.build"
常用的构建后端:
| 构建后端 | requires | build-backend |
|---|---|---|
| Hatchling (推荐) | "hatchling >= 1.26" | "hatchling.build" |
| Setuptools | "setuptools >= 77.0.3" | "setuptools.build_meta" |
| Flit | "flit_core >= 3.12.0, <4" | "flit_core.buildapi" |
| PDM | "pdm-backend >= 2.4.0" | "pdm.backend" |
| uv-build | "uv_build >= 0.11.7, <0.12.0" | "uv_build" |
[project] - 项目元数据
| 字段 | 说明 | 示例 |
|---|---|---|
name | 包名(PyPI 上的名称) | "my-awesome-package" |
version | 版本号 | "0.1.0" |
description | 简短描述 | "A short description" |
readme | README 文件路径 | "README.md" |
requires-python | Python 版本要求 | ">=3.9" |
license | SPDX 许可证表达式 | "MIT" |
dependencies | 运行时依赖 | ["requests>=2.28.0"] |
[project.urls] - 项目链接
[project.urls]
Homepage = "https://github.com/user/repo"
Documentation = "https://readthedocs.org"
Repository = "https://github.com/user/repo"
Issues = "https://github.com/user/repo/issues"
[project.scripts] - 命令行工具
[project.scripts]
my-cli = "my_package.module:function"
安装后会创建一个 my-cli 命令。
[project.optional-dependencies] - 可选依赖
[project.optional-dependencies]
dev = ["pytest", "ruff"]
docs = ["mkdocs"]
安装时使用:pip install my-package[dev]
编写包代码
1. 创建init.py
src/my_awesome_package/init.py:
"""My Awesome Package - A short description."""
__version__ = "0.1.0"
__author__ = "Your Name"
__email__ = "your.email@example.com"
from .core import hello, add_numbers
__all__ = ["hello", "add_numbers", "__version__"]
2. 编写核心模块
src/my_awesome_package/core.py:
"""Core functionality of my awesome package."""


def hello(name: str = "World") -> str:
    """Say hello to someone.

    Args:
        name: The name to greet. Defaults to "World".

    Returns:
        A greeting string.
    """
    return f"Hello, {name}!"


def add_numbers(a: int | float, b: int | float) -> int | float:
    """Add two numbers together.

    Args:
        a: First number.
        b: Second number.

    Returns:
        The sum of a and b.
    """
    return a + b


class Calculator:
    """A simple calculator class."""

    def __init__(self) -> None:
        self.history: list[str] = []

    def add(self, a: float, b: float) -> float:
        """Add two numbers."""
        result = a + b
        self.history.append(f"{a} + {b} = {result}")
        return result

    def subtract(self, a: float, b: float) -> float:
        """Subtract b from a."""
        result = a - b
        self.history.append(f"{a} - {b} = {result}")
        return result

    def get_history(self) -> list[str]:
        """Get calculation history."""
        return self.history.copy()
3. 创建 CLI 入口(可选)
src/my_awesome_package/cli.py:
"""Command-line interface for my awesome package."""

import argparse
import sys

from . import __version__
from .core import hello


def main() -> int:
    """Main entry point for the CLI."""
    parser = argparse.ArgumentParser(
        description="My Awesome Package CLI"
    )
    parser.add_argument(
        "--version",
        action="version",
        version=f"%(prog)s {__version__}"
    )
    parser.add_argument(
        "--name",
        default="World",
        help="Name to greet"
    )

    args = parser.parse_args()
    print(hello(args.name))
    return 0


if __name__ == "__main__":
    sys.exit(main())
4. 编写测试
tests/test_core.py:
"""Tests for core module."""

import pytest

from my_awesome_package.core import Calculator, add_numbers, hello


class TestHello:
    """Tests for hello function."""

    def test_hello_default(self):
        assert hello() == "Hello, World!"

    def test_hello_with_name(self):
        assert hello("Alice") == "Hello, Alice!"

    def test_hello_empty_string(self):
        assert hello("") == "Hello, !"


class TestAddNumbers:
    """Tests for add_numbers function."""

    def test_add_positive_integers(self):
        assert add_numbers(2, 3) == 5

    def test_add_negative_integers(self):
        assert add_numbers(-1, -1) == -2

    def test_add_floats(self):
        assert add_numbers(1.5, 2.5) == 4.0

    def test_add_mixed(self):
        assert add_numbers(1, 2.5) == 3.5


class TestCalculator:
    """Tests for Calculator class."""

    def test_add(self):
        calc = Calculator()
        assert calc.add(2, 3) == 5

    def test_subtract(self):
        calc = Calculator()
        assert calc.subtract(5, 3) == 2

    def test_history(self):
        calc = Calculator()
        calc.add(1, 2)
        calc.subtract(5, 3)
        history = calc.get_history()
        assert len(history) == 2
        assert "1 + 2 = 3" in history[0]
5. 创建 README.md
# My Awesome Package [](https://pypi.org/project/my-awesome-package/) [](https://pypi.org/project/my-awesome-package/) A short description of your package. ## Installation ```bash pip install my-awesome-package
License
1. 使用 uv 管理依赖
---

## 构建包

### 1. 使用 uv 管理依赖

```bash
# 添加运行时依赖
uv add requests pydantic

# 添加开发依赖
uv add --dev pytest ruff mypy

# 同步依赖(安装所有依赖)
uv sync

# 只安装特定可选依赖
uv sync --extra dev
2. 运行测试
# 运行测试
uv run pytest

# 运行测试并生成覆盖率报告
uv run pytest --cov=my_awesome_package --cov-report=html
3. 代码检查
# 运行 linter
uv run ruff check .

# 运行 formatter
uv run ruff format .

# 运行类型检查
uv run mypy src/
4. 构建分发包
# 构建 sdist 和 wheel
uv build

# 构建时不使用本地源码覆盖(推荐用于发布)
uv build --no-sources
构建完成后,会在 dist/ 目录下生成:
dist/
├── my_awesome_package-0.1.0.tar.gz        # 源码分发包 (sdist)
└── my_awesome_package-0.1.0-py3-none-any.whl  # wheel 包
5. 验证构建
# 检查包的元数据
uv pip show --files dist/my_awesome_package-0.1.0-py3-none-any.whl

# 使用 twine 检查(可选)
pip install twine
twine check dist/*
发布到 PyPI
1. 注册 PyPI 账号
- 访问 https://pypi.org/account/register/
- 完成注册并验证邮箱
- 启用双因素认证(推荐)
2. 生成 API Token
- 登录 PyPI
- 访问 https://pypi.org/manage/account/token/
- 点击 “Add API token”
- 设置 Token 名称和权限范围
- 立即复制并保存 Token(只显示一次)
Token 格式:pypi-AgEI...
3. 配置认证信息
方法一:环境变量(推荐)
export UV_PUBLISH_TOKEN="pypi-your-token-here"
方法二:命令行参数
uv publish --token "pypi-your-token-here"
方法三:使用 .pypirc 文件
创建 ~/.pypirc:
[pypi]
username = __token__
password = pypi-your-token-here

[testpypi]
username = __token__
password = pypi-your-testpypi-token-here
设置文件权限:
chmod 600 ~/.pypirc
4. 发布到 PyPI
# 发布所有构建产物
uv publish

# 使用 Token 发布
uv publish --token "pypi-your-token-here"

# 发布到指定索引(需要在 pyproject.toml 中配置)
uv publish --index pypi
5. 验证发布
发布成功后,访问 https://pypi.org/project/my-awesome-package/ 查看你的包。
安装测试:
# 在新环境中测试安装
uv run --with my-awesome-package --no-project -- python -c "from my_awesome_package import hello; print(hello())"
使用 TestPyPI 测试
在正式发布前,建议先在 TestPyPI 上测试。
1. 注册 TestPyPI 账号
访问 https://test.pypi.org/account/register/
2. 配置 TestPyPI 索引
在 pyproject.toml 中添加:
[[tool.uv.index]]
name = "testpypi"
url = "https://test.pypi.org/simple/"
publish-url = "https://test.pypi.org/legacy/"
explicit = true
3. 发布到 TestPyPI
# 生成 TestPyPI Token 后
uv publish --index testpypi --token "pypi-your-testpypi-token"
4. 从 TestPyPI 安装测试
# 创建测试环境
uv venv test-env
source test-env/bin/activate  # Linux/macOS
# test-envScriptsactivate   # Windows

# 从 TestPyPI 安装
uv pip install --index-url https://test.pypi.org/simple/ my-awesome-package

# 测试导入
python -c "from my_awesome_package import hello; print(hello())"
版本管理
使用 uv version 管理版本
# 查看当前版本
uv version

# 设置精确版本
uv version 1.0.0

# 预览版本变更(不实际修改)
uv version 2.0.0 --dry-run

# 语义化版本升级
uv version --bump patch    # 0.1.0 -> 0.1.1
uv version --bump minor    # 0.1.0 -> 0.2.0
uv version --bump major    # 0.1.0 -> 1.0.0

# 预发布版本
uv version --bump patch --bump beta    # 0.1.0 -> 0.1.1b1
uv version --bump major --bump alpha   # 0.1.0 -> 1.0.0a1

# 从预发布升级到稳定版
uv version --bump stable    # 1.0.0b2 -> 1.0.0
版本号规范
遵循 语义化版本:
- MAJOR.MINOR.PATCH (例如:1.2.3)
- MAJOR: 不兼容的 API 变更
- MINOR: 向下兼容的功能性新增
- PATCH: 向下兼容的问题修正
预发布版本:1.0.0a1, 1.0.0b2, 1.0.0rc1
最佳实践
1. 项目结构
推荐使用 src 布局:
my-package/
├── src/
│   └── my_package/
│       ├── __init__.py
│       ├── core.py
│       └── py.typed        # PEP 561 类型标记
├── tests/
├── pyproject.toml
├── README.md
├── LICENSE
└── .gitignore
2. 依赖管理
# 明确指定版本范围
dependencies = [
    "requests>=2.28.0,<3.0.0",
    "pydantic>=2.0.0",
]
# 分离开发依赖
[project.optional-dependencies]
dev = ["pytest>=7.0", "ruff>=0.1.0"]
3. CI/CD 自动发布
GitHub Actions 示例 (.github/workflows/publish.yml):
name: Publish to PyPI
on:
  release:
    types: [published]
jobs:
  publish:
    runs-on: ubuntu-latest
    permissions:
      id-token: write  # 用于可信发布
    steps:
      - uses: actions/checkout@v4
      - name: Install uv
        uses: astral-sh/setup-uv@v4
      - name: Set up Python
        run: uv python install 3.12
      - name: Run tests
        run: |
          uv sync --extra dev
          uv run pytest
      - name: Build package
        run: uv build --no-sources
      - name: Publish to PyPI
        run: uv publish
        env:
          UV_PUBLISH_TOKEN: ${{ secrets.PYPI_TOKEN }}
4. 可信发布(Trusted Publishing)
PyPI 支持无需 Token 的可信发布:
- 在 PyPI 项目设置中添加 GitHub Actions 作为可信发布者
- 配置 GitHub Actions 使用
id-token: write权限 - 不需要设置任何 Token
- name: Publish to PyPI
  run: uv publish
  # 不需要设置 UV_PUBLISH_TOKEN
5. 发布检查清单
发布前确认:
- 更新版本号
- 更新 CHANGELOG
- 运行测试并确保通过
- 运行 linter 和类型检查
- 更新 README(如有必要)
- 构建并验证包
- 在 TestPyPI 上测试
- 确认许可证文件
# 完整的发布流程
uv run pytest &&
uv run ruff check . &&
uv build --no-sources &&
twine check dist/* &&
uv publish
常见问题
Q1: 包名已被占用怎么办?
- 使用更有创意的名称
- 添加前缀(如
yourname-packagename) - 检查 PyPI 上是否真的需要该名称
Q2: 构建失败怎么办?
# 清理构建缓存
rm -rf dist/ build/ *.egg-info

# 重新构建
uv build --no-sources

# 查看详细错误
uv build --verbose
Q3: 如何删除已发布的版本?
PyPI 不允许删除已发布的版本,只能:
- 发布新版本
- 使用
yanking标记版本为不推荐
Q4: 如何处理二进制扩展?
如果包含 C/C++ 扩展,需要使用 cibuildwheel:
# GitHub Actions
- name: Build wheels
  uses: pypa/cibuildwheel@v2.16
Q5: 发布后如何更新包?
# 更新版本号
uv version --bump patch

# 重新构建并发布
uv build --no-sources
uv publish
Q6: 如何在私有仓库发布?
# pyproject.toml
[[tool.uv.index]]
name = "private"
url = "https://private.pypi.org/simple/"
publish-url = "https://private.pypi.org/legacy/"
uv publish --index private
参考资源
- uv 官方文档
- Python 打包用户指南
- pyproject.toml 规范
- PyPI 帮助
- 语义化版本
- SPDX 许可证列表
快速参考命令
# 项目初始化
uv init my-package
cd my-package

# 依赖管理
uv add requests
uv add --dev pytest
uv sync

# 运行代码
uv run python -m my_package
uv run pytest

# 版本管理
uv version
uv version --bump patch

# 构建和发布
uv build --no-sources
uv publish

# 发布到 TestPyPI
uv publish --index testpypi
本篇LangGraph Python中文入门教程详解,系统梳理StateGraph状态机定义、节点编写、边与条件路由、检查点持久化(MemorySaver)等核心机制,提供从环境安装到完整循环智能体构建的代码示例与实操指导。
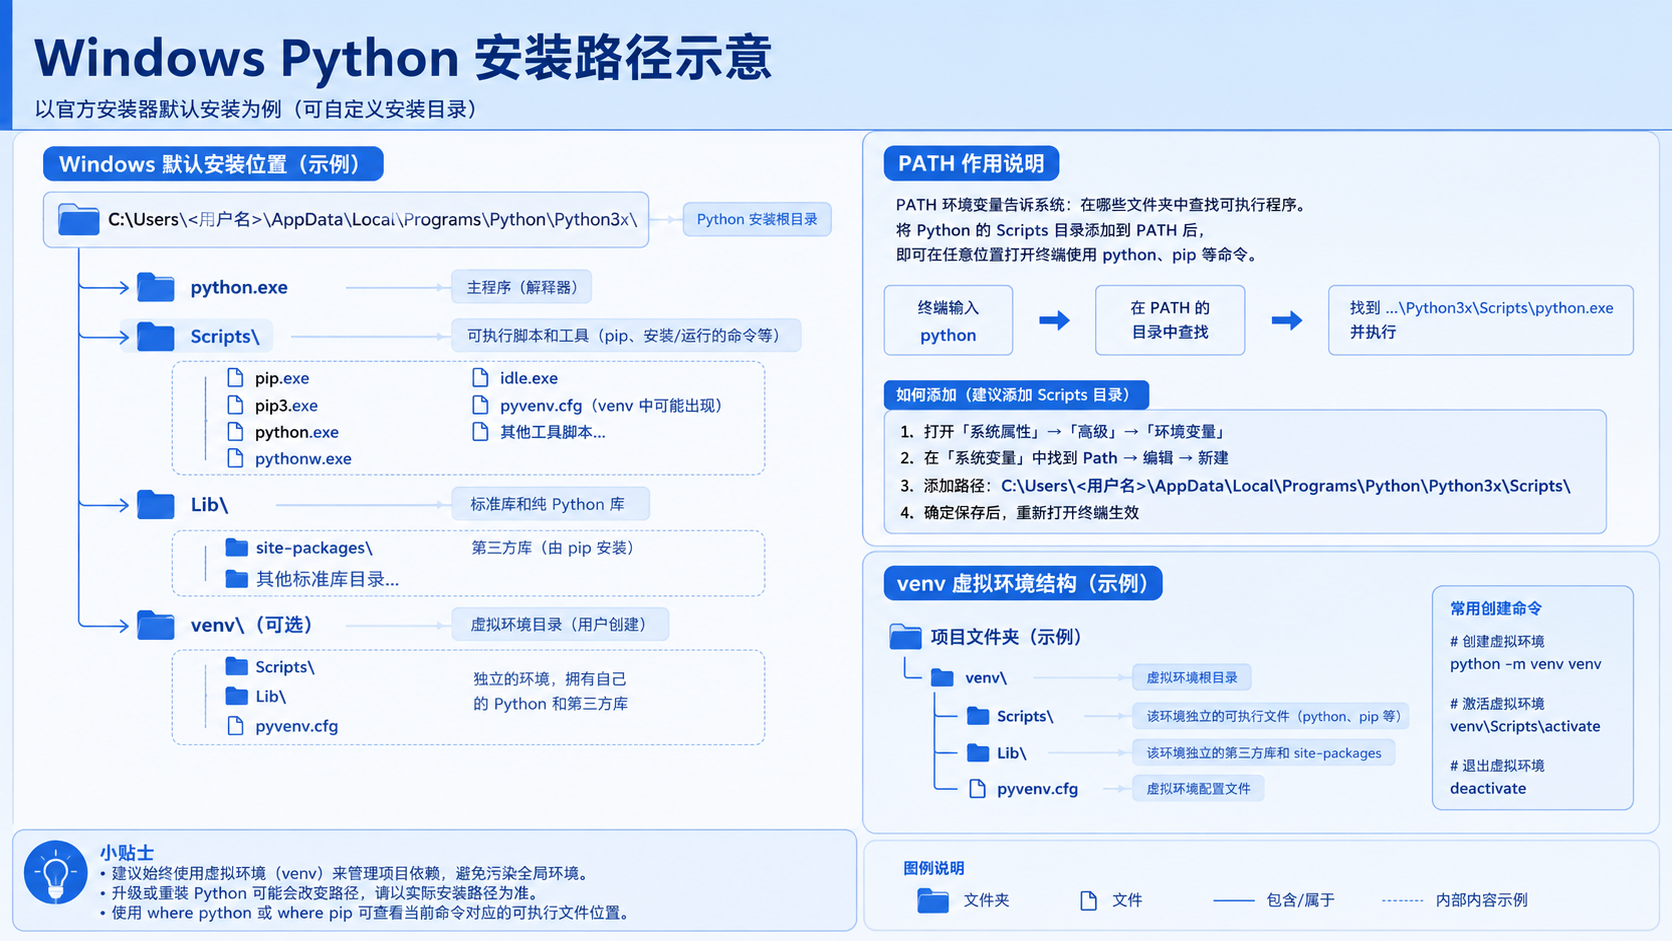
面向后端开发者,基于 Python 官方文档说明如何在 Windows 上安装 Python、创建 venv 虚拟环境及使用 pip 管理依赖。包含可复制命令、验证方法及工具选择边界,避免常见配置误区。
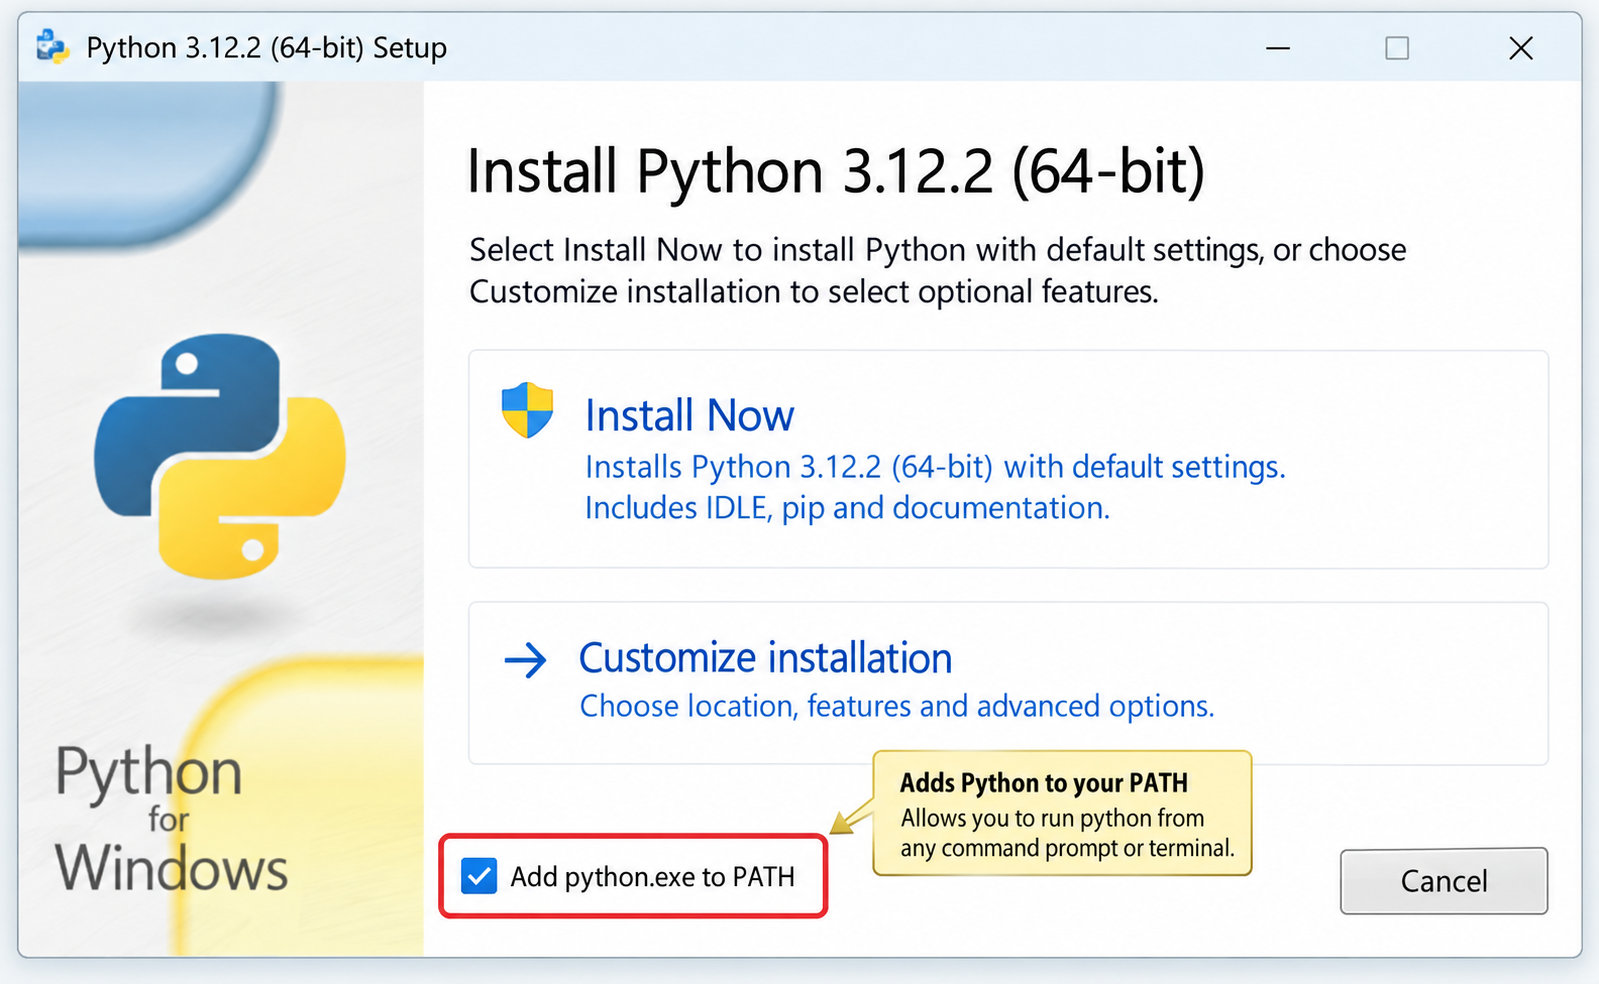
针对Windows初学者的Python安装实战指南。详细讲解如何从Python官网下载匹配架构的安装包,重点演示安装首屏勾选“Add python.exe to PATH”的关键操作,并提供使用python --version和py命令验证环境变量的具体步骤,帮助新手快速搭建开发环境并排查路径问题。
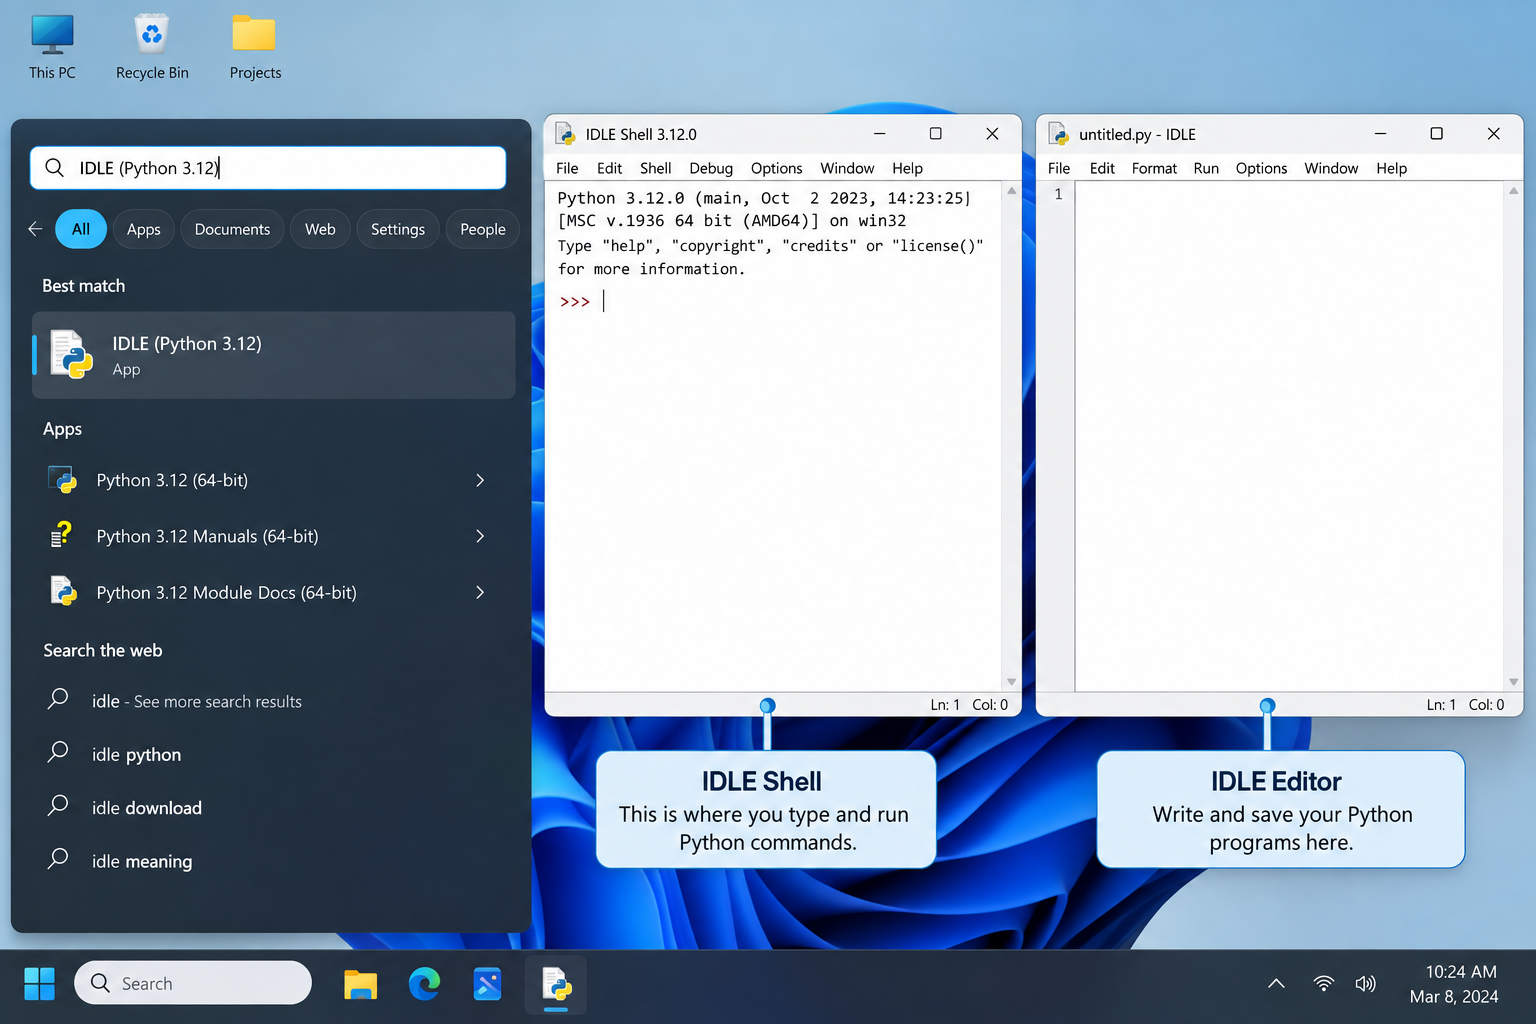
刚在Windows安装好Python却不知道如何启动?本文详细演示如何通过开始菜单找到并打开IDLE集成开发环境,以及如何在PowerShell或命令提示符中使用python和py命令启动交互式解释器、运行.py脚本文件。包含退出解释器的方法及常见启动问题排查,帮助初学者快速验证安装成功并开始编写代码。

了解Python编程领域中最好的就业行业导语:近年来,Python作为一种易学易用的编程语言,越来越受到企业和开发者的青睐。在Python编程领域中,有许多就业机会,涵盖了各个行业。本文将介绍一些Python编程领域中最好的就业行业,并提供相应的代码示例。数据科学和机器学习数据科学和机器学习是Python编程领域中最热门的行业之一。Python在数据科学和机
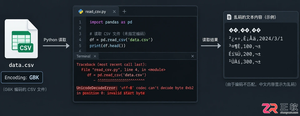
针对Python处理CSV文件时常见的编码报错、内存溢出和数据类型错误,本文对比标准库csv与Pandas库的适用场景,提供可复制的代码示例和因果排查思路,帮助开发者选择最优处理方案。
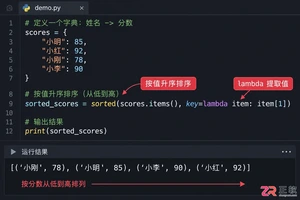
本文介绍如何使用Python的sorted函数对字典按值进行升序和降序排序,结合具体代码示例和应用场景,帮助读者理解排序逻辑及其在数据处理中的实际价值。
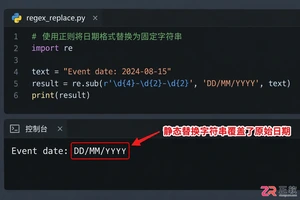
深入讲解Python中使用re.sub进行正则匹配与替换的技巧,涵盖基础语法、分组引用及回调函数应用,帮助开发者解决复杂字符串修改需求,提升代码效率与可维护性。
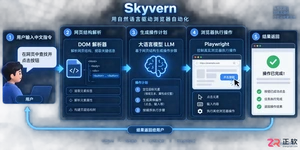
Skyvern是一款基于大语言模型的开源浏览器自动化框架,目前仅提供英文界面且无官方中文版。本文指导用户通过GitHub获取源码,使用Docker快速部署本地环境,并解释其如何通过DOM树解析与自然语言指令实现网页自动操作,同时提供针对中文用户的配置建议与替代方案。



Postman是一套面向API全生命周期的开发与测试平台,可在Mac上发送和调试多种协议请求,管理集合、环境及认证信息,并完成脚本测试、模拟服务、监控、文档发布和团队协作。它适合开发、测试及运维人员使用,提供个人免费方案。
Docker Desktop 是 Docker 官方为 Mac 提供的容器开发环境,集成 Docker Engine、命令行工具、Compose、Build、Kubernetes 与图形化管理界面。

Android Studio 是 Google 面向安卓应用开发提供的官方集成开发环境,基于 IntelliJ IDEA 构建。它整合智能代码编辑、Gradle 构建、界面预览、设备模拟、性能分析、调试测试及 APK 分析等工具。

PixPix 是面向品牌、卖家和内容团队的在线 AI 图片视频创作平台,提供图视频 Agent、无限画布、图片生成、视频生成、自然语言编辑及商品套图、产品精修和带货视频等电商工具。

Postman 是面向 API 全生命周期的开发与协作平台。Windows 桌面版可用于构建和发送 HTTP、GraphQL、gRPC、WebSocket、MQTT 等请求,并提供环境变量、集合、脚本测试、模拟服务、监控、文档及团队工作区等

Docker Desktop 为 Windows 开发者提供集成式容器环境,内置 Docker Engine、命令行工具、Compose、Build 与 Kubernetes 等组件,可在本机完成镜像构建、容器运行、日志查看和资源管理。