springboot中如何利用Tomcat容器实现自启动
一、Spring通过注解导入Bean大体可分为四种方式,我们主要来说以下Import的两种实现方法:1、通过实现ImportSerlector接口,实现Bean加载:publicclassTestServiceImpl{publicvoidtestImpl(){System.out.println("我是通过importSelector导入进来的service");}}publicclassTestServiceimplementsImportSelector{@OverridepublicString[
一、Spring通过注解导入Bean大体可分为四种方式,我们主要来说以下Import的两种实现方法:
1、通过实现ImportSerlector接口,实现Bean加载:
public class TestServiceImpl {
 public void testImpl() {
 System.out.println("我是通过importSelector导入进来的service");
 }
}
public class TestService implements ImportSelector {
 @Override
 public String[] selectImports(AnnotationMetadata annotationMetadata) {
 return new String[]{"com.ycdhz.service.TestServiceImpl"};
 }
}
@Configuration
@Import(value = {TestService.class})
public class TestConfig {
}
public class TestController {
 @Autowired
 private TestServiceImpl testServiceImpl;

 @RequestMapping("testImpl")
 public String testTuling() {
 testServiceImpl.testImpl();
 return "Ok";
 }
}
2、 通过实现ImportSerlector接口,实现Bean加载:
public class TestService {
 public TestService() {
 System.out.println("我是通过ImportBeanDefinitionRegistrar导入进来的组件");
 }
}
public class TestImportBeanDefinitionRegistrar implements ImportBeanDefinitionRegistrar {
 @Override
 public void registerBeanDefinitions(AnnotationMetadata importingClassMetadata, BeanDefinitionRegistry registry) {
 //定义一个BeanDefinition
 RootBeanDefinition beanDefinition = new RootBeanDefinition(TestService.class);
 //把自定义的bean定义导入到容器中
 registry.registerBeanDefinition("testService",beanDefinition);
 }
}
@Configuration
@Import(TestImportBeanDefinitionRegistrar.class)
public class TestConfig {
}
二、 Springboot启动过程中会自动装配
我们从spring-boot-autoconfigure-2.0.6.RELEASE.jar下搜索到Tomcat的相关配置,发现有两个自动装配类,分别包含了三个定制器(面向对象的单一职责原则),还有一个工厂类。
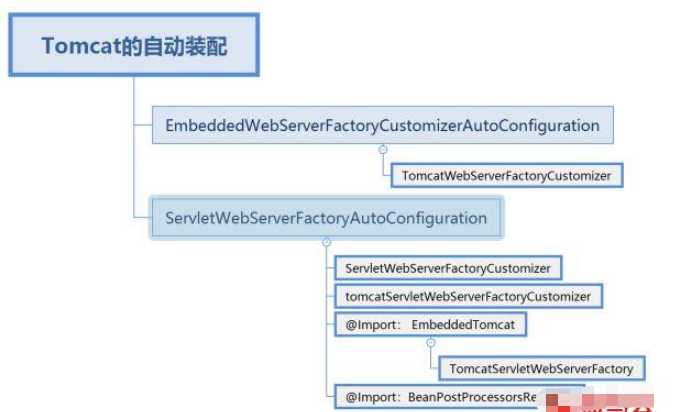
2.1、TomcatWebServerFactoryCustomizer:定制Servlet和Reactive服务器通用的Tomcat特定功能。
public class TomcatWebServerFactoryCustomizer implements
 WebServerFactoryCustomizer, Ordered {
 @Override
 public void customize(ConfigurableTomcatWebServerFactory factory) {
 ServerProperties properties = this.serverProperties;
 ServerProperties.Tomcat tomcatProperties = properties.getTomcat();
 PropertyMapper propertyMapper = PropertyMapper.get();
 propertyMapper.from(tomcatProperties::getBasedir).whenNonNull()
 .to(factory::setBaseDirectory);
 propertyMapper.from(tomcatProperties::getBackgroundProcessorDelay).whenNonNull()
 .as(Duration::getSeconds).as(Long::intValue)
 .to(factory::setBackgroundProcessorDelay);
 customizeRemoteIpValve(factory);
 propertyMapper.from(tomcatProperties::getMaxThreads).when(this::isPositive)
 .to((maxThreads) -> customizeMaxThreads(factory,
  tomcatProperties.getMaxThreads()));
 propertyMapper.from(tomcatProperties::getMinSpareThreads).when(this::isPositive)
 .to((minSpareThreads) -> customizeMinThreads(factory, minSpareThreads));
 propertyMapper.from(() -> determineMaxHttpHeaderSize()).when(this::isPositive)
 .to((maxHttpHeaderSize) -> customizeMaxHttpHeaderSize(factory,
  maxHttpHeaderSize));
 propertyMapper.from(tomcatProperties::getMaxHttpPostSize)
 .when((maxHttpPostSize) -> maxHttpPostSize != 0)
 .to((maxHttpPostSize) -> customizeMaxHttpPostSize(factory,
  maxHttpPostSize));
 propertyMapper.from(tomcatProperties::getAccesslog)
 .when(ServerProperties.Tomcat.Accesslog::isEnabled)
 .to((enabled) -> customizeAccessLog(factory));
 propertyMapper.from(tomcatProperties::getUriEncoding).whenNonNull()
 .to(factory::setUriEncoding);
 propertyMapper.from(properties::getConnectionTimeout).whenNonNull()
 .to((connectionTimeout) -> customizeConnectionTimeout(factory,
  connectionTimeout));
 propertyMapper.from(tomcatProperties::getMaxConnections).when(this::isPositive)
 .to((maxConnections) -> customizeMaxConnections(factory, maxConnections));
 propertyMapper.from(tomcatProperties::getAcceptCount).when(this::isPositive)
 .to((acceptCount) -> customizeAcceptCount(factory, acceptCount));
 customizeStaticResources(factory);
 customizeErrorReportValve(properties.getError(), factory);
 }
}
2.2、ServletWebServerFactoryCustomizer:WebServerFactoryCustomizer 将ServerProperties属性应用于Tomcat web服务器。
public class ServletWebServerFactoryCustomizer implements
 WebServerFactoryCustomizer, Ordered {
 private final ServerProperties serverProperties;
 public ServletWebServerFactoryCustomizer(ServerProperties serverProperties) {
 this.serverProperties = serverProperties;
 }
 @Override
 public int getOrder() {
 return 0;
 }
 @Override
 public void customize(ConfigurableServletWebServerFactory factory) {
 PropertyMapper map = PropertyMapper.get().alwaysApplyingWhenNonNull();
 map.from(this.serverProperties::getPort).to(factory::setPort);
 map.from(this.serverProperties::getAddress).to(factory::setAddress);
 map.from(this.serverProperties.getServlet()::getContextPath)
 .to(factory::setContextPath);
 map.from(this.serverProperties.getServlet()::getApplicationDisplayName)
 .to(factory::setDisplayName);
 map.from(this.serverProperties.getServlet()::getSession).to(factory::setSession);
 map.from(this.serverProperties::getSsl).to(factory::setSsl);
 map.from(this.serverProperties.getServlet()::getJsp).to(factory::setJsp);
 map.from(this.serverProperties::getCompression).to(factory::setCompression);
 map.from(this.serverProperties::getHttp2).to(factory::setHttp2);
 map.from(this.serverProperties::getServerHeader).to(factory::setServerHeader);
 map.from(this.serverProperties.getServlet()::getContextParameters)
 .to(factory::setInitParameters);
 }
}
2.3、ServletWebServerFactoryCustomizer :WebServerFactoryCustomizer 将ServerProperties属性应用于Tomcat web服务器。
public class TomcatServletWebServerFactoryCustomizer
 implements WebServerFactoryCustomizer, Ordered {
 private final ServerProperties serverProperties;
 public TomcatServletWebServerFactoryCustomizer(ServerProperties serverProperties) {
 this.serverProperties = serverProperties;
 }
 @Override
 public void customize(TomcatServletWebServerFactory factory) {
 ServerProperties.Tomcat tomcatProperties = this.serverProperties.getTomcat();
 if (!ObjectUtils.isEmpty(tomcatProperties.getAdditionalTldSkipPatterns())) {
 factory.getTldSkipPatterns()
  .addAll(tomcatProperties.getAdditionalTldSkipPatterns());
 }
 if (tomcatProperties.getRedirectContextRoot() != null) {
 customizeRedirectContextRoot(factory,
  tomcatProperties.getRedirectContextRoot());
 }
 if (tomcatProperties.getUseRelativeRedirects() != null) {
 customizeUseRelativeRedirects(factory,
  tomcatProperties.getUseRelativeRedirects());
 }
 }
}
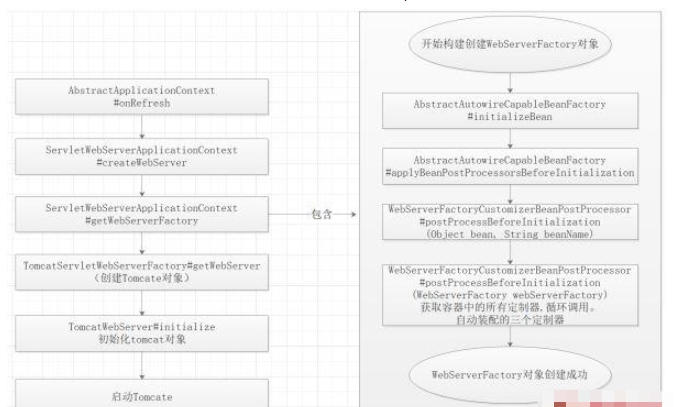
三、有了TomcatServletWebServerFactory,相当于有了Spring加载的入口
通过AbstractApplicationContext#onReFresh()在IOC 容器中的带动tomcat启动,然后在接着执行 ioc容器的其他步骤。
我们通过断点可以观察Tomcat加载的整个生命周期,以及三个定制器的加载过程。
@Override
public WebServer getWebServer(ServletContextInitializer... initializers) {
 Tomcat tomcat = new Tomcat();
 File baseDir = (this.baseDirectory != null) ? this.baseDirectory
 : createTempDir("tomcat");
 tomcat.setBaseDir(baseDir.getAbsolutePath());
 Connector connector = new Connector(this.protocol);
 tomcat.getService().addConnector(connector);
 customizeConnector(connector);
 tomcat.setConnector(connector);
 //设置是否自动启动
 tomcat.getHost().setAutoDeploy(false);
 //创建Tomcat引擎
 configureEngine(tomcat.getEngine());
 for (Connector additionalConnector : this.additionalTomcatConnectors) {
 tomcat.getService().addConnector(additionalConnector);
 }
 //刷新上下文
 prepareContext(tomcat.getHost(), initializers);
 //准备启动
 return getTomcatWebServer(tomcat);
}
private void initialize() throws WebServerException {
TomcatWebServer.logger
.info("Tomcat initialized with port(s): " + getPortsDescription(false));
synchronized (this.monitor) {
try {
addInstanceIdToEngineName();
Context context = findContext();
context.addLifecycleListener((event) -> {
if (context.equals(event.getSource())
&& Lifecycle.START_EVENT.equals(event.getType())) {
// Remove service connectors so that protocol binding doesn't
// happen when the service is started.
removeServiceConnectors();
}
});
// Start the server to trigger initialization listeners
this.tomcat.start();
// We can re-throw failure exception directly in the main thread
rethrowDeferredStartupExceptions();
try {
ContextBindings.bindClassLoader(context, context.getNamingToken(),
getClass().getClassLoader());
}
catch (NamingException ex) {
// Naming is not enabled. Continue
}
// Unlike Jetty, all Tomcat threads are daemon threads. We create a
// blocking non-daemon to stop immediate shutdown
startDaemonAwaitThread();
}
catch (Exception ex) {
stopSilently();
throw new WebServerException("Unable to start embedded Tomcat", ex);
}
}
}备注: 在这个过程中我们需要了解Bean的生命周期,Tomcat的三个定制器均在BeanPostProcessorsRegistrar(Bean后置处理器)过程中加载;
构造方法-->Bean后置处理器Before-->InitializingBean-->init-method-->Bean后置处理器After
org.springframework.beans.factory.support.AbstractAutowireCapableBeanFactory#doCreateBean
  org.springframework.beans.factory.support.AbstractAutowireCapableBeanFactory#initializeBean
protected Object doCreateBean(final String beanName, final RootBeanDefinition mbd, final @Nullable Object[] args)
throws BeanCreationException {
// Instantiate the bean.
BeanWrapper instanceWrapper = null;
if (mbd.isSingleton()) {
instanceWrapper = this.factoryBeanInstanceCache.remove(beanName);
}
if (instanceWrapper == null) {
//构造方法
instanceWrapper = createBeanInstance(beanName, mbd, args);
}
final Object bean = instanceWrapper.getWrappedInstance();
Class beanType = instanceWrapper.getWrappedClass();
if (beanType != NullBean.class) {
mbd.resolvedTargetType = beanType;
}
// Initialize the bean instance.
......
return exposedObject;
}
protected Object initializeBean(final String beanName, final Object bean, @Nullable RootBeanDefinition mbd) {
if (System.getSecurityManager() != null) {
AccessController.doPrivileged((PrivilegedAction 
命名空间的基本概念与常见引入问题在C++等编程语言中,命名空间(namespace)是一种将代码标识符(如变量、函数、类名)封装在特定名称下的机制,其主要目的是避免命名冲突,尤其是在大型项目或使用多个第三方库时。使用“using namespace”指令可以将指定命名空间中的所有名称引入当前作用域,

理解递归的基本原理在C语言中,递归是一种函数调用自身的编程技术。要掌握它,首先需要理解其核心思想:将一个复杂的大问题,分解为一个或几个与原问题相似但规模更小的子问题,直到子问题足够简单,可以直接求解。这个过程通常包含两个关键部分:递归出口和递归体。递归出口定义了问题何时不再继续分解,即最简单、可直接

递归函数的基本概念与适用场景在C语言编程中,递归是一种函数调用自身的编程技巧。它并非适用于所有问题,但在处理某些具有自相似结构的问题时,能提供极其清晰和优雅的解决方案。递归的核心思想是将一个大规模问题分解为一个或多个同类型但规模更小的子问题,直到子问题简单到可以直接求解。典型的适用场景包括树形结构的
理解内存管理的基石在Objective-C的编程世界中,内存管理是开发者必须掌握的核心技能之一。它直接关系到应用的性能、稳定性与资源利用效率。与一些采用自动垃圾回收机制的语言不同,Objective-C在很长一段时间里,依赖一套基于引用计数的、需要开发者部分介入的管理规则。这套规则的核心思想是明确的
理解 dealloc 的角色与时机在 iOS 应用开发中,内存管理是保障应用性能与稳定性的基石。dealloc 方法是 Objective-C 中对象生命周期结束时的关键回调,它标志着对象即将被系统回收内存。正确理解其触发时机至关重要:当一个对象的引用计数降为零时,运行时系统会自动调用该对象的 de
内存管理的基石在Objective-C的世界里,内存管理是开发者必须掌握的核心技能之一。作为一门在手动引用计数(MRC)时代诞生的语言,Objective-C要求程序员对对象的生命周期有清晰的认识。dealloc方法正是这一生命周期中至关重要的终点站。它是一个实例方法,当对象的引用计数降为零时,系统

native2ascii 工具的基本定位在Ja va应用程序的国际化与本地化开发过程中,处理非拉丁字符集是一个常见且关键的环节。Ja va内部使用Unicode字符集来统一表示全球各种语言的文字,但其属性文件(.properties)在历史上要求使用ASCII编码,或者更准确地说,要求非ASCII字

理解 native2ascii 工具的基本用途在软件开发,特别是涉及国际化处理的场景中,开发者常常需要处理不同编码的文本资源。native2ascii 是 Ja va 开发工具包(JDK)中提供的一个命令行实用程序,其主要功能是将包含本地字符编码(非ASCII字符)的文件,转换为包含 Unicode

native2ascii 命令的由来与作用在Ja va开发中,处理国际化资源文件是一个常见需求。资源文件通常以.properties格式存储,用于支持多语言界面。然而,Ja va属性文件默认采用ISO-8859-1字符集编码,这导致了一个直接的问题:当文件中包含非拉丁字符(如中文、日文、韩文等)时,

内存监控工具的价值与挑战在软件开发,尤其是使用C/C++这类手动管理内存的语言时,内存错误是程序员最常遭遇的难题之一。其中,野指针问题因其隐蔽性和破坏性,往往成为最难定位的“幽灵”缺陷。它可能潜伏在代码中,在特定条件下才被触发,导致程序崩溃、数据损坏或难以预测的行为。传统的调试手段,如打印日志或使用






Windows 10 是一款微软推出的经典操作系统,拥有硬件兼容性与多任务处理能力。它更偏向把系统状态查看和常用调节动作放在一起,适合需要持续观察和微调设备状态的场景。

极度公式是一款跨平台专业LaTeX公式识别编辑软件,支持OCR公式识别和多平台编辑。和使用说明,避免使用,享受完整功能与稳定支持。做扫描整理、文字提取和表格转换时,它能把识别后的处理步骤接得更顺,资料录入这类场景会省下不少时间。