

cypress测试本地web应用
Cypress测试本地应用需先启动本地项目并配置baseUrl简化访问。数据初始化可通过cy.exec、cy.request等方法实现,但推荐使用stub绕过后端依赖。登录验证应避免UI操作,改用cy.request直接发送请求并自动处理cookie,以提升测试效率。
cypress测试本地web应用
之前聊过,Cypress虽然也能测线上部署的应用,但它的真正强项其实是在本地开发阶段。这一章,我们就来聊聊怎么用Cypress测试本地应用——核心就三个问题:Cypress跟后端怎么配合?怎么配置Cypress让它适配你的项目?以及如何更聪明地绕过登录验证?
- Cypress与后端应用的关系
- 如何配置Cypress让项目适配
- 如何更优雅地绕过身份验证
一、启动本地应用
之前几章的例子都是拿官方文档的网页来测的,那相当于线上的生产环境,而且是Cypress自家的,除了正常访问,咱们啥也动不了。启动本地应用,就是把你正在开发的项目跑起来。
可能有人会问:为什么非得用本地的?线上不是现成的吗?
官方的解释是这样的:
- 在日常的本地开发中,Cypress是围绕着构建、优化的工具。
- 数据存根(stub)能力。
- 最重要的还是你得有控制这个应用的能力,比如随时改改配置之类的。
当然,也不是说非要二选一。本地环境跑大部分测试,线上环境留几个冒烟测试,也是常见做法。
二、访问本地应用
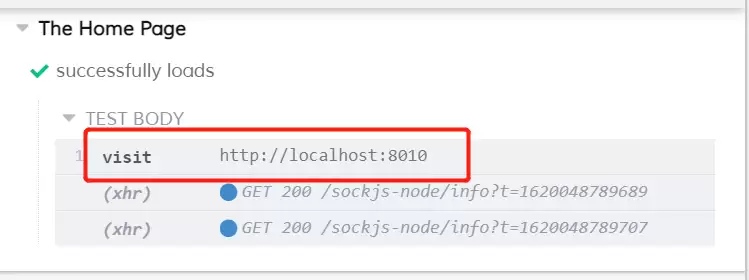
之前演示的代码用不上了,新建一个测试文件,比如home_page_spec.js,里面写一个简单的用例:
describe('The Home Page', () => { it('successfully loads', () => { cy.visit('http://localhost:8010') // 这里换成你自己本地的url })})
访问成功。
三、配置Cypress
Cypress项目根目录下有个cypress.json文件,默认是个空对象。你可以在这里配置各种东西,比如测试文件位置、超时时间、环境变量、报告器等等,但今天先不展开。
重点来了——加一个baseUrl,后面所有cy.visit()和cy.request()都会自动加上这个前缀,省事不少。
{ "baseUrl": "http://localhost:8010"}
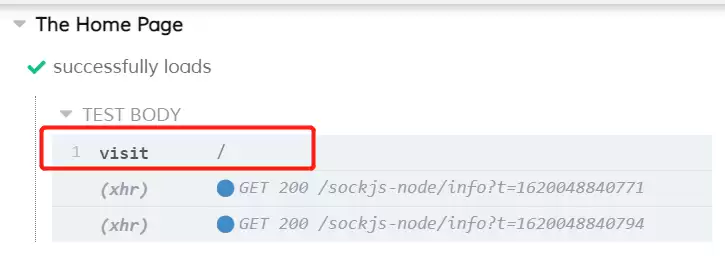
试试看,现在用相对路径/就能访问了:
describe('The Home Page', () => { it('successfully loads', () => { cy.visit('/') })})
访问成功。
到这步,你就可以开始写本地应用的测试了,具体怎么写,就看项目需求了。
四、Seeding data
这里说的Seeding data,就是初始化数据。比如测登录页面,得先往数据库里插一个用户。以前用Selenium的时候,通常是在setup和teardown里准备和清理数据。
Cypress也有几种方式:
cy.exec(),可以执行系统命令。
cy.task(),可以通过pluginsFile在Node中运行代码。
cy.request(),可以发送HTTP请求。
下面这段代码演示了在测试前用这些方法初始化数据:
describe('The Home Page', () => { beforeEach(() => { // reset and seed the database prior to every test cy.exec('npm run db:reset && npm run db:seed') // seed a post in the DB that we control from our tests cy.request('POST', '/test/seed/post', { title: 'First Post', authorId: 1, body: '...', }) // seed a user in the DB that we can control from our tests cy.request('POST', '/test/seed/user', { name: 'Jane' }) .its('body') .as('currentUser') }) it('successfully loads', () => { // this.currentUser will now point to the response // body of the cy.request() that we could use // to log in or work with in some way cy.visit('/') })})
这种用法本身没毛病,但每个测试都要跟服务器或浏览器交互,确实影响效率。好在Cypress提供了更快的解决方案。
1. Stubbing the server
这里就是mock的概念——断开与后端的依赖。既然要跟服务器交互才能拿到数据,那如果能绕开它,直接想要什么数据就有什么数据,连后端都不用启动,岂不美哉?关于stub的内容很多,后面用到再细说。
2. 解决登录问题
登录一直是测试中的老大难。不登录,后续测试没法玩。如果每个测试前都走一遍UI登录,理论可行,但整个测试会非常慢。所以Cypress官方建议:不要在每次测试前使用UI登录。
当然,UI测试本身还是要测的,但前置数据状态的设置要避免通过UI。官方举了个购物车的例子:你要测购物车功能,得先有商品,难道要登录管理后台一个一个创建?显然不是。至于怎样做最合适,后面再聊。
回到登录问题,Cypress可以用cy.request()直接发送登录请求,它会自动处理cookie,这样就跳过了UI。代码可以优化成下面这样:
describe('The Dashboard Page', () => { beforeEach(() => { // reset and seed the database prior to every test cy.exec('npm run db:reset && npm run db:seed') // seed a user in the DB that we can control from our tests // assuming it generates a random password for us cy.request('POST', '/test/seed/user', { username: 'jane.lane' }) .its('body') .as('currentUser') }) it('logs in programmatically without using the UI', function () { // destructuring assignment of the this.currentUser object const { username, password } = this.currentUser // programmatically log us in without needing the UI cy.request('POST', '/login', { username, password, }) // now that we're logged in, we can visit // any kind of restricted route! cy.visit('/dashboard') // our auth cookie should be present cy.getCookie('your-session-cookie').should('exist') // UI should reflect this user being logged in cy.get('h1').should('contain', 'jane.lane') })})
这个优化思路是对的,不过以前用Selenium的时候,虽然内置方法不支持,但借助requests库也能迂回解决。
遇到Git合并冲突别慌张,本文详解冲突产生的原因及标准处理流程,涵盖查看冲突文件、理解标记含义、手动修改代码及完成合并提交的完整步骤,助你高效解决协作开发中的代码冲突问题。

深入对比Java中获取当前时间戳的两种主流方式:System.currentTimeMillis与java.time.Instant。分析二者的精度差异、API设计、时钟回拨影响与实际选型建议。

针对大数据工程场景,系统对比Java、Scala与Python在执行性能、生态结合、开发效率和维护成本上的核心差异,给出清晰的架构选型依据与落地方案。
深入解析Java常量命名标准、大写下划线语义规则,剖析接口常量反模式的危害与本质原因,并提供枚举、不可实例化常量工具类等工业级最佳替代方案。
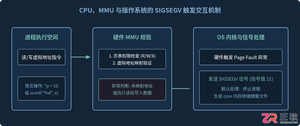
针对C语言常见的段错误(Segmentation fault)问题,详细剖析内存非法访问根因,提供结合GDB、Core Dump与AddressSanitizer的标准化排查解决步骤与预防方法。
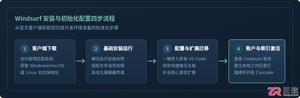
本文提供全面的Windsurf开发工具安装与使用详细教程,覆盖客户端下载安装、环境配置与VS Code插件迁移、Cascade核心协作中枢使用技巧、Chat与Write双模式实战及高效开发规范。
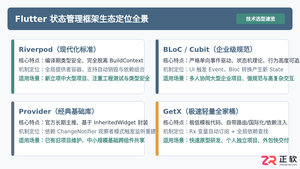
全面盘点Flutter主流状态管理框架,深度解析Provider、Riverpod、Bloc与GetX的核心机制、优缺点及适用场景,提供系统化的状态管理选型指南。
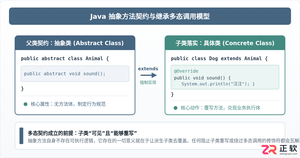
深入剖析Java中抽象方法为何严禁使用private和static修饰符。从面向对象契约规范、方法继承重写、JVM动态绑定(invokevirtual)与静态解析(invokestatic)等底层机制展开详细推导,结合编译报错示例与全景对比,彻底理清修饰符限制背后的设计逻辑。


详细讲解uni-app中网络请求拦截的配置方法与实现路径,包含uni.addInterceptor原生API拦截与Promise二次封装方案、Token注入、全局错误处理及踩坑提醒。




IntelliJ IDEA 是 JetBrains 推出的专业集成开发环境,重点服务于 Java、Kotlin 与 JVM 项目开发。软件集成代码补全、静态检查、重构、调试、测试、版本控制及构建工具,并可借助插件扩展语言和框架支持。

JetBrains PyCharm 是面向 Python 开发者的集成开发环境,提供智能补全、代码检查、重构、调试、测试、版本控制及虚拟环境管理功能。Mac 版兼容 Intel 与 Apple 芯片,核心功能可免费使用。

JetBrains WebStorm 是面向 JavaScript、TypeScript 和现代 Web 技术的专业集成开发环境,可智能理解项目结构,提供代码补全、重构、错误检查、运行调试、测试及 Git 工具。

JetBrains IntelliJ IDEA 是以 Java、Kotlin 和 JVM 项目为核心的专业集成开发环境,提供智能补全、代码检查、安全重构、调试、测试、版本控制及构建工具集成。统一发行版的核心功能可免费用于商业和非商业项目,

PhpStorm 是 JetBrains 面向 PHP 与现代 Web 开发打造的专业集成开发环境,提供代码补全、静态检查、重构、调试、测试、数据库、版本控制及前端语言支持。Windows 用户可直接下载安装程序,

PyCharm 是 JetBrains 推出的 Python 集成开发环境,提供智能代码补全、错误检查、重构、调试、测试、Git、终端及 Jupyter Notebook 支持。统一版安装后可体验 30 天 Pro 功能,


